How to Install Cheap Privacy Fence Ideas: DIY Cost Guide
Learn step-by-step installation procedures for cheap privacy fence ideas, including corrugated metal, bamboo reed, and budget board-on-board wood framing.
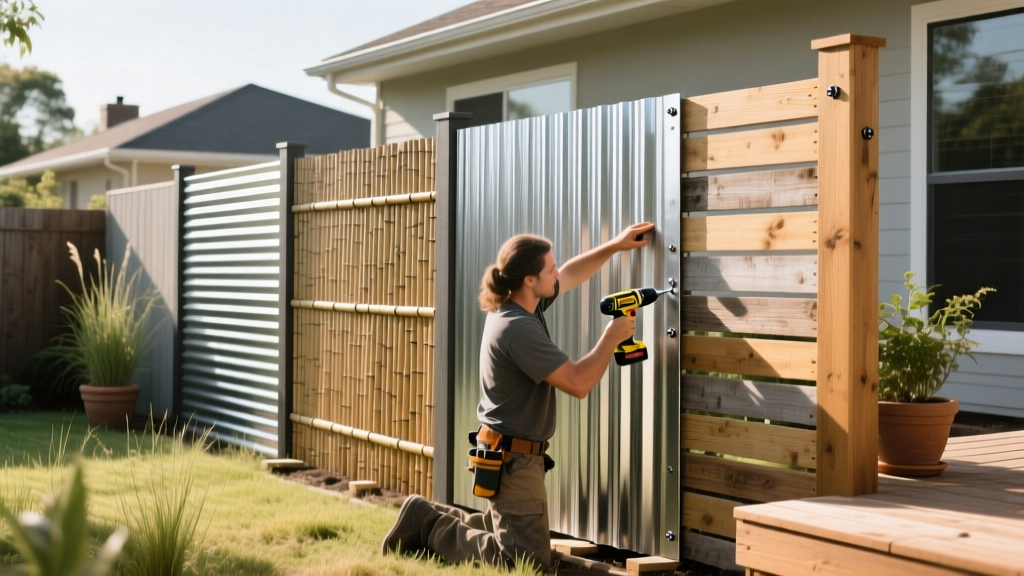
Core Principles of Budget Fence Installation
Executing cheap privacy fence ideas successfully requires prioritizing structural integrity over expensive materials. A budget fence will fail prematurely if the foundational installation protocols are ignored. The primary enemy of any privacy fence is wind load. A solid 6-foot privacy fence acts as a sail, generating up to 15 pounds of lateral force per square foot during 50 mph gusts. To counteract this, post depth and framing geometry must strictly adhere to the 1/3 rule: one-third of the post's total length must be buried underground. For a standard 6-foot above-ground fence, you must use 9-foot posts buried 3 feet deep, or 8-foot posts buried 2.5 feet deep with a concrete collar.
Before breaking ground, verify your local frost line. In northern climates, the bottom of your post hole must extend at least 6 inches below the frost line to prevent frost heave from pushing the fence out of plumb. Always call 811 to have underground utilities marked before digging. Budget fencing relies on precise execution; cutting corners on post-setting will negate any material savings within the first winter season.
Method 1: Corrugated Metal Panels on Wood Frames
Corrugated galvanized steel offers maximum durability for minimal cost. As of 2026, 26-gauge galvanized panels (typically 36 inches wide by 8 feet long) average $14 to $18 per linear foot (LF) installed, making it one of the most resilient cheap privacy fence ideas available.
Framing Layout and Post Spacing
Construct the frame using 4x4 UC4A pressure-treated (PT) pine posts and 2x4 PT rails. Space posts exactly 8 feet on-center to match the standard panel length, allowing for a 1-inch overlap at each seam. Install three horizontal 2x4 rails: one 4 inches from the ground, one at the exact midpoint (42 inches), and one 4 inches from the top. Secure the rails to the posts using 3-inch structural screws (such as Simpson Strong-Tie SDWS) rather than standard nails, which can pull out under wind-induced torsion.
Panel Fastening and Edge Details
Mount the corrugated panels vertically using 1-1/4-inch #10 hex-washer head self-drilling screws with EPDM neoprene seals. Drive the screws into the flat valleys of the corrugation, not the high ridges, to ensure a watertight seal against the wood frame. Space fasteners every 12 inches along each rail.
Modern pressure-treated wood uses Alkaline Copper Quaternary (ACQ) or Copper Azole preservatives, which are highly corrosive to standard galvanized steel. Direct contact between ACQ wood and bare metal panels will cause rapid rusting. You must apply a peel-and-stick bituminous membrane (like Grace Vycor) to the face of the 2x4 rails before attaching the metal, or use polymer-coated fencing screws to prevent galvanic corrosion.
Method 2: Bamboo Reed Roll Application
Bamboo reed rolls provide an organic aesthetic and are highly cost-effective, averaging $7 to $11 per LF. However, they are structurally non-load-bearing and require either an existing fence to attach to or a dedicated tension-wire framework.
Tension Wire vs. Direct Stapling
Never staple bamboo rolls directly to wooden posts and rely on the staples for structural support; the cane will split and the fence will sag within months. Instead, install a framework of 14-gauge galvanized tension wire. Run horizontal wires at 12-inch, 36-inch, and 60-inch heights, pulling them taut with a fence puller and securing them to turnbuckles on the end posts.
Weave the tension wire through the bamboo rolls every 6 inches. To secure the edges and prevent unraveling, clamp the bamboo edges using 1x2 wooden batten strips screwed directly into the end posts, sandwiching the bamboo rather than piercing it.
Weatherproofing the Cane
According to research from the USDA Forest Products Laboratory, natural reeds and bamboo are highly susceptible to UV degradation and fungal rot if left untreated. Immediately after installation, apply two heavy coats of a penetrating tung oil or a dedicated bamboo sealer (such as Bamboo Shield). Reapply annually to prevent the cane from turning brittle and gray.
Method 3: Rough-Sawn Hemlock Board-on-Board
For those who prefer the look of traditional wood without the premium price of cedar or redwood, rough-sawn Eastern Hemlock is the ultimate budget lumber. Board-on-board installation eliminates gaps and provides total privacy, costing between $16 and $22 per LF.
Staggered Spacing and Fastener Selection
Use 1x6 rough-sawn hemlock boards. Install the first layer of boards vertically on one side of the 2x4 rails, leaving a 3.5-inch gap between each board (since a nominal 1x6 is actually 5.5 inches wide). Then, install the second layer on the opposite side of the rails, centering each board over the 3.5-inch gaps. This creates a 1-inch overlap on both sides, blocking visibility while allowing the wood to expand and contract with humidity changes.
Do not use electro-galvanized or bright nails. Hemlock retains moisture and will rust standard fasteners, leaving black streaks down the fence. Use exclusively 2-1/2-inch hot-dipped galvanized ring-shank nails. The ring shanks provide 300% more withdrawal resistance than smooth shanks, preventing the boards from popping loose during seasonal wood movement.
Cost and Durability Comparison Matrix
| Material Type | 2026 Avg. Cost (per LF) | Expected Lifespan | Wind Load Resistance | Maintenance Level |
|---|---|---|---|---|
| Corrugated Galvanized Steel | $14 - $18 | 30 - 50 Years | Excellent | Low |
| Bamboo Reed Rolls | $7 - $11 | 5 - 8 Years | Poor (Requires backing) | High (Annual sealing) |
| Rough-Sawn Hemlock (Board-on-Board) | $16 - $22 | 10 - 15 Years | Good | Medium (Stain every 3 yrs) |
Post-Setting Protocols: Gravel vs. Concrete
The longevity of cheap privacy fence ideas is entirely dependent on how the posts are set in the ground. Water pooling at the base of a wooden post will cause rot, even in pressure-treated lumber. To prevent this, dig your post holes 10 inches in diameter to allow room for concrete and drainage.
Always pour 3 to 4 inches of crushed 3/4-inch gravel at the bottom of the hole before setting the post. This creates a French drain effect, allowing water to percolate away from the end-grain of the wood. Once the post is plumb and braced, backfill with a fast-setting concrete mix (such as Quikrete Fence Post Mix). According to the Quikrete engineering guidelines, fast-setting mix achieves 4,000 PSI compressive strength in 28 days and requires no pre-mixing in a wheelbarrow; you simply pour the dry mix into the hole and add water. Slope the top of the concrete collar away from the post at a 45-degree angle to shed surface water.
Common Installation Failures and Troubleshooting
When installing budget fences, DIYers frequently encounter specific structural failures. Refer to this troubleshooting guide to avoid costly rework:
- Symptom: Metal panels bowing or oil-canning in the sun.
Cause: Panels were fastened too tightly without allowing for thermal expansion.
Fix: When driving self-drilling screws into metal panels, stop driving the moment the EPDM washer makes contact and compresses slightly. Over-driving restricts the metal's ability to expand in high heat, causing it to buckle. - Symptom: Bamboo rolls sagging in the middle of the span.
Cause: Insufficient horizontal tension wire support.
Fix: Never exceed 4-foot horizontal spans without a vertical support batten. Add a 1x2 vertical wood strip screwed into the mid-rail every 4 feet to clamp the bamboo and distribute the weight. - Symptom: Wood boards warping and twisting off the rails.
Cause: Installing wet, green hemlock boards with insufficient fasteners.
Fix: If using green lumber, you must use three fasteners per board per rail (one center, two edges) instead of the standard two. As the wood dries and cups, the extra fastener will hold the edges flat against the rail.
For comprehensive structural framing guidelines and load calculations, always consult the American Wood Council design resources to ensure your specific fence height and local wind zone requirements are met. By applying professional installation techniques to budget-friendly materials, you can achieve a high-end privacy barrier that withstands the elements for decades.