Installing Stone Veneer with Brick: Step-by-Step Guide
Learn how to properly install stone veneer with brick substrates. This step-by-step guide covers prep, mortar selection, lath, and application techniques.

Why Installing Stone Veneer with Brick Requires Specific Preparation
Integrating stone veneer with brick substrates is one of the most durable exterior and interior upgrades you can execute. Because both materials are masonry-based, they share similar thermal expansion coefficients, reducing the risk of cracking at the transition points. However, treating brick as a simple 'glue-and-go' surface is a primary cause of veneer delamination and moisture entrapment.
Brick is highly porous and features deep mortar joints that create an uneven bonding plane. Furthermore, exterior brick walls are designed to absorb and slowly release moisture. If you install stone veneer with brick without addressing these characteristics, you risk trapping water behind the veneer, leading to freeze-thaw spalling, efflorescence, and structural rot in the underlying framing. This guide details the exact 2026 industry standards for preparing, lathing, and applying manufactured or natural stone veneer over existing brick facades.
Critical Check: Painted vs. Unpainted Brick
Unpainted Brick: Can be prepped and coated directly with a scratch coat over metal lath. The brick's porosity allows the mortar to cure properly through hydration.
Painted or Sealed Brick: Mortar will not bond to paint or silane sealers. You must either mechanically abrade the surface (sandblasting or heavy grinding) to expose raw clay, or install a secondary drainage plane using 20-gauge galvanized hat channels (furring strips) fastened directly into the brick joints before applying your weather-resistive barrier and lath.
Essential Materials and Tools for the Job
To ensure a permanent bond and proper moisture management, source materials that meet current ASTM standards. Do not substitute standard brick mortar for veneer-specific blends, as veneer mortar contains polymer additives for higher tensile strength.
- Mortar: Type S Veneer Stone Mortar (e.g., Quikrete Veneer Stone Mortar #1136 or Sakrete Stone Veneer Mortar). Type S provides the necessary 1,800 PSI compressive strength and high bond adhesion.
- Metal Lath: 2.5 lb self-furring galvanized diamond mesh lath (ASTM C847). The 'self-furring' dimples keep the mesh 1/4-inch away from the brick to allow mortar to wrap behind it.
- Weather-Resistive Barrier (WRB): Two layers of Grade D building paper (ASTM D226) or a high-performance fluid-applied membrane for exterior applications.
- Fasteners: 1.5-inch or 2-inch masonry nails or Tapcon concrete screws (3/16-inch diameter), long enough to penetrate the brick mortar joint by at least 1 inch.
- Tools: Hawk, 1/2-inch notched trowel, margin trowel, wire brush, masonry jointer (convex or V-shaped), and a stiff bristle brush.
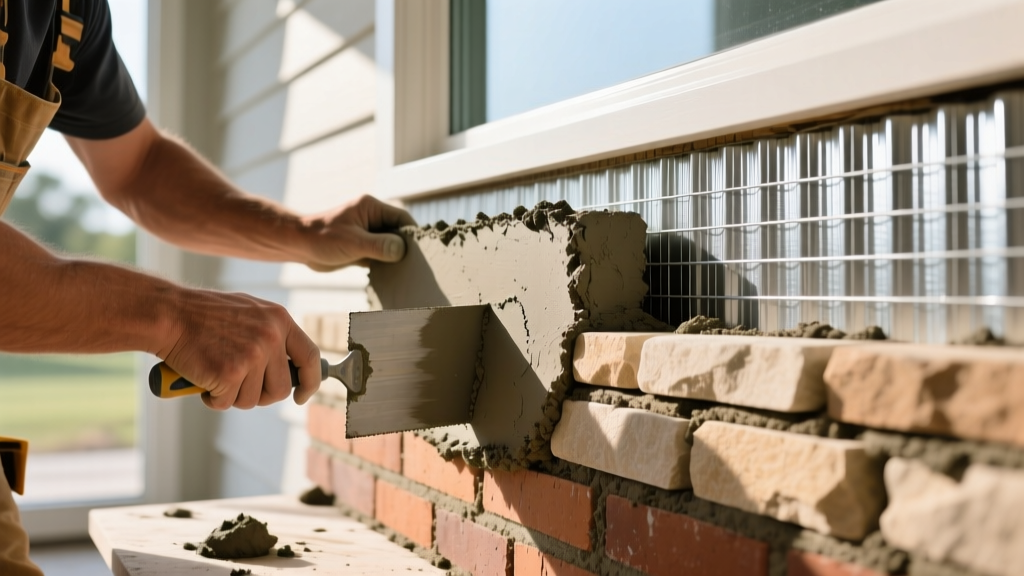
Step 1: Substrate Evaluation and Moisture Management
Before ordering materials, evaluate the existing brick. Tap the bricks with a hammer; a hollow sound indicates spalling or delamination from the backing. Any compromised bricks must be removed and replaced, or the wall must be structurally reinforced.
Clean the brick thoroughly using a stiff wire brush and a trisodium phosphate (TSP) solution to remove dirt, algae, and loose mortar. For exterior installations, moisture management is non-negotiable. According to the Brick Industry Association (BIA), applying an impermeable layer over a mass masonry wall can trap moisture. Therefore, you must install a breathable WRB.
Staple or nail two layers of Grade D building paper horizontally across the brick, overlapping horizontal seams by 2 inches and vertical seams by 6 inches. This creates a slip plane and a secondary drainage channel, ensuring any water that penetrates the stone veneer with brick backing is directed down and out through weep screeds at the base.
Step 2: Fastening the Metal Lath
Metal lath provides the mechanical grip necessary to hold the heavy scratch coat and stone. Cut the 2.5 lb galvanized lath to size, ensuring it wraps around corners by at least 6 inches. Never stop the lath at a corner; always wrap it to prevent corner cracking.
Fasten the lath directly into the mortar joints of the brick, not the clay brick itself, to avoid shattering the masonry unit. Space fasteners every 6 inches vertically and 16 inches horizontally. Ensure the lath feels completely rigid when pulled; any flexing will translate into cracked mortar joints later.
Step 3: Applying the Scratch Coat
The scratch coat creates a uniform, flat plane over the uneven brick and mortar joints. Mix your Type S veneer mortar to a thick, peanut-butter consistency. Using a flat masonry trowel, press the mortar forcefully through the lath so it oozes out the back, encapsulating the wire. Apply a uniform layer approximately 1/2-inch thick.
Before the mortar sets (usually within 30 to 45 minutes, depending on ambient temperature), use a notched trowel or a scratch rake to score horizontal lines into the surface. This 'scratching' provides a mechanical key for the final setting bed. Allow the scratch coat to cure for a minimum of 48 hours, misting it lightly with water twice a day to prevent rapid drying and shrinkage cracks.
Pro Tip: Curing Time is Not Drying Time
Mortar cures through a chemical hydration process, not evaporation. If you are installing stone veneer with brick in hot, dry climates (above 85°F), cover the scratch coat with damp burlap to retain moisture. Rushing the 48-hour cure window is the leading cause of base-coat delamination.
Step 4: Setting the Stone Veneer
Begin installation at the bottom corners and work your way up and inward. Apply a 1/2-inch to 1-inch layer of fresh mortar to the back of each stone (back-buttering). Press the stone firmly into the setting bed on the wall, wiggling it slightly to squeeze out excess mortar and eliminate air pockets.
Maintain a consistent 3/4-inch joint width between stones. Use plastic spacers or wooden shims if necessary to support heavy stones while the mortar sets. For natural stone, dry-lay several pieces on the ground first to blend colors, sizes, and textures, avoiding repetitive patterns that make the installation look manufactured.
Step 5: Grouting, Tooling, and Cleanup
Once the stones are firmly set (typically 24 hours later), fill the joints using a grout bag, similar to cake frosting. Avoid smearing mortar across the face of the stones, as cleaning it off later can stain porous stone faces. When the joint mortar becomes 'thumbprint hard' (firm but slightly pliable), use a convex jointer to compress and smooth the joints. Compressing the mortar increases its density and water resistance.
Finally, use a dry, stiff bristle brush to knock off any loose mortar crumbs. Never use acid washes or wire brushes on the stone face, as this will permanently etch the surface and expose uncolored aggregate.
2026 Cost Breakdown: Stone Veneer Over Brick
Installing stone veneer with brick backing is generally more cost-effective than tearing down the brick and framing a new wall. Below is the current national average cost breakdown per square foot for a professional-grade exterior installation.
| Material / Service | Cost per Sq. Ft. (Low) | Cost per Sq. Ft. (High) |
|---|---|---|
| Manufactured Stone Veneer | $7.50 | $12.00 |
| Type S Mortar & Grout | $1.20 | $1.80 |
| WRB, Lath & Fasteners | $1.50 | $2.25 |
| Professional Labor | $14.00 | $22.00 |
| Total Estimated Cost | $24.20 | $38.05 |
Note: Natural stone (e.g., ledgestone or fieldstone) will increase material costs by $4 to $9 per square foot and requires heavier structural support and more labor-intensive fitting.
Common Failure Modes and Troubleshooting
Even with meticulous preparation, environmental factors can challenge your installation. The National Veneer Stone Association (NVMA) identifies several common failure modes when adhering masonry to masonry:
1. Efflorescence (White Powdery Staining)
The Cause: Water migrating through the brick substrate dissolves soluble salts, depositing them on the surface of the stone veneer as it evaporates.
The Fix: Ensure your WRB is properly lapped and that weep screeds at the foundation line are completely clear of soil and mulch. If efflorescence appears, brush it off dry. Do not use water, as it will drive the salts back into the pore structure.
2. Mortar Joint Cracking
The Cause: Applying mortar joints too thick (exceeding 1 inch) or failing to score the scratch coat, leading to shrinkage stress.
The Fix: Keep joints strictly between 1/2-inch and 3/4-inch. If shrinkage cracks appear, rake them out with a masonry blade and repoint using a polymer-modified pointing mortar.
3. Stone Delamination in Freeze-Thaw Cycles
The Cause: Water gets trapped behind the stone, freezes, expands, and pops the stone off the scratch coat. This almost always happens when the installer skips the WRB or fails to back-butter the stones completely.
The Fix: Prevention is the only cure. 100% back-buttering ensures no voids exist behind the stone for water to pool and freeze. Always follow the Masonry Society's guidelines for cold-weather masonry construction if installing in temperatures below 40°F.
Final Thoughts on Brick Substrates
When executed correctly, installing stone veneer with brick backing yields a composite wall system that is virtually indestructible. The key to longevity lies not in the aesthetic placement of the stones, but in the hidden layers: the WRB, the self-furring lath, and the properly cured scratch coat. By respecting the moisture dynamics of the existing brick and utilizing polymer-modified Type S mortars, your veneer installation will withstand decades of environmental stress without compromising the structural integrity of the original masonry.
Written by
Marcus ChenMarcus Chen is a licensed structural engineer (PE) and building materials analyst with over 12 years of experience across residential, commercial, and industrial construction. He holds a Master of Science in Civil Engineering from UC Berkeley and spent six years at Thornton Tomasetti before transitioning to independent consulting and technical writing. Marcus specializes in material selection for seismic-prone regions, concrete reinforcement strategies, and lifecycle cost analysis. His work has been cited by the American Concrete Institute (ACI) and the Structural Engineers Association of California (SEAOC). When he is not on a job site or at his desk, you will find him hiking the Sierra Nevada or restoring a 1920s craftsman bungalow in Oakland, CA.
More from Marcus Chen
View all
Construction Cost
How Much Did the Eiffel Tower Cost to Build?
How much did the Eiffel Tower cost to build in 1889? We adjust for inflation and compare its budget to modern skyscraper construction.
Aug 4, 2026

Fire Resistance
What Is a Fire Resistant Material? Testing & Certification Guide
Discover what is a fire resistant material through ASTM and UL testing. Learn how fire ratings, certifications, and assemblies work in construction.
Aug 4, 2026

Construction Cost
How Much Did the Burj Khalifa Cost to Build?
How much did the Burj Khalifa cost to build? We break down the $1.5B project and extract 5 money-saving strategies for your next build.
Jul 30, 2026