Styling Stone Veneer on House Exteriors: Modern Design & Layout Guide
Explore top design trends for applying stone veneer on house exteriors. Discover layout styles, material pairings, and curb appeal tips for modern facades.

Applying stone veneer on house facades is one of the most effective ways to anchor a structure visually and elevate its architectural pedigree. Unlike full-thickness natural masonry, manufactured and natural stone veneers offer the same high-end aesthetic at a fraction of the weight and structural cost. However, the difference between a custom-designed luxury exterior and a builder-grade afterthought lies entirely in profile selection, material pairing, and transition detailing.
The Architectural Impact of Stone Veneer
Stone provides visual 'weight.' When applied to the lower third or specific vertical columns of a facade, it grounds the home, making it feel permanently tied to the landscape. According to exterior design research tracked by the National Association of Home Builders (NAHB), mixed-material exteriors combining masonry with siding consistently yield higher perceived property values and faster sales cycles compared to single-material facades.
For transitional and modern farmhouse styles, restrict stone veneer to roughly 30% of the total facade area. Use the remaining 70% for lighter cladding like fiber cement or cedar. Exceeding 50% stone coverage on a standard two-story residential build often overwhelms the fenestration (windows and doors) and makes the structure look top-heavy and fortress-like.
Top Stone Profiles for Modern & Transitional Homes
The profile you choose dictates the shadow lines and texture of the exterior. Industry leaders like Eldorado Stone and Cultured Stone categorize their veneers by geometric layout, which directly correlates to specific architectural styles.
| Profile Type | Best Architectural Style | Visual Weight | Mortar Joint Strategy |
|---|---|---|---|
| Stacked / Ledge Stone | Modern, Contemporary, Prairie | Medium (Horizontal emphasis) | Dry-stack (Mortarless) or tight 1/4' joint |
| Ashlar / Cut Stone | Traditional, French Country, Tudor | High (Formal, structured) | Standard 1/2' raked or flush joint |
| Fieldstone / Rubble | Craftsman, Rustic, Mountain | Very High (Organic, heavy) | Wide 3/4' to 1' over-grouted joint |
Material Pairings: What to Combine with Stone
Stone veneer on house exteriors rarely exists in isolation. The contrast between the masonry and the secondary cladding is where the design succeeds or fails.
Fiber Cement and Wood Cladding
Pairing a heavy, textured stone like a limestone fieldstone with smooth, wide-lap fiber cement siding (such as James Hardie Artisan 7' reveal) creates a highly sought-after transitional look. For a warmer, more organic aesthetic, integrate thermally modified wood cladding (like Thermory Ash) on the upper gables. The rich, dark brown tones of the thermally modified wood pick up the subtle earth tones within the stone, creating a cohesive palette without matching it exactly.
Matte Black Steel and Glass
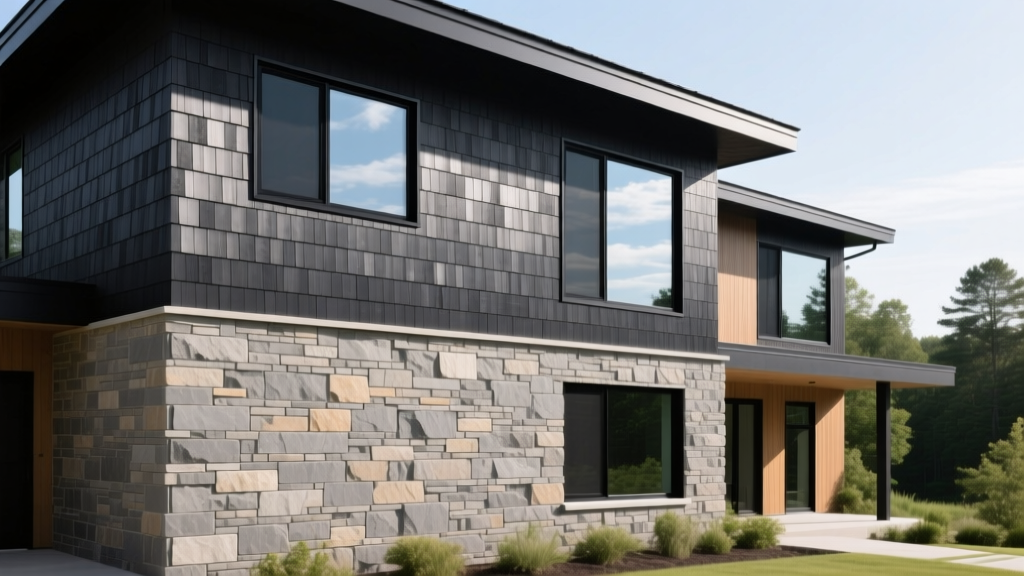
For contemporary designs, the current 2026 trend heavily favors pairing cool-toned, mortarless stacked stone (in slate or charcoal gray) with matte black aluminum-clad windows and standing seam metal roof accents. The sharp, industrial lines of the black metal provide a necessary geometric counterpoint to the organic randomness of the stone.
Layout Patterns and Technical Transitions
A beautiful stone profile will look entirely artificial if the layout and termination points are poorly executed. The goal of veneer is to mimic the structural behavior of full-thickness masonry.
The Corner Return and Window Buck Detail
Never terminate stone veneer flush with the outside corner of a wall or the edge of a window frame. Full masonry wraps around corners and sits proud of the window frame. To achieve this illusion with 1.5-inch thick veneer, you must use manufactured corner pieces that alternate in length (e.g., 8-inch and 12-inch returns). At windows and doors, the stone must return into the 'buck' (the framed opening) by at least 3 to 4 inches before terminating, allowing the window casing to overlap the stone slightly.
The Siding-to-Stone Transition Flashing
When stone veneer covers the lower portion of a wall and transitions to siding above, water management is critical. Do not simply butt the siding down to the stone. Install a Z-flashing (or drip cap) at the top of the stone course. Leave a deliberate 1/4-inch gap between the bottom of the siding and the top of the flashing to prevent capillary action from wicking water up into the wood or fiber cement cladding.
'The most common failure in residential stone veneer design isn't structural; it is visual. When installers treat stone like wallpaper, stopping it at arbitrary horizontal lines without wrapping corners or integrating flashing, the brain immediately registers it as a thin appliqué rather than a structural material.' — Architectural detailing principles via ArchDaily exterior guides.
Color Palette Strategies for 2026 Exteriors
Color selection in stone veneer dictates the mood of the architecture. The current market has shifted away from high-contrast, multi-color 'chocolate and vanilla' stones toward more monochromatic, nuanced palettes.
- Monochromatic Blending: Select a stone that shares the exact undertone of your siding, but varies in texture. For example, a warm greige fiber cement siding paired with a limestone veneer that features subtle beige and taupe notes. This creates a quiet, ultra-luxury European aesthetic.
- Tonal Contrast: Pair a dark, cool-toned stone (like a basalt or slate ledge stone) with bright, warm-white trim and siding. The high contrast highlights the shadow lines of the stone and makes the fenestration pop.
- The Mortar Variable: Never ignore the mortar color. Using standard gray mortar on a warm, tan sandstone will make the facade look dirty and disjointed. Specify a buff, tan, or custom-tinted mortar that matches the lightest color in the stone to make the joints disappear, or use a dark charcoal mortar to create a dramatic, grid-like shadow effect on cut-stone profiles.
Avoiding Common Design Pitfalls
Even with premium materials, specific layout errors can cheapen the final appearance. Ensure your contractor avoids these frequent mistakes:
- The 'Wainscot' Trap: Running stone at a uniform, continuous height (e.g., exactly 4 feet high) all the way around the perimeter of the house makes it look like interior wainscoting pasted to the outside. Vary the termination heights. Run the stone up to the soffit on garage columns, drop it to the window sill line on the main facade, and let it run to grade on chimney chases.
- Ignoring the Weep Screed: Aesthetics must not compromise the building envelope. Code requires a weep screed at the base of the stone veneer (minimum 4 inches above grade or 2 inches above paved surfaces). Designers often try to hide this by burying it in soil or mulch, which leads to catastrophic moisture wicking and efflorescence. Plan your landscaping grading to accommodate the 4-inch visual reveal of the weep screed.
- Over-scaling the Profile: Using massive, 12-inch high fieldstones on a small, single-story cottage will dwarf the architecture. Scale the stone size to the height of the building. Smaller ledge stones and tight ashlar patterns are vastly superior for single-story elevations and narrow wall columns.
By treating stone veneer as a structural, load-bearing material in your design intent—even when it is technically just a 2-inch cladding—you ensure the exterior achieves the timeless, grounded aesthetic that only real masonry can provide.
Written by
Marcus ChenMarcus Chen is a licensed structural engineer (PE) and building materials analyst with over 12 years of experience across residential, commercial, and industrial construction. He holds a Master of Science in Civil Engineering from UC Berkeley and spent six years at Thornton Tomasetti before transitioning to independent consulting and technical writing. Marcus specializes in material selection for seismic-prone regions, concrete reinforcement strategies, and lifecycle cost analysis. His work has been cited by the American Concrete Institute (ACI) and the Structural Engineers Association of California (SEAOC). When he is not on a job site or at his desk, you will find him hiking the Sierra Nevada or restoring a 1920s craftsman bungalow in Oakland, CA.
More from Marcus Chen
View all
Construction Cost
How Much Did the Eiffel Tower Cost to Build?
How much did the Eiffel Tower cost to build in 1889? We adjust for inflation and compare its budget to modern skyscraper construction.
Aug 4, 2026

Fire Resistance
What Is a Fire Resistant Material? Testing & Certification Guide
Discover what is a fire resistant material through ASTM and UL testing. Learn how fire ratings, certifications, and assemblies work in construction.
Aug 4, 2026

Construction Cost
How Much Did the Burj Khalifa Cost to Build?
How much did the Burj Khalifa cost to build? We break down the $1.5B project and extract 5 money-saving strategies for your next build.
Jul 30, 2026