Fiberglass vs Concrete Inground Pools: Installation & Cost Guide
Compare fiberglass vs concrete inground pools with our installation guide. Explore excavation, crane lifts, gunite curing, 2026 costs, and timelines.

Choosing between a pre-manufactured fiberglass shell and a site-built structural concrete vessel fundamentally alters your construction timeline, site logistics, and long-term maintenance. While both materials yield durable inground pools, the installation methodologies are entirely distinct. Fiberglass installation is an exercise in precision excavation and heavy lifting, whereas concrete (gunite/shotcrete) installation is a multi-week masonry and structural engineering project. This guide breaks down the exact installation phases, material specifications, and critical failure modes for both systems.
Phase 1: Site Excavation and Base Preparation
The dirt-removal phase highlights the first major divergence between the two materials. Fiberglass shells are manufactured to exact tolerances, meaning the excavation must perfectly mirror the pool's template. Over-digging a fiberglass hole cannot be corrected by simply packing dirt back in; compacted soil will settle over time, leaving the pool floor unsupported and prone to cracking. Any over-excavation must be filled with compacted 3/8-inch crushed gravel.
Concrete pool excavation is more forgiving regarding exact dimensions, as the steel rebar cage and gunite shell are built to fit the hole. However, concrete pools require deeper, wider trenches for the bond beam (the structural perimeter collar) and often require step-downs for deep ends and diving bowls.
Phase 2: Structural Installation and Shell Formation
The Fiberglass Crane Lift and Backfill
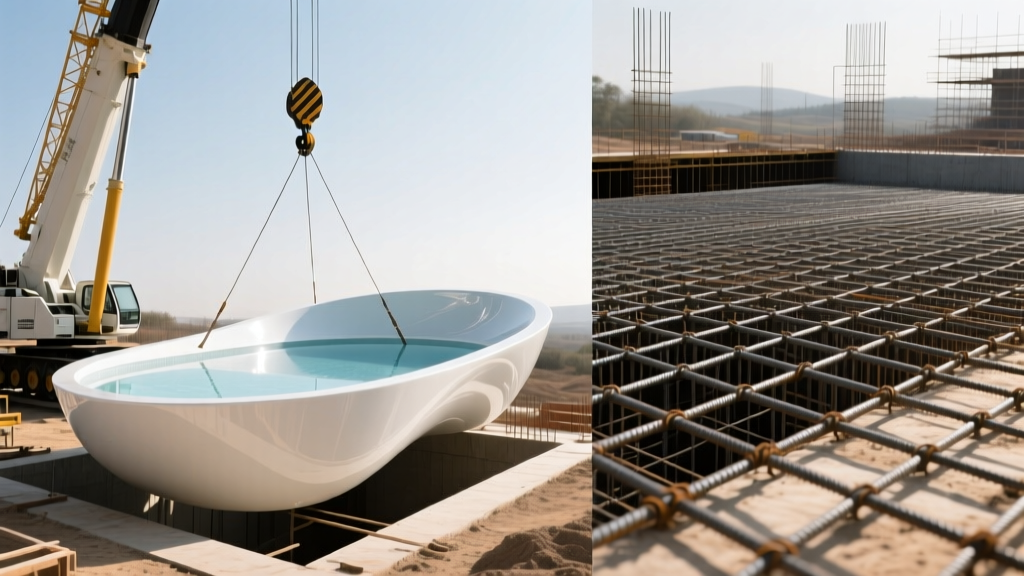
Fiberglass installation hinges on a single, high-stakes event: the crane lift. The site must have a minimum of 30 feet of overhead clearance (free from power lines and mature tree canopies) and adequate ground bearing capacity to support a 50-ton crane and a 10,000-pound pool shell.
- Plumbing Stub-Outs: Before the shell is lowered, all main drain, skimmer, and return lines are stubbed up through the gravel base. Because fiberglass shells flex slightly under water pressure, plumbers must use flexible PVC or install expansion loops in rigid Schedule 40 PVC to prevent shear stress on the shell fittings.
- The Drop: The shell is rigged with nylon straps (never chains or steel cables, which will gouge the gelcoat) and lowered into the excavation.
- Concurrent Backfilling: As the pool is filled with water, the exterior is simultaneously backfilled with 3/8-inch clean crushed gravel. The water inside and the gravel outside must rise at the exact same rate to equalize hydrostatic pressure and prevent the walls from bowing inward or outward.
Gunite and Shotcrete Application
Concrete pools are built from the ground up using a network of steel reinforcement and pneumatically applied concrete. According to the American Concrete Institute (ACI) Committee 506, gunite (dry-mix) is generally preferred over shotcrete (wet-mix) for residential pools due to its higher compressive strength, typically achieving 4,000 to 5,000 PSI.
- Steel Reinforcement: A grid of #3 or #4 steel rebar is tied together at 10-inch or 12-inch centers. The rebar must be elevated 2 to 3 inches off the earth using plastic dobies (chairs) to ensure the concrete fully encapsulates the steel, preventing corrosion.
- Shooting the Concrete: A pneumatic hose blows the dry concrete mix through a nozzle where water is added at the last second. The nozzleman must maintain a consistent 90-degree angle and a 3-to-4-foot distance to ensure proper compaction.
- Curing Process: Gunite requires a 28-day curing period to reach full structural strength. For the first 7 days, the shell must be watered down 3 to 4 times daily to prevent plastic shrinkage cracking. The interior plaster finish is typically applied between days 14 and 21.
Phase 3: Decking Integration and Coping
The interface between the pool shell and the surrounding hardscape is a primary failure point if engineered incorrectly.
Fiberglass Decking: Fiberglass pools expand and contract with water temperature changes at a different rate than a concrete patio. A 1/2-inch expansion joint (slip plane) filled with polyurethane sealant must be installed between the pool's concrete coping and the surrounding deck. If a concrete deck is poured directly against a fiberglass coping, winter freeze-thaw cycles will push the deck against the shell, causing the gelcoat to spider-crack and delaminate.
Concrete Decking: Because the pool shell and a poured concrete deck share similar thermal expansion coefficients, concrete pools can accept cantilever decks poured directly over the bond beam, creating a seamless, integrated look without the need for wide expansion joints.
2026 Installation Cost and Timeline Matrix
Material costs, specialized labor rates, and crane rental fees dictate the final price. The following table reflects average national installation data for a standard 14x28-foot pool in 2026, assuming standard soil conditions and moderate site access.
| Installation Phase | Fiberglass Pool | Concrete (Gunite) Pool |
|---|---|---|
| Excavation & Prep | $4,500 - $7,000 | $6,000 - $9,500 |
| Shell / Structure | $22,000 - $35,000 (Crane + Shell) | $28,000 - $42,000 (Steel + Gunite) |
| Plumbing & Electrical | $6,500 - $9,000 | $7,500 - $11,000 |
| Interior Finish | Included (Gelcoat) | $8,000 - $15,000 (Pebble/Plaster) |
| Total Estimated Cost | $65,000 - $95,000 | $85,000 - $130,000+ |
| Average Timeline | 3 to 5 Weeks | 8 to 14 Weeks |
Critical Failure Modes and Edge Cases
Understanding how these pools fail is essential for proper installation oversight. The Pool & Hot Tub Alliance (PHTA) frequently cites improper groundwater management and structural rebound as leading causes of premature pool failure.
Fiberglass: Hydrostatic Flotation
A fiberglass pool is essentially a massive boat. If the local water table rises after a heavy rainstorm and the pool is drained for maintenance, the hydrostatic pressure from the surrounding saturated gravel can literally push the empty pool out of the ground, cracking the plumbing and destroying the deck.
The Fix: Every fiberglass installation must include a hydrostatic relief valve installed in the main drain sump. This valve automatically opens when exterior groundwater pressure exceeds interior water pressure, allowing groundwater to flow into the pool to equalize the weight.
Concrete: Rebound and Delamination
During the gunite shooting process, large aggregate particles often bounce off the rebar and fall to the floor of the pool. This material is called "rebound." It has a high sand-to-cement ratio and virtually no structural integrity. Lazy contractors will sometimes trowel this rebound into the pool's floor or coves to save time.
The Fix: Independent inspectors, such as those following InterNACHI Pool Inspection Standards, mandate that all rebound be shoveled out and discarded before the gunite crew begins troweling. If rebound is encapsulated in the floor, it will eventually delaminate, causing the interior plaster to hollow, crack, and pop off.
"The longevity of a concrete pool is determined entirely by the nozzleman's discipline during the shooting phase and the crew's diligence in removing rebound. A poorly shot shell cannot be fixed by a high-end pebble finish."
Decision Framework: Which Installation Suits Your Site?
Choose Fiberglass Installation If:
- Your site has wide, unobstructed overhead access for a 50-ton crane.
- You have a high water table and need the superior hydrostatic drainage properties of a full-gravel backfill envelope.
- You require a rapid installation timeline (under 5 weeks) to meet a strict deadline.
- You want to minimize long-term chemical usage, as the non-porous gelcoat surface does not harbor algae or alter water pH like curing concrete does.
Choose Concrete Installation If:
- Your site has narrow access points, mature trees, or overhead power lines that prohibit crane access.
- You require a highly customized, non-standard shape, infinity edge, or integrated architectural features (like built-in tanning ledges or complex step configurations) that fiberglass molds cannot accommodate.
- You are building a commercial or high-traffic municipal pool where the 5,000 PSI structural mass of gunite is required for heavy decking loads and extreme durability.
Written by
David NakamuraDavid Nakamura is a licensed architect (AIA) and construction technology writer focused on sustainable building methods, mass timber engineering, and high-performance building envelopes. He holds a Master of Architecture from the University of Washington and is a certified Passive House Consultant (CPHC). David spent eight years at the Seattle firm Mithun, where he led the design of three LEED Platinum projects, before founding his own practice specializing in net-zero residential design. He serves on the editorial advisory board of GreenBuilder Magazine and has authored peer-reviewed papers on cross-laminated timber (CLT) connections for the Journal of Structural Engineering. In his spare time, David teaches woodworking at Pratt Fine Arts Center and kayaks the Puget Sound.
More from David Nakamura
View all
Construction Cost
Labor Cost to Build a Deck Per Sq Ft: 2026 Installation Guide
Discover the exact labor cost to build a deck per sq ft in 2026. This installation guide breaks down contractor rates, complexity factors, and hidden fees.
Aug 4, 2026

Construction Cost
How Much Does It Cost to Build a 3 Bedroom House? Financing Guide
Learn exactly how much it costs to build a 3 bedroom house and explore 2026 financing options, construction loan types, and budget frameworks for your build.
Aug 4, 2026

Construction Cost
Cost to Build a Tennis Court: 2026 Guide
How much does it cost to build a tennis court in 2026? Breakdowns for asphalt, concrete, and synthetic surfaces plus fencing and lighting.
Jul 30, 2026