Preventing Blisters in Concrete: A Scenario-Based Finishing Guide
Learn how to prevent and fix blisters in concrete. Match your finishing technique, mix design, and trowel timing to specific weather and application scenarios.
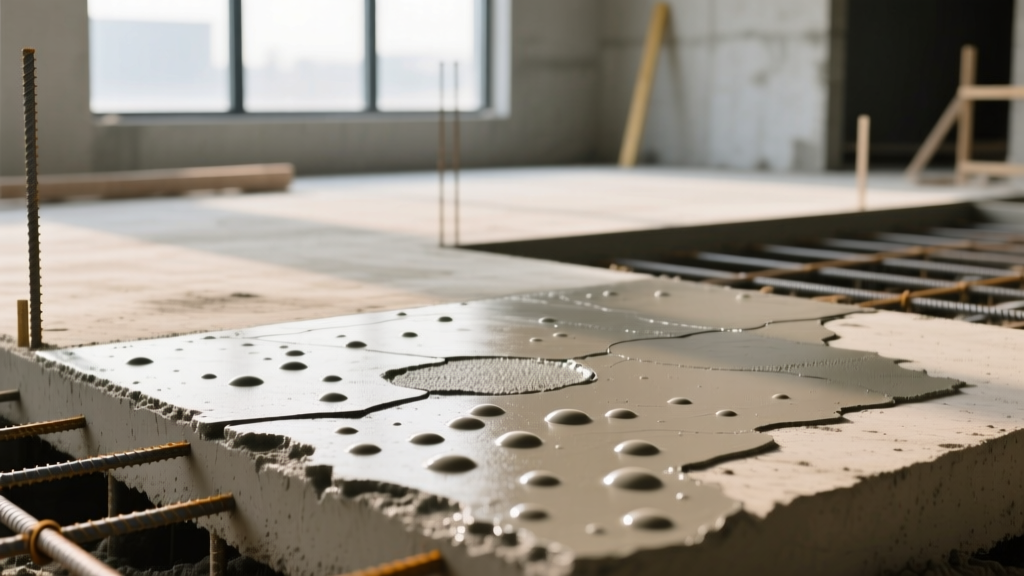
Blisters in concrete are rarely the result of a defective batch from the ready-mix plant. Instead, they are almost always an application mismatch—a collision between the concrete's mix design, the ambient environmental conditions, and the finishing techniques deployed by the crew. A blister is a small, hollow bump on the surface, typically ranging from 1/8 inch to 1 inch in diameter, caused by trapped air or bleed water vapor that rises to the surface but cannot escape through a prematurely sealed, dense troweled skin.
To achieve a flawless finish, contractors must move beyond generic rules of thumb and adopt an application-fit approach. This means matching your finishing tools, timing, and surface preparation to the specific scenario at hand. Below is a comprehensive framework for diagnosing, preventing, and remediating blisters in concrete based on real-world job site variables.
The Mechanics of Surface Blisters in Concrete
When concrete is placed and consolidated, entrapped air and bleed water naturally migrate upward. If the surface is worked with a float or trowel while the underlying concrete is still bleeding or off-gassing, the mechanical action seals the top 1/8 inch of the slab. This creates an impermeable barrier. As the sun heats the slab or internal hydration generates thermal energy, the trapped air and water expand. The vapor pressure pushes against the dense surface skin, forming a blister.
Scenario-Matching Matrix: Mix Design vs. Finishing Technique
The risk of blistering changes dramatically depending on the structural requirements of the slab. Air-entrained concrete, which is essential for exterior freeze-thaw durability, behaves entirely differently under a power trowel than non-air-entrained interior mixes. Use the matrix below to align your finishing strategy with your specific application.
| Application Scenario | Typical Mix Traits | Blister Risk Level | Required Finishing Adjustment |
|---|---|---|---|
| Interior Warehouse / Industrial | 0-2% Air, 5-6 inch slump, hard-troweled | Low | Standard power troweling sequence. Wait for bleed water to evaporate before initial floating. |
| Exterior Driveway / Sidewalk | 5-7% Air, 4 inch slump, broom or float finish | Moderate to High | Never hard-trowel. Use a wood or magnesium float. Do not overwork the surface; leave a porous texture to allow vapor escape. |
| Topping Slab over Vapor Retarder | 3-5% Air, 4 inch slump, dry-shake hardener | Extreme | The polyethylene barrier (e.g., 15-mil Stego Wrap) prevents downward bleeding, forcing all vapor upward. Delay troweling significantly; use a bullfloat to open pores before the final set. |
| Architectural Tilt-Up Panels | Self-consolidating or high-slump, form release agents | High (Surface Form Blisters) | Use a non-reactive, breathable form release agent. Vibrate internally in strict 18-inch lifts to prevent macro-voids that mimic surface blisters. |
Environmental Triggers and Timing Adjustments
Weather dictates the evaporation rate of bleed water, which directly controls the window of time you have to finish the slab before a crust forms. According to guidelines published by the National Ready Mixed Concrete Association (NRMCA), monitoring the evaporation rate is critical for surface integrity.
Scenario 1: Hot, Dry, and Windy Conditions
When the evaporation rate exceeds 0.2 lbs/ft²/hr, the surface crusts over rapidly while the concrete mass below is still actively bleeding. This is the primary recipe for blistering in summer flatwork.
- Actionable Fix: Apply a monomolecular evaporation retardant (such as Confilm or E-CON) immediately after screeding. This forms a microscopic barrier that slows surface evaporation by up to 40%, keeping the surface pores open long enough for trapped air to escape.
- Timing Shift: Delay your first power float pass. Rely on a hand float or bullfloat to level the surface without sealing it. Do not begin steel troweling until the concrete can support a worker's weight with only a 1/4 inch indentation.
Scenario 2: Cold Weather and High Air-Entrainment
In cold weather, concrete sets slower, but the surface can become unusually sticky due to the high air content (often bumped to 6-8% in winter mixes to protect against early freeze-thaw damage). This stickiness causes finishing tools to drag, prematurely sealing the surface and trapping the abundant microscopic air bubbles.
- Actionable Fix: Switch from steel floats to magnesium or aluminum floats for the intermediate passes. These metals do not drag on sticky, air-entrained surfaces, allowing you to level the slab without closing the pores.
- Rule of Thumb: Never attempt a hard, burnished finish on concrete with an air content greater than 3%. The Portland Cement Association (PCA) explicitly warns that burnishing air-entrained concrete will almost guarantee surface scaling and blistering.
Tool Selection: Trowel Blade Pitch and Material
The angle of your power trowel blades dictates how much surface pressure is applied and how tightly the pores are sealed. Mismanaging blade pitch is a leading cause of application-fit failure.
- Initial Floating (0° to 5° Pitch): Blades should be nearly dead flat. This provides a wide footprint to level the slab and push aggregate slightly below the surface without sealing the top layer. Using a pitched blade here will trap air instantly.
- Intermediate Troweling (5° to 10° Pitch): Once the concrete has stiffened and all bleed water sheen is gone, increase the pitch. This begins to densify the surface. If blisters begin to form during this stage, immediately flatten the blades and re-open the surface pores.
- Burnishing (15° to 20°+ Pitch): Reserved strictly for interior, non-air-entrained concrete to achieve a glass-smooth finish. The high pitch creates immense friction and heat, fusing the cement paste into an impermeable shell.
Formwork and Release Agent Scenarios for Vertical Elements
Blisters are not exclusive to horizontal flatwork; they frequently appear on vertical architectural walls and tilt-up panels. In these scenarios, the issue is usually an application mismatch between the formwork oil and the concrete's viscosity.
If a heavy, petroleum-based form release agent is applied too thickly, it pools in the microscopic imperfections of the form liner. When the concrete is placed, the heat of hydration causes the petroleum oil to vaporize. Because the rigid formwork prevents the gas from escaping laterally, it pushes into the plastic concrete, forming surface blisters that pop and leave pockmarks when the forms are stripped.
Remediation: What to Do When Blisters Appear
If you notice blisters forming while the slab is still plastic, your immediate reaction should be to halt all finishing operations. Do not attempt to 'pop' them with a trowel or a needle; this will only tear the surface matrix, creating permanent, ragged divots that cannot be hidden.
Step-by-Step Remediation Protocol
- Stop and Wait: If blisters appear during power troweling, raise the blades to a flat pitch, back the machine off, and allow the concrete to continue its initial set. In some cases, the vapor pressure will naturally dissipate as the concrete cools.
- Post-Cure Assessment: Once the slab has fully cured (typically 28 days), assess the blisters. If they are hollow and easily crushed under foot traffic, they must be removed.
- Grinding: Use a planetary concrete grinder equipped with 40-grit metal-bonded diamonds to shave off the blistered surface layer. Do not use acid etching, as it will not penetrate the dense, troweled skin effectively.
- Patching: Clean the ground area with a commercial degreaser, apply a high-solids epoxy primer, and trowel in a polymer-modified cementitious patching compound (such as an acrylic-modified micro-topping). Feather the edges to blend with the surrounding slab.
Frequently Asked Questions
Can adding more water to the surface prevent blisters?
No. Spraying water on the surface during finishing alters the water-to-cement ratio of the top 1/8 inch, leading to severe crazing, scaling, and dusting. If the surface is drying too fast, use a monomolecular evaporation retardant instead.
Do synthetic macro-fibers cause blisters?
Synthetic fibers do not cause blisters, but they can make the surface feel 'hairy' and sticky during early finishing. If a finisher overworks the surface trying to push the fibers down, they will inadvertently seal the pores and trap air. Use a float with a slightly more aggressive pitch early on to push fibers below the surface without over-densifying the paste.
By treating concrete finishing as a dynamic, scenario-dependent process rather than a rigid checklist, contractors can eliminate blisters in concrete entirely. Match the mix to the environment, match the tool to the mix, and let the concrete dictate the timing.