Stone Veneer Thickness: Design, Shadows & Style Guide
Discover how stone veneer thickness impacts shadow lines, room scale, and trim transitions in this expert design guide for architects and builders.

The Aesthetics of Depth: Why Thickness Dictates Design
When selecting stone for an interior feature wall or exterior facade, most homeowners and junior designers focus exclusively on color palette and texture. However, expert architects and interior designers know that stone veneer thickness is the primary variable that dictates a space's visual weight, shadow profiling, and trim integration. Thickness is not merely a structural specification; it is a fundamental design tool.
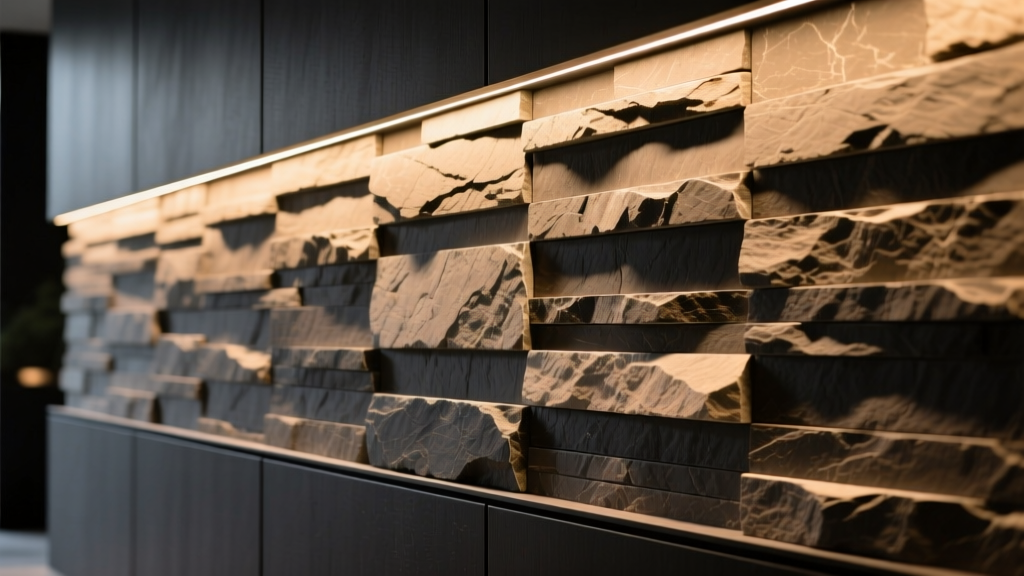
The depth of the stone determines how light interacts with the surface. A ultra-thin sliced stone will absorb and reflect light uniformly, creating a sleek, modern canvas. Conversely, a thick ledgestone profile will cast deep, dramatic shadows that shift dynamically throughout the day, adding a rugged, three-dimensional quality to the architecture. Understanding these optical mechanics is essential for executing a deliberate design vision.
Profile Breakdown: Matching Thickness to Design Styles
Manufactured and natural stone veneers generally fall into three distinct thickness categories. Each category serves a specific architectural style and spatial requirement.
Ultra-Thin Veneer (0.5" to 1"): The Modern Minimalist
Ultra-thin profiles include sliced natural stone, thin brick, and low-profile manufactured ashlar. Weighing between 5 and 8 pounds per square foot, these materials are designed for spaces where preserving square footage is critical.
- Best Applications: Small powder rooms, zero-clearance fireplace surrounds, and elevator lobby accent walls.
- Design Impact: Creates a clean, unobtrusive texture. Because the face is nearly flush with standard trim depths, it integrates seamlessly with standard door casings and baseboards without requiring custom millwork transitions.
- Lighting Strategy: Pairs best with 'washing light' (fixtures placed 12 to 18 inches away from the wall), which flattens the texture and emphasizes the color variations rather than the physical topography.
Standard Thickness (1" to 2.5"): The Transitional Workhorse
This is the most common range for traditional fieldstone, cobble, and standard dry-stack profiles. Weighing 10 to 15 pounds per square foot, standard thickness offers a balance of pronounced texture and manageable installation logistics.
- Best Applications: Kitchen islands, exterior wainscoting, and large-scale living room feature walls.
- Design Impact: Provides substantial visual weight without overwhelming the room. The 1-to-2-inch depth creates noticeable shadow lines that give the stone a tactile, authentic masonry feel.
- Lighting Strategy: Highly versatile. Works well with both washing light and moderate 'grazing light' (fixtures placed 6 to 12 inches away), which will highlight the mortar joints and stone clefts.
Thick & Ledge Profiles (2.5" to 4"+): The Rustic Statement
Thick profiles encompass heavy ledgestone, massive dry-stack, and oversized chink-style stones. These can weigh upwards of 15 to 25 pounds per square foot. According to ASTM C1670 standards for adhered manufactured stone, while these are non-load-bearing, their sheer mass requires rigorous substrate preparation.
- Best Applications: Grand two-story great rooms, rustic lodge exteriors, and heavy timber-frame integration.
- Design Impact: Highly aggressive visual presence. The deep reveals create stark contrasts between light and dark, making the wall the undisputed focal point of the structure.
- Lighting Strategy: Demands 'grazing light' placed as close as 3 to 6 inches from the wall surface. This extreme raking angle maximizes the deep shadows cast by the thick ledges, amplifying the rugged aesthetic.
Design Matrix: Thickness, Lighting, and Spatial Scale
Use the following matrix to align your stone veneer thickness selection with the room's scale and lighting plan. Mismatching these elements is the most common cause of disappointing stone installations.
| Thickness Profile | Weight (lbs/sq ft) | Ideal Room Scale | Optimal Lighting Angle | Shadow Intensity |
|---|---|---|---|---|
| Ultra-Thin (0.5" - 1") | 5 - 8 lbs | Small / Intimate | Wash (12"-18" offset) | Low / Subtle |
| Standard (1" - 2.5") | 10 - 15 lbs | Medium / Open | Mid-Graze (6"-12" offset) | Medium / Defined |
| Thick Ledge (2.5" - 4"+) | 15 - 25 lbs | Large / Voluminous | Tight Graze (3"-6" offset) | High / Dramatic |
Navigating Transitions and Trim Details
The true test of a designer's expertise is how they handle the edges. When a 2.5-inch thick stone veneer meets a standard 0.5-inch drywall surface, you are left with a 2-inch reveal. Ignoring this transition results in an amateurish, unfinished look. Here are the three professional methods for resolving thickness disparities:
1. The Shadow Return (Drywall Float)
Instead of bringing the drywall flush to the stone, the drywall is floated out using furring strips or thicker gypsum panels to meet the exact depth of the stone. A reveal bead or Schluter-DECO-DE profile is used to create a crisp 1/8-inch gap between the stone and the drywall. This creates a floating effect and entirely eliminates the awkward side-profile of the stone.
2. Millwork Casing and Corbels
For traditional or transitional designs, the thickness of the stone is embraced and framed. Custom wood casing, matching the room's baseboards or crown molding, is installed over the edge of the stone. For heavy ledge profiles, structural wood corbels are placed beneath the stone's bottom course to visually support the massive thickness, even if the stone is mechanically adhered.
3. Metal Transition Profiles
In contemporary spaces, thick stone edges are capped with brushed brass, matte black, or stainless steel Schluter profiles. The metal wraps the exposed edge of the stone, protecting it from chipping while providing a deliberate, high-end industrial contrast to the natural cleft of the stone.
Structural Realities for Deep Profiles
While design drives the selection of stone veneer thickness, physics dictates its execution. The Masonry Veneer Manufacturers Association (MVMA) strictly outlines substrate requirements that scale with the weight of the material.
Standard 1/2-inch interior drywall can safely support approximately 15 pounds per square foot of adhered veneer. If your design calls for a thick ledgestone profile weighing 22 pounds per square foot, standard drywall is a catastrophic failure point. The shear weight will cause the gypsum core to delaminate from the paper face, pulling the stone off the wall.
The Fix: For any stone exceeding 15 lbs/sq ft, the substrate must be upgraded to 1/2-inch cement backer board (such as Durock or HardieBacker), mechanically fastened to the wall studs every 6 inches. Additionally, thicker, heavier stones require a deeper mortar bed and the use of a non-sag, polymer-modified mortar (ANSI A118.15) to prevent the stones from sliding down the wall during the curing process.
Expert Tips for Maximizing Visual Impact
To elevate your stone installation from a simple material application to a masterclass in architectural design, implement these advanced detailing strategies:
- Grade the Thickness: If using a dry-stack profile, ask your mason to 'grade' the installation. Place the thickest, most protruding stones at eye level and gradually transition to flatter, thinner stones near the floor and ceiling. This creates a subtle, organic bulge that mimics natural geological formations.
- Specify the Mortar Joint: Thickness isn't just about the stone; it's about the mortar. A standard gray mortar joint pushed flush with a thick stone will look flat. Specify a 'raked' or 'recessed' joint (pushed back 1/4 inch) to add an extra layer of shadow depth, effectively increasing the perceived thickness of the wall without adding weight.
- Mock-Up the Lighting: Before the stone is ordered, build a 4x4 foot mock-up board with your selected profile. Bring it on-site at night and test your exact lighting fixtures at varying distances. As noted in Eldorado Stone's design guidelines, the interplay between artificial light and stone texture can drastically alter the perceived color and depth of the material.
Written by
Sarah WhitfieldSarah Whitfield is a chartered quantity surveyor (MRICS) and construction cost analyst with 15 years of experience in material pricing, procurement strategy, and project budgeting. She earned her degree in Construction Management from the University of Reading (UK) and has worked on projects ranging from $2M custom homes to $180M mixed-use developments across North America and Europe. Sarah currently leads cost estimating for BuildMat Insight, maintaining a proprietary database of 4,000+ material price points updated quarterly. She is a frequent contributor to RSMeans cost data panels and has presented at the International Cost Engineering Council (ICEC) congress. Based in Denver, CO, Sarah is an avid trail runner and volunteer mentor for Women in Construction.
More from Sarah Whitfield
View all
Wood & Lumber
What Are the Different Types of Wood? A Builder's Guide
Compare structural softwoods, finish hardwoods, and engineered lumber. Analyze Janka ratings, MOE values, and 2026 pricing for construction.
Aug 4, 2026

Walls & Panels
Steel Framing vs Wood Framing: Corrosion and Moisture Defense
Compare steel framing vs wood framing for moisture resistance. Learn about galvanized coatings, condensation risks, and corrosion protection strategies.
Jul 21, 2026

Stone & Masonry
How to Cut Stone Veneer: Wet Saw vs Grinder Comparison
Compare the best tools for cutting stone veneer. We review wet saws, angle grinders, and chop saws to help you achieve clean, chip-free cuts.
Jul 21, 2026