Troubleshooting and Repairing Failing Types of Concrete Joints
Learn to diagnose and repair failing types of concrete joints. Expert troubleshooting for spalling, random cracking, and sealant failures in slabs.
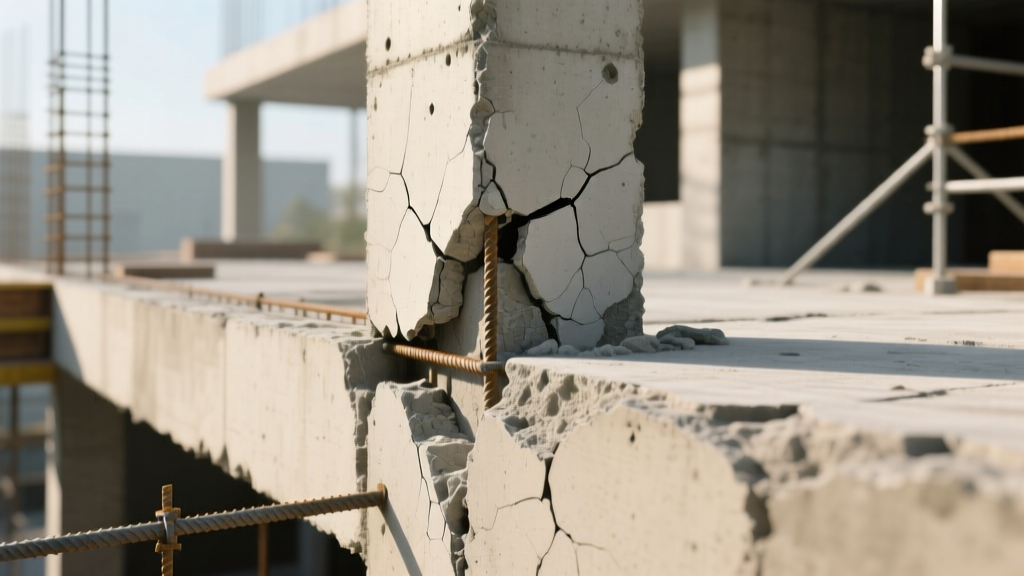
The Anatomy of Slab Failure: Why Joint Type Matters
Concrete is a brittle material that undergoes volumetric changes due to drying shrinkage, thermal expansion, and structural loading. Without planned weak points, a slab will relieve internal tensile stresses by cracking randomly. Understanding the specific types of concrete joints is the foundational step in both preventing and repairing slab failures. According to the Portland Cement Association, joints are essentially engineered cracks designed to control where and how the concrete fractures.
Concrete shrinks approximately 5/8 of an inch per 100 feet of length. If the distinct types of concrete joints are not spaced, cut, or sealed correctly, the slab will bypass the engineered relief points. This guide provides a field-tested framework for diagnosing joint failures and executing precise, long-lasting repairs.
Diagnostic Matrix: Identifying Joint Failure by Symptom
Before selecting a repair mortar or sealant, map the physical symptoms to the corresponding joint type. Use this matrix to isolate the root cause of the deterioration.
| Visible Symptom | Likely Joint Type | Primary Root Cause |
|---|---|---|
| Random cracking within 3 feet of a saw cut | Contraction (Control) | Sawing delayed past initial set; cut depth < 1/4 slab thickness. |
| Edge spalling and aggregate pop-outs along a straight line | Contraction (Control) | Sealant failure allowing incompressible debris (rocks) into the joint. |
| Upward buckling or severe compression spalling | Expansion / Isolation | Missing or degraded compressible filler; thermal expansion restricted. |
| Vertical faulting (one side higher than the other) | Construction / Isolation | Subgrade washout from water infiltration; missing load-transfer dowels. |
Troubleshooting Contraction (Control) Joints
Contraction joints are the most numerous joint type in any slab-on-grade. They are created by sawing, tooling, or inserting formed strips to induce a straight-line crack. The American Concrete Institute (ACI) recommends spacing these joints at intervals of 24 to 36 times the slab thickness (e.g., a 4-inch slab requires joints every 10 to 15 feet).
Random Cracking Outside the Joint
If a slab exhibits random map cracking or long transverse cracks that ignore the control joints, the joints were likely activated too late. For traditional wet-cut sawing, the window is typically 4 to 12 hours after placement, depending on ambient temperature. If early-entry dry-cut saws (e.g., Soff-Cut) are used, cutting must occur within 1 to 4 hours of finishing. Furthermore, the cut depth must be exactly 1/4 to 1/3 of the total slab depth. A shallow cut fails to create a sufficient stress riser, causing the concrete to crack randomly where internal tension peaks.
Spalling and Edge Raveling
Spalling occurs when the edges of the joint break off, creating a wide, jagged trench. This is almost always caused by incompressible materials—like small stones or hardened mortar—falling into an unsealed or poorly sealed joint. When the slab expands thermally, it crushes against the stone, blowing out the weaker concrete edge.
Isolation and Expansion Joint Failures
Isolation joints completely separate the slab from adjacent structures (columns, walls, foundations) to allow independent movement in all three planes. Expansion joints are similar but are used within the slab field to accommodate thermal growth in long expanses.
Compression Failures and Buckling
If an isolation joint lacks a compressible filler material (such as 1/2-inch closed-cell polyethylene foam like Pemko or Sealtight), the expanding slab will bear directly against the rigid structure. This results in severe compression spalling or catastrophic buckling (blow-ups) in exterior pavements. Repairing this requires sawing out a 1-inch strip of concrete adjacent to the structure, cleaning the subgrade, and installing a high-recovery compressible backer board before resealing.
Water Infiltration and Subgrade Washout
When the top sealant of an isolation joint fails, surface water channels directly into the subgrade. Over time, this washes away the compacted base, creating a void. When heavy loads cross the joint, the unsupported edge snaps downward, leading to vertical faulting. Repairing this requires slab jacking (polyurethane foam injection) to fill the void and re-establish subgrade support before resealing the joint.
Construction Joint Troubleshooting
Construction joints occur at the end of a daily pour or when work is interrupted. They must transfer shear loads to prevent differential settlement. The most common failure mode here is the misalignment or omission of smooth steel dowel bars. If dowels are tilted or bound by dried concrete slurry, they restrict horizontal movement, causing the joint to lock up and crack nearby. Troubleshooting locked construction joints often involves retrofitting with carbon fiber stitching or, in severe cases of differential settlement, full-depth panel replacement.
Step-by-Step Repair Protocols for Sealant Restoration
Restoring failed sealant in any of the types of concrete joints requires meticulous preparation. Adhesion failure accounts for over 80% of premature joint sealant failures. Follow this exact protocol for high-traffic industrial or exterior slabs:
- Rout and Saw: Use a walk-behind saw to cut a clean 1/2-inch wide reservoir along the joint line. For spalled edges, use a handheld angle grinder with a diamond cup wheel to rout the damaged edges back to sound, unfractured concrete, creating a uniform 3/4-inch wide channel.
- High-Pressure Cleaning: Blow out all dust and debris using an oil-free air compressor delivering a minimum of 100 psi. Follow this with a high-pressure water blast (minimum 3000 psi) to remove microscopic silica dust from the pore structure.
- Solvent Wipe: Once completely dry, wipe the joint faces with a clean rag dampened with xylene or methyl ethyl ketone (MEK). This removes form release oils and surface efflorescence that block chemical adhesion.
- Install Backer Rod: Insert a closed-cell polyethylene backer rod. The rod diameter must be 25% larger than the joint width to ensure a tight friction fit. Crucial: The backer rod must be positioned to maintain a 1:1 depth-to-width ratio for joints under 1/2-inch wide, and a 1:2 ratio (depth is half the width) for wider joints. This ensures the sealant undergoes only extension and compression, avoiding shear stress.
- Apply Primer and Sealant: For porous or aged concrete, apply a manufacturer-approved primer. Dispense a high-modulus polyurethane sealant (such as SikaFlex-1a or MasterSeal NP 1) using a bulk loading gun. Tool the sealant immediately with a convex spatula and a mild soapy water solution to force it into the pores and create a slight concave profile that sheds water.

Preventative Maintenance Checklist
To maximize the service life of your slab and minimize the need to repair the various types of concrete joints, implement this annual inspection protocol:
- Spring Thaw Inspection: Check all exterior joints for signs of subgrade washout (pumping of mud/water when heavy vehicles cross the joint).
- Sealant Adhesion Test: Manually pull on the sealant every 3 years. If it releases from the concrete face cleanly, the chemical bond has failed and the joint requires routing and resealing.
- Debris Clearing: Annually flush all joints with high-pressure water to remove incompressible sand and gravel before the summer thermal expansion cycle begins.
- Hardness Verification: When selecting replacement sealants, verify the Shore A hardness. Exterior pavements require softer sealants (Shore A 15-25) to handle wide thermal movement, while interior industrial floors require harder polyureas (Shore A 40-50) to resist forklift tire pick-up and indentation.
By accurately diagnosing the specific joint type and applying material-science-backed repair protocols, facility managers and contractors can extend the operational lifespan of concrete slabs by decades, avoiding the massive capital expenditure of full-depth replacement.
Written by
Priya KapoorPriya Kapoor is a real estate market analyst and construction economics researcher with expertise in housing affordability, development feasibility, and infrastructure investment. She holds a Master of Regional Planning from Cornell University and previously worked as a senior analyst at CBRE's Investment Properties group, where she modeled returns for $4B in mixed-use development pipelines. Priya now runs an independent research practice advising developers, municipalities, and REITs on construction cost forecasting and market timing. She publishes the quarterly "BuildMat Market Pulse" report tracking material price indices across 12 commodity categories. Based in Austin, TX, Priya serves on the board of Habitat for Humanity Austin and is a marathon runner.
More from Priya Kapoor
View all
Construction Cost
Cost to Build a 1600 Sq Ft Home in 2026: Full Breakdown
Accurate 2026 cost to build a 1600 sq ft home—material, labor, and regional pricing breakdowns included. Plan your budget with real-time estimates.
Aug 11, 2026
Wood & Lumber
Name the Types of Wood for Pressure Treatment and Preservation
Learn how to name the types of wood best suited for pressure treatment. Compare species treatability, chemical retention levels, and 2026 preservation costs.
Aug 4, 2026

Stone & Masonry
Stone Veneer Suppliers Lindenhurst: 2026 Cost Analysis
Analyze 2026 stone veneer costs in Lindenhurst, NY. Compare local supplier pricing, delivery fees, and Suffolk County installation labor rates.
Aug 4, 2026