6 Types of Concrete Cracks Caused by Installation Errors
Learn how installation errors cause 6 types of concrete cracks. Expert specs for subgrade compaction, saw-cut timing, and finishing techniques.

The Anatomy of Installation-Induced Concrete Failures
Concrete is fundamentally designed to crack; tensile stresses inevitably exceed the material's low tensile strength, which is precisely why engineers specify control joints. However, uncontrolled, random, or structural cracking represents a failure in installation protocol. For contractors and site supervisors, understanding the specific types of concrete cracks from an installation perspective is the only way to diagnose root causes and implement preventative specifications. This guide maps six critical crack types directly to the installation phases that cause them, providing exact ASTM standards and field measurements to ensure slab integrity.
Phase 1: Subgrade Preparation & Differential Settlement Cracks
Differential settlement cracks are structural failures that manifest as wide, diagonal fissures spanning the entire depth of the slab. They occur when the underlying soil compresses unevenly beneath the concrete's weight. This is almost exclusively an installation and site-prep error, common in areas with expansive clays or improperly backfilled trenches.
Installation Specifications for Subgrade Stability
- Compaction Density: The subgrade must be compacted to a minimum of 95% Standard Proctor density (ASTM D698). Use a nuclear density gauge or drive-tube sampler to verify compaction before placing the vapor barrier.
- Base Material: Never pour directly on soft clay. Install a 4-to-6-inch base layer of well-graded, crushed aggregate (e.g., 3/4-inch minus gravel). This base must be mechanically compacted in 2-inch lifts to prevent post-pour consolidation.
- Moisture Uniformity: The subgrade must be uniformly damp, not saturated or bone-dry. A dry subgrade will rapidly wick moisture from the bottom of the slab, causing curling and subsequent corner cracks.
Phase 2: Placement & Plastic Shrinkage Cracks
Plastic shrinkage cracks appear as short, parallel, diagonal lines on the surface before the concrete's final set. They are caused by the rate of surface evaporation exceeding the rate of bleed water rising to the surface. According to the National Ready Mixed Concrete Association, this is the most common surface defect in flatwork, heavily influenced by wind, low humidity, and high ambient temperatures during the pour.
Adding water to the truck chute to improve workability is the leading cause of plastic shrinkage and long-term drying shrinkage. Every additional gallon of water per cubic yard reduces compressive strength by approximately 200 psi and drastically increases crack width. Limit slump to a maximum of 4.5 inches for flatwork. If higher workability is required, specify High-Range Water Reducers (HRWR) or polycarboxylate ether (PCE) superplasticizers at the batch plant.
Evaporation Control Protocols
Monitor the NRMCA evaporation nomograph on-site. If the calculated evaporation rate approaches or exceeds 0.2 lbs/sq ft/hr, deploy mitigation strategies immediately. Erect temporary windbreaks to reduce surface wind velocity, apply liquid evaporation retardants (e.g., MasterKure ERT 20) forming a monomolecular film, or use atomized water misting above the slab (never directly on the surface).
Phase 3: Finishing & Surface Craze Cracking
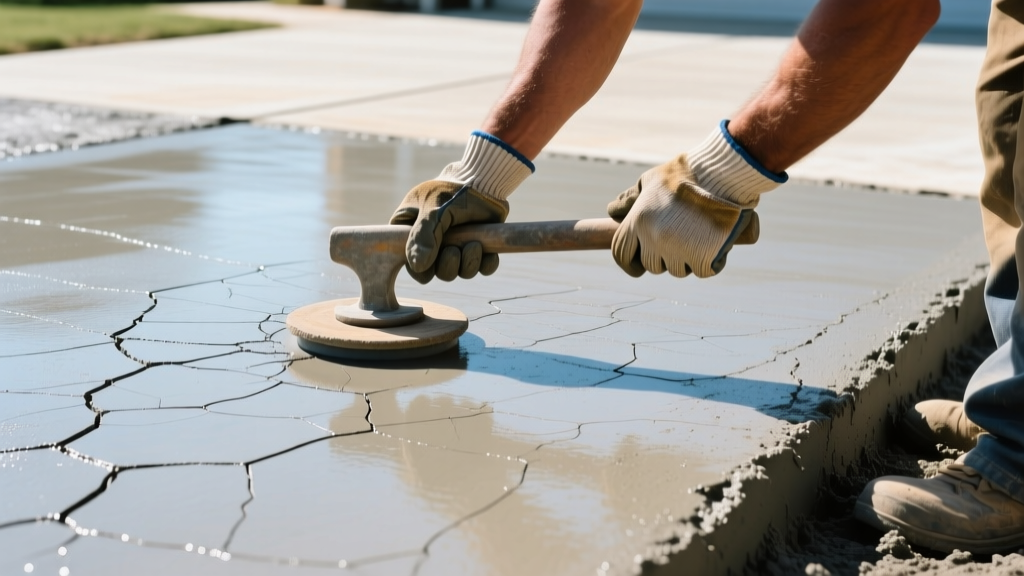
Craze cracking presents as a network of fine, shallow, hexagonal cracks resembling alligator skin. While rarely a structural threat, it severely compromises aesthetics and surface durability. This specific type of concrete crack is a direct result of improper finishing techniques—specifically, overworking the surface or trapping bleed water beneath a dense, troweled crust.
Finishing Rules to Prevent Crusting
- Never Add Dry Cement: Sprinkling dry cement or a cement-sand mix onto the surface to absorb bleed water creates a highly concentrated, high-shrinkage layer that will craze and scale within months.
- Respect the Bleed Cycle: Do not begin floating or troweling while bleed water (the sheen) is visible on the surface. Forcing water back into the matrix increases the water-cement ratio at the top 1/8 inch of the slab, guaranteeing surface shrinkage.
- Limit Hard Troweling: For exterior flatwork exposed to freeze-thaw cycles, avoid hard steel troweling. A broom or float finish is sufficient and preserves the necessary microscopic air-void system at the surface.
Phase 4: Jointing, Curing & Thermal Contraction Cracks
As concrete hydrates and cools, it undergoes thermal contraction and drying shrinkage. If control joints are improperly spaced, incorrectly depth-cut, or executed too late, the slab will relieve its internal tensile stress by cracking randomly. The Portland Cement Association emphasizes that jointing is the single most critical installation step for crack mitigation.
Precision Jointing Specifications
- Depth of Cut: Saw-cut control joints to exactly 25% (one-quarter) of the slab's total depth. For a standard 4-inch residential slab, the cut must be exactly 1 inch deep. Cuts that are too shallow will fail to induce cracking; cuts that are too deep compromise aggregate interlock and load transfer.
- Spacing Ratios: Joint spacing (in feet) should be 2 to 3 times the slab thickness (in inches). Therefore, a 4-inch slab requires joints spaced 8 to 12 feet apart. Never exceed a 15-foot joint spacing for standard 4-inch flatwork.
- Timing the Cut: Saw-cutting must occur within 4 to 12 hours of placement, depending on ambient temperature. Use the 'thumbprint test': if you can press a thumbprint 1/8 inch into the concrete without pulling up coarse aggregate, the slab is ready to cut. Cutting too early causes raveling; cutting too late allows uncontrolled thermal cracking.
Phase 5: Freeze-Thaw Exposure & D-Cracking
D-cracking (Deterioration cracking) manifests as a series of fine cracks parallel to joints and edges, eventually leading to spalling. This is caused by the installation of concrete containing porous, absorptive coarse aggregates (like certain limestones or cherts) that trap water, freeze, and expand. While partially a material selection issue, it is an installation failure if the contractor does not enforce strict air-entrainment and water-cement ratio limits on-site.
Mix Design Verification
For any exterior slab in a freeze-thaw climate, the installation crew must verify the batch ticket before the truck begins discharging. The mix must specify a maximum water-cement ratio of 0.45 and an air-entrainment content of 5% to 7% (per ASTM C260). These microscopic air bubbles provide expansion chambers for freezing water, preventing the internal hydraulic pressures that cause D-cracking and surface scaling.
Diagnostic Matrix: Types of Concrete Cracks and Installation Fixes
| Crack Type | Visual Signature | Primary Installation Error | Preventative Specification |
|---|---|---|---|
| Differential Settlement | Wide, diagonal, structural fissures | Pouring over uncompacted fill or soft clay pockets | 95% Standard Proctor density (ASTM D698); 4-inch compacted aggregate base |
| Plastic Shrinkage | Short, parallel diagonal surface lines | Allowing rapid evaporation; adding water at the chute | Max 4.5-inch slump; use evaporation retardants if rate >0.2 lbs/sq ft/hr |
| Craze Cracking | Fine, shallow hexagonal surface network | Troweling over bleed water; sprinkling dry cement | Wait for surface sheen to disappear before floating; use broom finish |
| Thermal Contraction | Random full-depth map cracking | Saw-cutting joints too late or at incorrect depth | Cut to 25% slab depth within 4-12 hours; spacing 24-36x slab thickness |
| D-Cracking | Parallel cracking near joints/edges with spalling | Failing to verify air-entrainment on batch ticket | Verify 5-7% air content (ASTM C260) and 0.45 max w/c ratio prior to pour |
| Curling / Corner Cracks | Upward deflection of slab edges with corner breaks | High moisture/temperature differential between top and bottom | Apply ASTM C309 curing compound immediately after finishing; maintain 7 days |
Summary of Best Practices for Crack Mitigation
Preventing the most destructive types of concrete cracks requires shifting the focus from reactive patching to proactive installation control. By enforcing strict subgrade compaction limits, refusing on-site water additions, respecting the bleed-water cycle during finishing, and executing precision saw-cutting within the critical 4-to-12-hour window, contractors can virtually eliminate uncontrolled cracking. Always reference the American Concrete Institute guidelines (specifically ACI 302.1R for concrete floor and slab construction) to ensure your field specifications align with current industry tolerances.
Written by
James ThorntonJames Thornton is a construction industry veteran with 25 years of hands-on experience in wood framing, lumber grading, and residential building codes. He started as a framing carpenter in rural Oregon, earned his ICC Residential Building Inspector certification, and eventually became a senior plan reviewer for the City of Portland Bureau of Development Services. James holds a B.S. in Wood Science & Technology from Oregon State University and is a certified lumber grader through the West Coast Lumber Inspection Bureau (WCLIB). He has inspected over 3,000 residential construction sites and authored the city's internal guide on advanced framing techniques (2x6 at 24" O.C.). James lives in Bend, OR, where he builds custom timber-frame cabins and competes in lumberjack sports.
More from James Thornton
View all
Insulation
Best Home Insulation Materials: Complete 2026 Guide
Compare top home insulation materials for 2026. Find R-values, installed costs per square foot, and best uses for fiberglass, spray foam, and mineral wool.
Aug 4, 2026

Sustainable Building
Certify Your Green Building Material for LEED and WELL
Step-by-step guide to certifying a green building material for LEED v5 and WELL v2. Master EPDs, HPDs, and VOC limits for 2026 project specifications.
Aug 4, 2026

Stone & Masonry
Veneer Stacked Stone Panels: Interior Design & Style Showcase
Discover how veneer stacked stone panels transform interiors. Explore modern design profiles, material pairings, and technical installation specs.
Aug 4, 2026