Roof Jack Maintenance: How to Inspect, Clean, and Replace Pipe Boots
Learn how to inspect, clean, and replace roof jack pipe boots. This maintenance playbook covers EPDM degradation, lead flashing upgrades, and sealing tips.
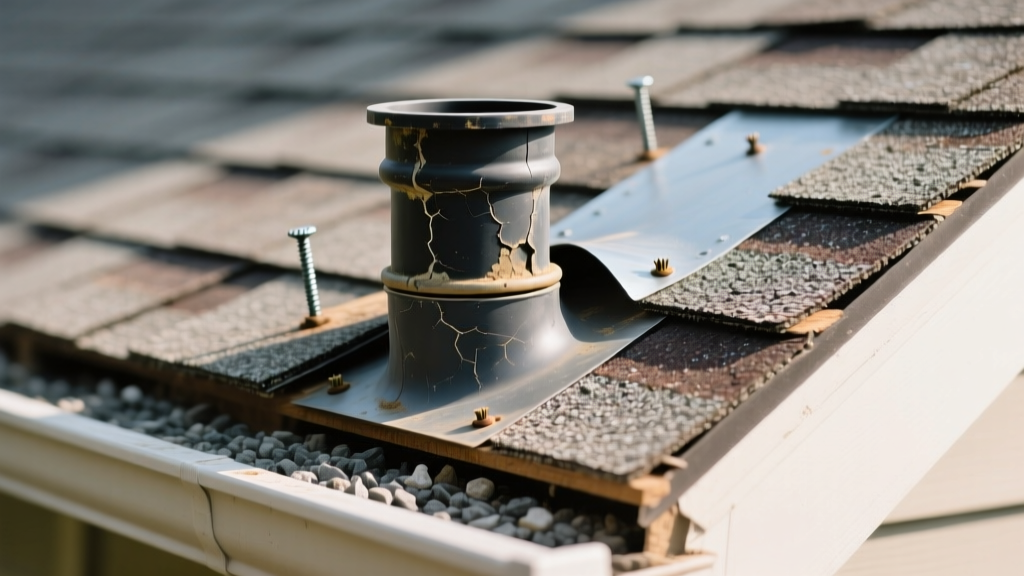
The Critical Role of the Roof Jack in Roof Integrity
The roof jack—commonly referred to as a pipe boot or plumbing vent flashing—is the primary waterproofing seal where your home's plumbing soil stack penetrates the roof deck. While asphalt shingles or metal panels are designed to shed water over broad planes, the roof jack must manage a complex intersection of vertical pipe movement, thermal expansion, and direct UV exposure. According to inspection data aggregated by the International Association of Certified Home Inspectors (InterNACHI), compromised pipe boots account for nearly 35% of all mid-roof leak claims, far outpacing general shingle failure.
Maintaining a roof jack requires understanding the specific material chemistry of the boot, the thermal dynamics of the underlying PVC or cast-iron pipe, and the correct chemical cleaners that will not accelerate rubber degradation. This playbook provides a forensic approach to inspecting, cleaning, and replacing roof jacks to ensure a watertight seal.
Anatomy and Material Failure Modes
Before executing maintenance, you must identify the specific roof jack material installed on your roof. Each material exhibits distinct failure modes based on environmental stressors.
| Material Type | Expected Lifespan | Primary Failure Mode | Best Application |
|---|---|---|---|
| EPDM Rubber (Black) | 7–12 Years | UV drying, ozone cracking at the collar base, squirrel chewing. | Standard residential asphalt shingle roofs with PVC pipes. |
| Neoprene Rubber | 5–8 Years | Rapid UV degradation, splitting along the collar seam. | Budget installations (not recommended for long-term maintenance). |
| Lead Flashing | 25–40+ Years | Physical tearing from heavy foot traffic, thermal fatigue at bends. | Cast-iron pipes, slate roofs, and high-end architectural shingles. |
| Aluminum/Metal Base | 20–30 Years | Galvanic corrosion if in contact with treated lumber or copper, rubber collar failure. | Commercial flat roofs or standing seam metal roofs. |
The Thermal Expansion Variable
A frequently overlooked failure mechanism is thermal pipe movement. A 1.5-inch to 3-inch PVC soil stack can expand and contract up to 1/8 inch per 10-degree Fahrenheit temperature swing. Over a year of seasonal shifts, this vertical shearing force breaks cheap asphalt cements and rigid silicone seals. High-quality EPDM collars, like the Oatey Master Flash series, are engineered with a ribbed interior that grips the pipe while flexing with this thermal movement.
Step-by-Step Roof Jack Cleaning Playbook
Debris, moss, and lichen accumulation around the roof jack flange trap moisture against the nail heads and accelerate rubber rot. However, aggressive cleaning methods will destroy the waterproofing seal.
- Debris Removal: Use a soft-bristle nylon brush to sweep away pine needles and leaves from the uphill side of the flange. Never use a metal putty knife or wire brush, which can score the EPDM collar or lift the asphalt shingle sealant strips.
- Moss Treatment: Apply a 50/50 solution of white vinegar and water, or a dedicated zinc-based roof wash (e.g., Spray & Forget). Allow it to dwell for 15 minutes to kill moss rhizomes.
- Low-Pressure Rinse: Rinse the area with a standard garden hose.
Critical Warning: Never use a pressure washer or chlorine bleach on a roof jack. High PSI will force water under the shingle flange, and chlorine bleach rapidly extracts the plasticizers from EPDM rubber, causing it to turn brittle and crack within months.
- Collar Inspection: Once dry, run your thumb around the interior rim where the rubber meets the PVC pipe. Look for micro-fissures or a chalky residue, which indicates advanced UV oxidation.
Repair vs. Replace: The Decision Matrix
When you discover a compromised roof jack, the repair strategy depends on the exact location and severity of the failure. Use this framework to determine the correct intervention.
Scenario A: Minor Collar Cracking (Flange is Intact)
Diagnosis: The rubber collar has small surface cracks near the top, but the base flange is fully sealed under the shingles, and no nails have backed out.
Action: Install a secondary 'rain cap' or overlay boot. Products like the Oatey 14000 series rain collar slide directly over the existing pipe and rest on top of the old boot. Seal the top edge of the new rain collar with a high-grade tripolymer sealant like Geocel 2300 or OSI Quad Max. Do not use standard silicone, which lacks adhesion to asphalt granules.
Scenario B: Flange Leaks or Nail Back-Out
Diagnosis: Water is entering at the base, shingles are damp underneath, or the roofing nails securing the flange have popped up due to deck swelling.
Action: Full replacement is mandatory. Overlay boots will not fix a compromised base flange. You must carefully remove the surrounding shingles, extract the old jack, install a new EPDM or lead flashing unit, and integrate it into the shingle courses using neoprene-washer roofing screws rather than standard smooth-shank roofing nails.
Fastener and Flange Forensics
The National Roofing Contractors Association (NRCA) emphasizes that the majority of flashing failures originate at the fastener points. Standard 1.25-inch galvanized roofing nails rely on friction to stay in the OSB or plywood deck. Over time, wind uplift and wood expansion cause these nails to back out, breaking the asphalt seal.
When replacing a roof jack, upgrade the fastening system. Use 1.5-inch or 2-inch exterior-grade wood screws equipped with neoprene sealing washers (often sold as metal-to-wood roofing screws). Drive them through the pre-punched holes in the roof jack flange. The neoprene washer compresses to form a secondary mechanical gasket, completely eliminating the risk of capillary water draw through the fastener hole.
The Upgrade Path: Transitioning to Lead Flashing
For homeowners tired of replacing EPDM pipe boots every decade, upgrading to a lead roof jack during a full replacement is a high-ROI maintenance strategy. Lead flashing features a base that integrates under the shingles, but instead of a pre-formed rubber collar, it features a flat lead sheet with a center hole.
During installation, the roofer places the lead sheet over the pipe, then uses a specialized forming tool or a wooden block to hammer and fold the lead down tightly around the PVC or cast-iron pipe, creating a custom, friction-fit seal. Because lead does not suffer from UV degradation or ozone cracking, a properly formed lead roof jack will easily outlast a 30-year architectural shingle system.
Cost and Procurement Breakdown
- Standard EPDM Pipe Boot (1.5' to 3' pipe): $15 – $28 per unit. Requires replacement every 7-12 years.
- Lead Pipe Boot Flashing: $45 – $85 per unit. Expected lifespan of 30+ years.
- Professional Replacement Labor: $175 – $275 per jack, factoring in safe roof access, shingle removal, and reintegration.
- Premium Sealants (Geocel 2300 / Lexel): $9 – $14 per tube. Always keep a tube in your maintenance kit for emergency collar sealing.
Proactive roof jack maintenance prevents minor rubber degradation from escalating into catastrophic roof deck rot. By utilizing the correct cleaning agents, understanding thermal pipe dynamics, and upgrading fasteners and materials during replacement, you can effectively eliminate the most common source of mid-roof water intrusion.