Complete Interior Basement Waterproofing Installation Procedures
Master interior basement waterproofing installation with our step-by-step guide covering perimeter drainage, sump pumps, and crystalline coatings.
Pre-Installation Diagnostics and Moisture Mapping
Successful interior basement waterproofing begins with quantifying the hydrostatic pressure and moisture vapor transmission rate (MVTR) of the existing foundation. Before breaking concrete, conduct a comprehensive moisture map using a pinless moisture meter, such as the Tramex ME5, scanning the lower 24 inches of the foundation walls. Readings above 70% relative humidity or visible efflorescence (white, powdery salt deposits) indicate active capillary water migration.
Deploy a thermal imaging camera (e.g., FLIR E8-XT) to identify thermal bridges and hidden water trails behind finished drywall. Cold spots along the floor-to-wall joint (the cove joint) typically signify active hydrostatic seepage. According to Building Science Corporation, managing bulk water at the cove joint is the primary objective of any interior drainage system, as this is where 85% of basement leaks originate due to the cold joint formed during the original concrete pour.
Perimeter Drainage Trenching: The Core of Interior Systems
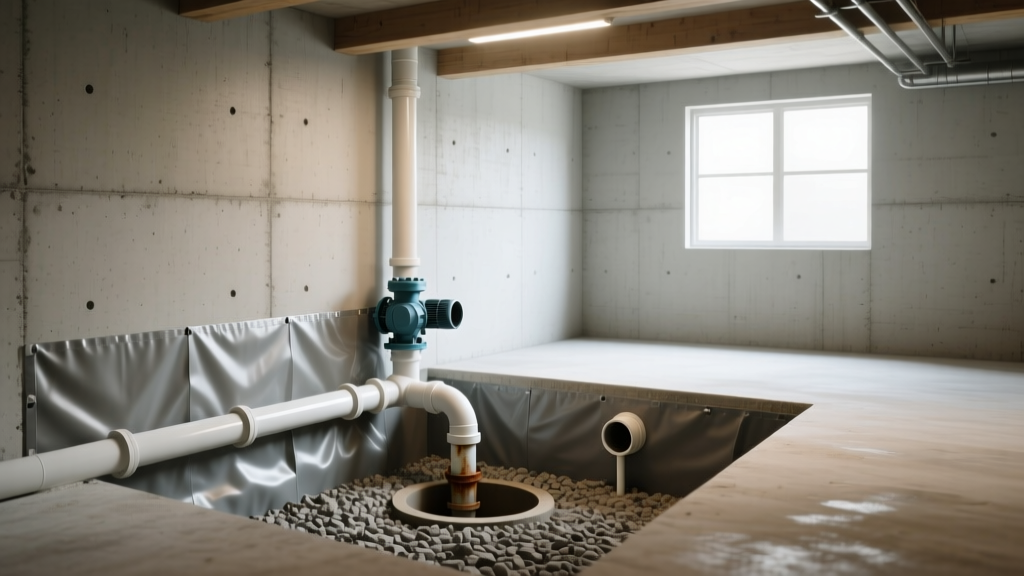
The interior French drain is the mechanical heart of the system. It intercepts water before it breaches the living space and routes it to a sump basin.
Step 1: Concrete Demolition and Trench Profiling
Mark a chalk line exactly 12 inches from the foundation wall. Using an electric demolition hammer with a 2-inch flat chisel bit, break the concrete slab to a depth of 12 inches. Crucially, you must excavate an additional 3 to 4 inches of soil below the bottom of the concrete footing to create a water reservoir channel. Use a HEPA-filtered wet/dry vacuum simultaneously to capture silica dust, complying with OSHA respirable crystalline silica standards.
Step 2: Drainage Pipe and Gravel Bedding
Avoid standard black corrugated flex pipe, which collapses under slab loads and traps silt in its ridges. Instead, install rigid, perforated PVC pipe (Schedule 40, 4-inch diameter) or specialized hollow-core drainage channels like the WaterGuard system.
- Bedding: Lay a 2-inch base of washed, 3/4-inch clear crushed stone (no fines).
- Pitch: Maintain a strict slope of 1/8 inch per linear foot toward the sump basin using a laser level.
- Wrapping: If using slotted PVC, wrap the pipe in a non-woven geotextile filter fabric (minimum 4 oz/sq yd) to prevent soil infiltration.
Step 3: Sump Pit Excavation and Pump Configuration
Excavate the sump pit at the lowest elevation point of the trench, typically 24 inches deep and 18 inches in diameter. Install a rigid polyethylene sump liner with pre-punched inlet holes. For the pump, select a 1/2 HP cast-iron submersible model with a mechanical vertical float switch (e.g., Zoeller M98 or Wayne CDU980E). Tethered floats frequently jam against the pit wall in narrow 18-inch basins. Install a swing-type check valve on the discharge line to prevent water hammer and backflow, sealing all joints with PVC primer and cement.
Wall Preparation and Crystalline Waterproofing Application
While interior drains manage bulk liquid water, the walls must be treated to stop moisture vapor and capillary seepage. Standard waterproofing paints (like acrylic or elastomeric coatings) will blister and peel under hydrostatic pressure. Instead, use a crystalline capillary waterproofing system, such as Xypex Concentrate or RadonSeal Deep-Penetrating Sealer.
- Surface Profiling: Remove all existing paint, drywall, and efflorescence using a wire wheel and a mild acid etch (1 part muriatic acid to 4 parts water). Neutralize the surface with a baking soda solution and rinse thoroughly. The concrete must be bare and porous.
- Pre-Soaking: Saturate the concrete walls with clean water until it reaches a 'saturated surface-dry' (SSD) state. Crystalline chemicals require water to activate and migrate into the concrete matrix.
- Application: Mix the crystalline powder with water to a thick, pancake-batter consistency. Apply using a stiff masonry brush at a rate of 1.25 to 1.5 lbs per 100 square feet. Focus heavily on the cove joint and any visible tie holes or cracks.
- Curing: Mist the walls with water twice daily for 48 hours to ensure the crystalline growth fully penetrates up to 4 inches deep, permanently sealing the capillaries.
Vapor Barrier and Wall Capping Integration
To protect finished framing from residual moisture and soil gases, install a dimpled high-density polyethylene (HDPE) drainage mat or a 20-mil polyethylene vapor barrier over the treated walls. As noted in the EPA Moisture Control guidelines, creating an unbroken air and vapor barrier is critical for preventing mold growth in below-grade assemblies. Seal the top and bottom edges of the vapor barrier to the concrete using acoustical sealant. If the home is in a high-radon zone, integrate the interior perimeter drain with a sub-slab depressurization system, sealing all slab penetrations to allow the sump pit to act as a collection point for soil gases.
Material and Labor Cost Breakdown
The following table outlines current market rates for professional interior basement waterproofing installation. Costs vary based on regional labor rates and site accessibility.
| System Component | Material Cost | Installed Cost (Labor + Materials) | Unit of Measure |
|---|---|---|---|
| Interior French Drain (Rigid PVC) | $15 - $25 | $60 - $110 | Per Linear Foot |
| Specialized Drainage Channel (e.g., WaterGuard) | $35 - $50 | $90 - $150 | Per Linear Foot |
| Sump Pump System (1/2 HP + Battery Backup) | $600 - $900 | $1,200 - $1,800 | Per System |
| Crystalline Wall Coating | $1.50 - $2.50 | $3.50 - $6.00 | Per Square Foot |
| 20-Mil Poly Vapor Barrier | $0.40 - $0.80 | $1.50 - $3.00 | Per Square Foot |
Warning: Common Failure Modes to Avoid
- The 'Bathtub' Effect: Installing an interior drain without a sump pump or with an undersized pump will simply fill the trench, raising the water table under the slab and causing upward hydrostatic pressure that can crack the floor.
- Clogged Discharge Lines: Routing the sump discharge into a municipal sewer or storm drain is illegal in most jurisdictions and risks severe backflow during heavy rain events. Always discharge to the exterior grade, minimum 10 feet from the foundation, with a positive slope and a buried pop-up emitter.
- Ignoring Exterior Grading: Interior systems manage water that has already reached the foundation. If the exterior grade slopes toward the house or downspouts dump at the foundation, the interior pump will run continuously, leading to premature motor burnout. Always correct exterior grading first.
System Testing and Final Commissioning
Before pouring new concrete over the trench or installing subflooring, conduct a 24-hour flood test. Manually fill the perimeter trench and sump pit with a garden hose until the float switch triggers the pump. Verify that the pump evacuates the pit within 30 to 45 seconds and that the check valve holds without audible backflow. Inspect the exterior discharge point to ensure high-velocity flow without pooling. Once verified, backfill the trench with 3/4-inch clear stone up to 2 inches below the slab surface, lay a 6-mil poly slip sheet over the stone, and pour a 5,000 PSI concrete patch mix to restore the slab. This commissioning process guarantees the system operates under load before it is concealed beneath finished flooring.