DIY Insulated Outdoor Cat House: Winter Build Guide
Learn how to build a highly efficient insulated outdoor cat house using XPS rigid foam and spray foam to protect feral cats in freezing weather.
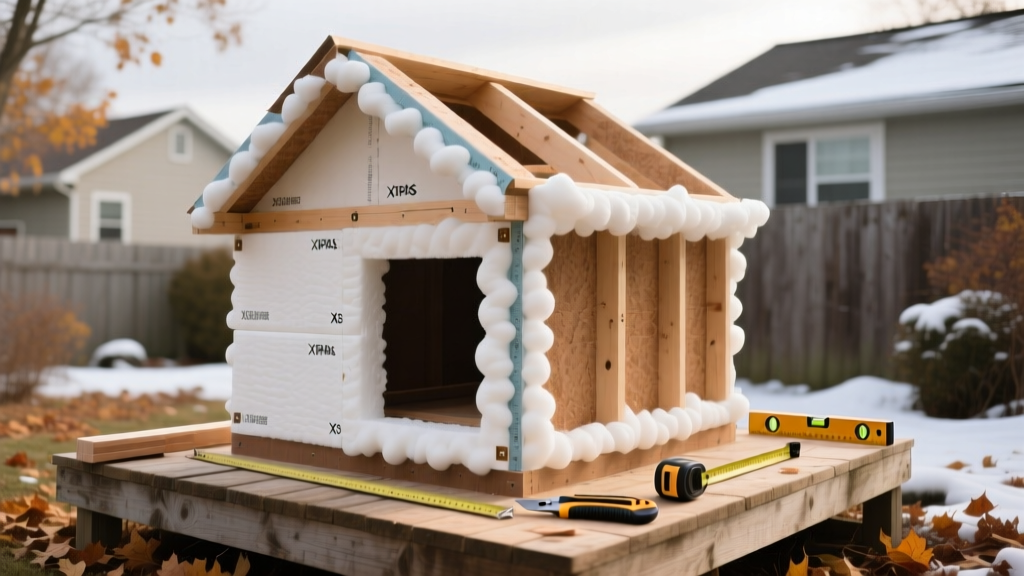
The Thermodynamics of Feline Micro-Shelters
Constructing an effective insulated outdoor cat house requires applying commercial building science to a micro-scale environment. An average adult cat generates roughly 15 to 20 watts of metabolic heat at rest. In a standard 2x2x2-foot shelter, this translates to approximately 3.5 to 4.5 BTUs per hour. To maintain a survivable interior temperature of 40°F when exterior temperatures drop to 0°F (a Delta T of 40), the enclosure’s thermal envelope must minimize conductive and convective heat loss. According to the Alley Cat Allies, standard plastic bins or uninsulated wooden boxes fail catastrophically in sub-freezing conditions because they lack both adequate R-value and air sealing. This guide details the professional installation of rigid foam and closed-cell spray foam to create a high-performance thermal barrier for outdoor felines.
Material Selection Matrix: Insulation Performance in Extreme Cold
Not all insulation materials perform equally in freezing temperatures. Selecting the wrong material can lead to thermal drift, moisture retention, and structural failure. Below is a comparison of common insulation materials evaluated specifically for micro-shelter applications.
| Material | nominal R-Value / Inch | Cold Weather Performance | Moisture Resistance | Verdict for Cat Shelters |
|---|---|---|---|---|
| XPS (Extruded Polystyrene) | R-5.0 | Excellent; maintains R-value below 0°F | High (Closed-cell) | Best Choice for walls and floors |
| Polyiso (Polyisocyanurate) | R-6.5 | Poor; suffers thermal drift below 50°F | Moderate (Foil-faced) | Avoid for exterior winter shelters |
| EPS (Expanded Polystyrene) | R-3.8 to R-4.4 | Good; stable in cold | Low (Permeable) | Acceptable if fully encapsulated |
| Fiberglass Batts | R-3.1 to R-3.4 | Poor; loses R-value when damp | Very Low | Never use; high condensation risk |
| Closed-Cell Spray Foam | R-6.0 to R-7.0 | Excellent; acts as vapor barrier | Very High | Best for air sealing joints and gaps |
Building Science Insight: Polyisocyanurate (Polyiso) foam is blown with gases that condense at low temperatures, causing the insulation to lose up to 20% of its R-value in freezing weather. Always specify XPS (such as Owens Corning FOAMULAR) for the primary thermal layer in unheated outdoor structures, as recommended by the U.S. Department of Energy for below-grade and extreme-cold applications.
Step-by-Step Construction and Insulation Procedure
This procedure outlines a framed wooden shelter measuring 24” x 24” x 24” (interior dimensions). This size is critical: a shelter that is too large will not trap the cat's body heat, while one that is too small restricts movement and bedding depth.
Step 1: Framing and Floor Insulation
Ground conduction is the primary source of heat loss in outdoor shelters. Do not place the shelter directly on bare soil or concrete without a thermal break.
- Construct the Base: Build a floor frame using pressure-treated 2x2 lumber. (2x2s are used instead of 2x4s to maximize interior volume while providing enough depth for insulation).
- Install Floor Insulation: Cut 2-inch thick XPS rigid foam board to fit snugly between the floor joists. The friction fit should be tight enough to hold the foam in place without adhesives.
- Subfloor Installation: Secure a 3/4-inch exterior-grade plywood subfloor over the joists and foam using 2-inch exterior deck screws. Seal the perimeter seam between the plywood and the joists with a bead of silicone caulk to prevent ground moisture intrusion.
- Elevate the Structure: Attach four 3-inch rubber or composite furniture feet to the bottom corners to elevate the shelter 3 inches off the ground, preventing capillary moisture wicking and snow drift blockage.
Step 2: Wall Framing and Primary Thermal Barrier
- Erect the Walls: Frame four walls using 2x2 studs spaced 12 inches on center. Sheathe the exterior with 1/2-inch CDX plywood or T1-11 siding.
- Friction-Fit XPS Foam: Cut 1.5-inch XPS foam boards to fit precisely between the wall studs. Use a straight edge and a utility knife with a fresh blade to ensure clean, square cuts. Gaps as small as 1/8-inch can reduce the effective R-value of the wall assembly by 15% due to convective looping.
- Continuous Interior Insulation: To eliminate thermal bridging through the 2x2 wood studs, install a continuous layer of 1/2-inch XPS foam over the interior face of the studs before installing the interior wall paneling.
Step 3: Air Sealing with Closed-Cell Spray Foam
Insulation without air sealing is ineffective. The Humane Society notes that drafts are a leading cause of hypothermia in outdoor pets. Use a low-expansion closed-cell spray foam (such as Great Stuff Pro Window & Door) to seal all interior seams.
WARNING: Do not use standard high-expansion gap-filling spray foam (like Great Stuff Big Gap Filler) inside the wall cavities or around the door frame. High-expansion foams generate immense curing pressure and will bow the thin interior paneling or warp the door jamb, preventing the weather flap from closing properly.
- Apply a continuous 1/4-inch bead of low-expansion foam along all interior corners where the walls meet the floor and ceiling.
- Seal the perimeter of the entrance hole thoroughly.
- Allow the foam to cure for 8 hours, then trim any excess flush with a serrated insulation knife.
Step 4: Installing the Radiant and Vapor Barrier
Cats exhale significant moisture vapor during sleep. In a tightly sealed micro-shelter, this vapor will condense on the cold interior walls if a vapor barrier is not installed on the warm side (the interior). Furthermore, reflecting radiant body heat back toward the animal drastically improves thermal comfort.
- Staple a layer of heavy-duty Mylar emergency blanket material (or specialized reflective foil-faced bubble insulation) directly over the interior XPS foam.
- Ensure the reflective side faces the interior living space.
- Tape all Mylar seams with foil-faced HVAC tape (not standard duct tape, which degrades in cold and humidity) to create a monolithic vapor retarder.
- Install 1/4-inch Lauan or PVC interior wall panels over the Mylar to protect it from claw damage.
Step 5: Roof Assembly and Weatherproofing
The roof must be sloped at a minimum 2:12 pitch to shed snow and rain. Frame the roof using 2x2s, insulate with 2-inch XPS foam, and sheathe with 1/2-inch plywood. Apply a self-adhering EPDM rubber roofing membrane or asphalt shingles over the plywood. Ensure the roof overhangs the entrance side by at least 4 inches to prevent wind-driven rain from entering the doorway.
Entryway Engineering and Bedding Selection
The entrance is the weakest link in the thermal envelope. Cut the entrance hole to exactly 6.5 inches in diameter—large enough for an adult cat, but small enough to deter larger predators like coyotes or raccoons. Offset the hole to one side of the wall rather than centering it; this creates a windbreak corner inside the shelter where the cat can sleep out of the direct draft line.
Weather Flap Installation
Install a heavy-duty clear vinyl flap (minimum 20-mil thickness) over the exterior of the hole. Secure it with a wooden batten strip and exterior screws. The flap must be weighted at the bottom with a small aluminum flat bar to ensure it swings shut immediately after the cat enters, even in 20 mph winds.
The Bedding Imperative: Straw vs. Hay vs. Blankets
Never use blankets, towels, or hay inside an outdoor shelter. Blankets absorb ambient moisture and body sweat, eventually freezing into a solid, heat-sapping block. Hay is hollow but highly absorbent; it will quickly mold and rot in the humid micro-climate of a cat shelter. Only use long-grain straw. Straw is water-resistant, hollow, and traps dead air spaces, providing an additional R-2 to R-3 of insulation beneath the animal. Pack the floor with 4 to 6 inches of dry straw, and plan to replace it entirely every 60 days during the winter season.
Common Installation Mistakes That Compromise R-Value
- Compressing the Insulation: Jamming fiberglass or foam into a cavity that is too small compresses the material, destroying the trapped air pockets and drastically lowering the R-value.
- Ignoring the Floor: Insulating the walls and roof while leaving the floor uninsulated will result in a 40% to 50% heat loss rate due to direct conduction into the frozen earth.
- Using Interior Latex Paint as a Vapor Barrier: Standard latex paint has a high perm rating and will not stop moisture vapor. You must use a physical barrier like Mylar or a specialized vapor-retarding primer.
- Oversizing the Shelter: Building a 4x4 foot shelter for a single cat. The cat's 20-watt metabolic output cannot heat a space that large without a supplemental heat source. Keep the interior volume strictly to 8 cubic feet.
Maintenance and Seasonal Re-application
An insulated outdoor cat house is not a 'build and forget' structure. Inspect the vinyl weather flap monthly for micro-tears or stiffness caused by extreme cold; replace it if it fails to swing freely. Check the exterior XPS foam (if any is exposed) for UV degradation or rodent chewing. By applying rigorous building envelope principles—continuous insulation, meticulous air sealing, and proper vapor management—you create a life-saving thermal refuge capable of withstanding the harshest winter conditions.