Ashlar Stone Veneer: The Complete Installation & Cost Guide
Master ashlar stone veneer with our complete guide. Explore natural vs. manufactured options, precise installation specs, and 2026 cost breakdowns.

What Defines True Ashlar Stone Veneer?
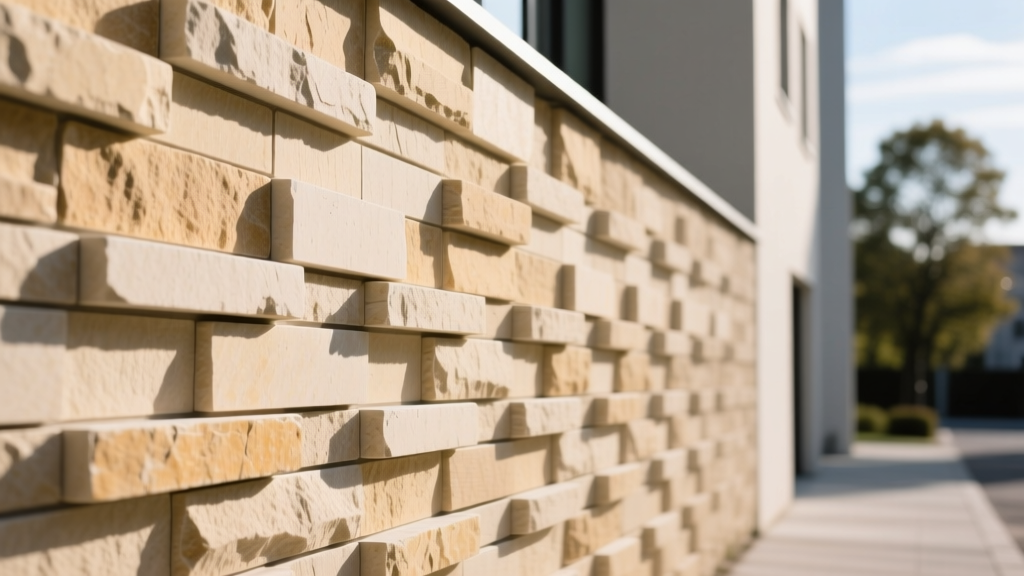
Ashlar stone veneer represents the intersection of classical masonry aesthetics and modern non-structural cladding. Unlike ledgestone or fieldstone, which rely on irregular, organic shapes, ashlar masonry consists of finely dressed, precision-cut stones with flat faces and square edges. When applied as a veneer, these stones are adhered to a structural backing rather than acting as a load-bearing wall. The hallmark of true ashlar is its strict geometric discipline: stones are laid in distinct horizontal courses, creating clean, continuous shadow lines that emphasize the architectural geometry of a structure.
According to the ASTM C1670 Standard Specification for Adhered Manufactured Stone Masonry Veneer, manufactured ashlar must meet strict compressive strength, absorption, and freeze-thaw durability criteria. Natural ashlar veneer, typically quarried from limestone, sandstone, or granite, is governed by ASTM C616 and C503 standards. The defining technical constraint of any adhered veneer is its weight and thickness; natural ashlar veneer is generally sliced to 3/4-inch to 1.5-inch thicknesses, while manufactured concrete ashlar ranges from 0.5 to 1.25 inches, keeping the total dead load under 15 pounds per square foot (psf) to prevent structural overloading.
Natural vs. Manufactured Ashlar: Material Matrix
Choosing between quarried natural stone and architectural manufactured stone veneer (MSV) dictates your budget, lead time, and structural preparation. Natural stone offers unparalleled geological variation and longevity, while manufactured ashlar provides uniform dimensions, integrated color oxides, and lighter weight.
| Material Property | Natural Ashlar (Limestone/Sandstone) | Manufactured Ashlar (MSV) |
|---|---|---|
| Average Weight | 10 - 15 lbs / sq ft | 6 - 9 lbs / sq ft |
| Standard Thickness | 0.75" - 1.5" | 0.5" - 1.25" |
| Compressive Strength | 4,000 - 12,000 psi (varies by quarry) | 2,800 - 4,500 psi (ASTM C1670 compliant) |
| Color Consistency | High variation; requires blending from multiple pallets | Batch-controlled; consistent with integral oxides |
| Material Cost (2026) | $18.00 - $35.00 / sq ft | $8.00 - $14.00 / sq ft |
| Lead Time | 4 - 12 weeks (quarry dependent) | 1 - 3 weeks (regional distributors) |
Structural Preparation & Substrate Requirements
Adhered ashlar stone veneer cannot be applied directly to drywall, painted surfaces, or uninsulated plywood. The substrate must be rigid, moisture-managed, and capable of supporting the sheer and tensile loads of the mortar and stone. The Whole Building Design Guide (WBDG) emphasizes that moisture management behind adhered veneers is the primary determinant of system longevity.
Mandatory Clearances and Flashing
- Above Grade: Maintain a minimum 4-inch clearance between the bottom of the veneer and finished soil grade to prevent capillary moisture uptake and soil-borne alkali efflorescence.
- Above Paved Surfaces: Maintain a 2-inch clearance above concrete patios, driveways, or walkways.
- Above Roofs: Maintain a 2-inch clearance above asphalt shingles or metal roofing, integrating step-flashing behind the weather-resistive barrier (WRB).
- Weep Screeds: Install a corrosion-resistant weep screed (minimum 0.019-inch galvanized steel or PVC) at the base of all walls. The weep holes must remain unobstructed to allow incidental moisture to drain from behind the lath.
Lath and Scratch Coat Specifications
For exterior applications over wood or steel framing, apply a minimum two layers of Grade D building paper or a continuous fluid-applied WRB. Over this, attach self-furring, corrosion-resistant diamond mesh lath (minimum 2.5 lbs per square yard) using 1.5-inch galvanized roofing nails or staples, spaced no more than 6 inches apart on center. Ensure the lath overlaps horizontal joints by 1 inch and vertical joints by 2 inches. Apply a 1/2-inch thick scratch coat of Type S mortar, scoring it horizontally with a coarse rake to create a mechanical key for the setting bed.
Step-by-Step Installation Protocol
The precision of ashlar demands a disciplined installation sequence. Unlike random rubble, ashlar courses must remain perfectly level, requiring continuous string lines and laser transit verification.
- Mortar Preparation: Mix Type S mortar (1 part Portland cement, 1/2 part hydrated lime, 4.5 parts washed masonry sand) to a stiff, workable consistency. For manufactured ashlar, use a polymer-modified veneer mortar to enhance flexural bond strength. Do not retemper mortar that has begun to initial set (typically 90 minutes after mixing).
- Dry Layout: Before buttering any stone, dry-lay a 10-foot horizontal section on the ground. Blend stones from a minimum of three different pallets to distribute color and texture variations evenly. For natural ashlar, use a masonry saw with a continuous rim diamond blade to trim end pieces, ensuring cut edges are placed face-up or hidden in corners.
- Buttering and Setting: Apply a 1/2-inch to 5/8-inch layer of mortar to the back of the stone (back-buttering) and a 1/4-inch layer to the scratch coat. Press the stone firmly into place, wiggling it slightly to squeeze out excess mortar and ensure full contact. Never "spot butter" or leave voids behind the stone, as these trap moisture and cause freeze-thaw spalling.
- Course Alignment: Maintain strict horizontal courses. If using a random ashlar pattern (varying stone heights), ensure the top and bottom edges of the course align perfectly with the adjacent stones. Use wooden shims or specialized plastic spacers to maintain consistent 1/2-inch joints while the mortar cures.
- Joint Tooling: Once the mortar has become thumbprint-hard (usually 30 to 45 minutes), tool the joints using a convex jointer or a V-joint tool. Concave joints are highly recommended for exterior ashlar veneer as they compress the mortar against the stone edges, creating a superior weather seal. Brush off excess mortar immediately with a dry, stiff-bristle masonry brush; never use acid washes on fresh mortar.
Design Applications & Joint Profiles
The visual impact of ashlar stone veneer is heavily dictated by the bond pattern and joint profile. Because the stones are rectilinear, the layout must be intentional.
Bond Patterns
- Running Bond: The most common and structurally forgiving pattern. Vertical head joints are staggered, typically offset by half the stone's length. This pattern naturally bridges minor substrate movements and minimizes the risk of continuous vertical cracking.
- Stack Bond: Stones are aligned perfectly both horizontally and vertically, creating a modern, grid-like aesthetic. This pattern is highly susceptible to step-cracking along the continuous vertical joints. If stack bond is specified, control joints filled with elastomeric sealant must be integrated every 12 to 15 linear feet.
- Random Ashlar: Utilizes stones of varying heights but maintains continuous horizontal bed joints. This requires careful planning to ensure vertical head joints do not align across different courses.
Joint Profiles
For exterior applications, concave or weathered joints are mandatory. These profiles shed water away from the horizontal bed joint and compress the mortar, increasing density. Flush or raked joints expose the edge of the stone, creating deep shadow lines that are highly desirable for interior feature walls or protected porticos, but they create a water shelf on the horizontal bed joint and should be strictly avoided in exposed exterior environments.
Cost Analysis & Budgeting Framework
Budgeting for ashlar stone veneer requires accounting for hidden preparation costs. The precision cutting of ashlar reduces on-site waste compared to irregular stone, but the labor intensity of maintaining perfect courses increases mason hourly requirements.
| Cost Category | Natural Ashlar Veneer | Manufactured Ashlar Veneer |
|---|---|---|
| Material (Stone & Mortar) | $19.50 - $36.00 / sq ft | $9.00 - $15.50 / sq ft |
| Substrate Prep (WRB, Lath, Screed) | $2.50 - $4.00 / sq ft | $2.50 - $4.00 / sq ft |
| Labor (Experienced Masonry Crew) | $22.00 - $35.00 / sq ft | $14.00 - $24.00 / sq ft |
| Scaffolding & Equipment | $1.50 - $3.00 / sq ft | $1.50 - $3.00 / sq ft |
| Total Installed Cost | $45.50 - $78.00 / sq ft | $27.00 - $46.50 / sq ft |
Common Failure Modes & Troubleshooting
Even with premium materials, adhered ashlar veneer is susceptible to specific pathologies if moisture dynamics are misunderstood. The National Park Service Preservation Brief 16 highlights that treating veneers as solid mass masonry rather than drained cavity systems is the root cause of most modern failures.
Efflorescence
Symptom: White, powdery salt deposits on the stone face or within the mortar joints. Cause: Water migrating through the substrate dissolves soluble alkali salts in the Portland cement or the natural stone itself, depositing them on the surface as the water evaporates. Fix: Ensure the WRB and weep screed system is functioning. For mild cases, dry-brush the deposits. For severe cases, apply a diluted proprietary efflorescence cleaner (never use raw muriatic acid on limestone or sandstone ashlar, as it will etch the calcium carbonate). Apply a breathable, silane-siloxane penetrating sealer only after the wall has fully dried and the efflorescence source is halted.
Spalling and Freeze-Thaw Damage
Symptom: The face of the stone or mortar joint flakes, chips, or pops off in thin layers. Cause: Moisture becomes trapped behind a non-breathable film-forming sealer (like acrylic or polyurethane). When temperatures drop, the trapped water freezes, expands by 9%, and blows off the face of the material. Fix: Strip the film-forming sealer using a chemical masonry stripper. Replace spalled stones. If replacing natural ashlar, ensure the new stones are matched not just in color, but in porosity and density to the existing field.
Delamination
Symptom: Entire sections of stone and mortar pull away from the scratch coat or lath. Cause: Failure to dampen the scratch coat before applying the setting bed, causing the dry substrate to suck moisture out of the setting mortar before hydration is complete. Alternatively, installing over a painted or sealed substrate without mechanical scarification. Fix: Remove all delaminated sections. Inspect the lath for corrosion. Re-apply scratch coat, mist it with water until damp (not saturated) immediately before buttering and setting the replacement ashlar stones.
Maintenance and Long-Term Durability
Ashlar stone veneer is fundamentally a low-maintenance cladding system when detailed correctly. Annual inspections should focus on the integrity of the elastomeric sealants at window and door perimeters, as well as the condition of the roof flashings above the veneer. Mortar joints in harsh coastal or freeze-thaw environments may require repointing every 25 to 40 years. When repointing, always rake out the old mortar to a depth of twice the joint width, and use a repointing mortar that is slightly softer and more permeable than the original setting bed to ensure that any future masonry movement cracks the sacrificial mortar joint rather than the ashlar stone itself.
Written by
Marcus ChenMarcus Chen is a licensed structural engineer (PE) and building materials analyst with over 12 years of experience across residential, commercial, and industrial construction. He holds a Master of Science in Civil Engineering from UC Berkeley and spent six years at Thornton Tomasetti before transitioning to independent consulting and technical writing. Marcus specializes in material selection for seismic-prone regions, concrete reinforcement strategies, and lifecycle cost analysis. His work has been cited by the American Concrete Institute (ACI) and the Structural Engineers Association of California (SEAOC). When he is not on a job site or at his desk, you will find him hiking the Sierra Nevada or restoring a 1920s craftsman bungalow in Oakland, CA.
More from Marcus Chen
View all
Construction Cost
How Much Did the Eiffel Tower Cost to Build?
How much did the Eiffel Tower cost to build in 1889? We adjust for inflation and compare its budget to modern skyscraper construction.
Aug 4, 2026

Fire Resistance
What Is a Fire Resistant Material? Testing & Certification Guide
Discover what is a fire resistant material through ASTM and UL testing. Learn how fire ratings, certifications, and assemblies work in construction.
Aug 4, 2026

Construction Cost
How Much Did the Burj Khalifa Cost to Build?
How much did the Burj Khalifa cost to build? We break down the $1.5B project and extract 5 money-saving strategies for your next build.
Jul 30, 2026