How to Install a Fireplace with Stone Veneer: Expert DIY Guide
Learn how to install a fireplace with stone veneer using mortar-set techniques. Includes framing, backer board, lath, and mortar application steps.

The Hidden Foundation: Substrate and Framing Requirements
Building a fireplace with stone veneer requires a substrate capable of supporting immense shear loads. Manufactured and natural stone veneers weigh between 10 and 15 pounds per square foot. Standard 1/2-inch drywall or water-resistant green board will fail under this weight, leading to catastrophic delamination. You must strip the existing drywall around the fireplace chase down to the studs and install a rigid, cementitious backer board.
Upgrading to Cement Backer Board
Use 1/2-inch cement backer board, such as USG Durock Next Gen or James Hardie HardieBacker 500. Fasten the boards to the wood or metal studs using corrosion-resistant cement board screws spaced every 8 inches along the edges and 12 inches in the field. Leave a 1/8-inch gap between panels and fill these joints with alkali-resistant fiberglass mesh tape embedded in a thin layer of polymer-modified thin-set mortar. This creates a monolithic, moisture-resistant shell that will not degrade when exposed to the moisture in your scratch coat and setting mortar.
Before installing any substrate, verify your firebox clearances. According to the NFPA 211 Standard for Chimneys and Fireplaces, combustible materials (including wood framing and certain backer boards) must maintain a minimum 12-inch clearance from the interior sides and back of a masonry firebox, and a 2-inch clearance from the front face. Always consult your specific zero-clearance fireplace manufacturer's manual, as engineered fireboxes have strictly mandated non-combustible zones that supersede general codes.
Weather-Resistant Barriers and Metal Lath
Moisture management is the most overlooked phase of veneer installation. Mortar is highly alkaline and retains water during the curing process. If applied directly to a substrate without a barrier, moisture will migrate behind the stone, causing wood studs to rot or steel studs to corrode.
- Apply the Vapor Barrier: Staple two layers of Grade D asphalt felt paper or a code-approved weather-resistive barrier (WRB) over the cement board. Overlap horizontal seams by 2 inches and vertical seams by 6 inches, shingling them so water sheds downward.
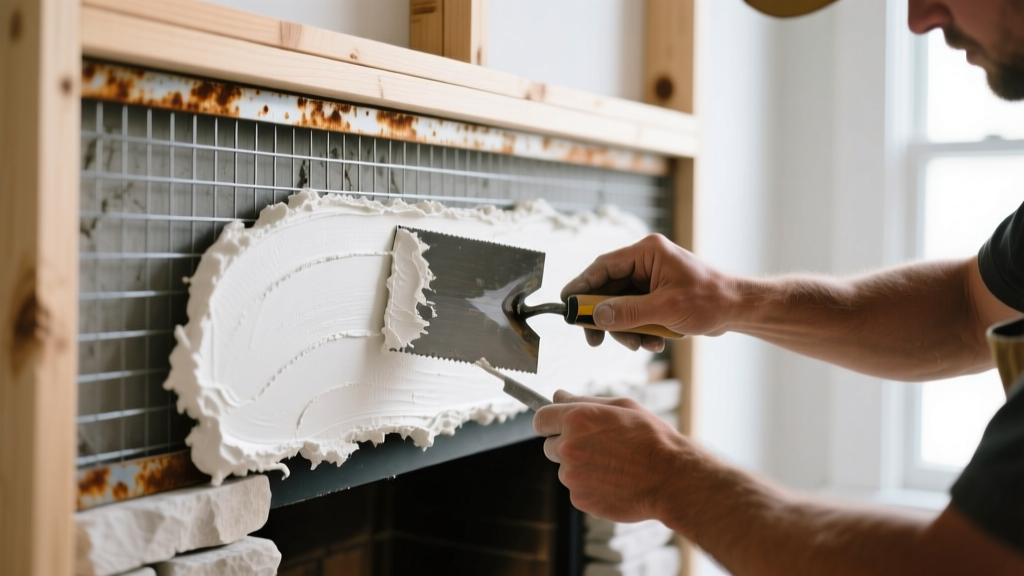
- Install Self-Furring Lath: Use 2.5 lb self-furring galvanized metal lath (meeting ASTM C847). The "self-furring" dimples hold the mesh 1/4-inch away from the wall, allowing the scratch coat mortar to wrap completely behind the wire. Attach the lath horizontally with galvanized roofing nails or staples driven into the studs every 6 inches.
- Overlap Protocol: Overlap lath seams by 1 inch on vertical joints and 2 inches on horizontal joints. Wrap the lath around all outside and inside corners by at least 4 inches to prevent corner cracking.
The Scratch Coat: Creating a Mechanical Bond
The scratch coat is a 3/4-inch layer of mortar applied over the metal lath. It encapsulates the wire and provides a scored, textured surface for the final stone adhesive to grip. Use a high-quality Type S masonry mortar or a specifically formulated veneer stone mortar (such as QUIKRETE Veneer Stone Mortar), which offers higher bond strength and flexibility than standard brick mortar.
Mixing and Slaking: Mix the mortar to a consistency similar to peanut butter. Once mixed, let it "slake" (rest) for 10 minutes. This allows the polymers and cement to fully hydrate. Remix briefly without adding any additional water. Adding water after slaking breaks the chemical bond and weakens the final cure.
Apply the mortar using a flat trowel, forcing it through the lath mesh to eliminate air pockets. Once the coat is roughly 3/4-inch thick, use a notched trowel or a scratch rake to score horizontal grooves 1/8-inch deep across the entire surface. Allow the scratch coat to cure for 24 to 48 hours, misting it lightly with water if the ambient temperature exceeds 80°F to prevent rapid drying and shrinkage cracks.
Material Yield and Cost Breakdown (2026 Estimates)
Accurate material estimation prevents project delays. The table below outlines the standard coverage rates and average material costs for a mortar-set fireplace with stone veneer project, based on 2026 national retail pricing.
| Material Component | Coverage / Yield | Avg. Cost (2026) | Pro-Tip for Fireplaces |
|---|---|---|---|
| 1/2" Cement Backer Board | 32 sq ft per sheet | $14.00 - $18.00 / sheet | Score and snap; do not use drywall saws. |
| 2.5 lb Galvanized Lath | 8 sq ft per linear yard | $12.00 - $16.00 / sheet | Ensure dimples face outward toward you. |
| Type S Veneer Mortar (80lb bag) | Scratch coat: ~25 sq ft | $9.50 - $13.00 / bag | Use a polymer-modified blend for vertical shear. |
| Manufactured Stone Veneer | Sold by the sq ft (flat) or linear ft (corners) | $11.00 - $22.00 / sq ft | Order 10% overage for cuts and breakage. |
Laying the Stone Veneer: The Buttering Method
Installing a fireplace with stone veneer requires a methodical approach to ensure structural integrity and visual randomness. Never stack stones in repetitive, uniform patterns.
- Dry Layout: Arrange the stones on the floor in front of the fireplace. Mix stones from at least three different pallets to blend color variations and sizes. Pre-select your corner pieces and arrange them in alternating long/short return patterns.
- Install Corners First: Corners dictate the sightlines. Apply a 1/2-inch layer of mortar to the back of the corner stone (buttering) and press it firmly into the scratch coat with a slight twisting motion until mortar squeezes out the sides. Use a level to ensure the corner returns are perfectly plumb.
- Work Upward from the Base: Install the flat stones starting from the hearth or mantel line and work your way up. Maintain a 1/2-inch mortar joint for traditional profiles, or push stones tight together for a dry-stack ledge stone appearance.
- Cut Stones to Fit: Use a 4-inch angle grinder equipped with a continuous-rim diamond blade to cut stones for tight fits around the firebox mantel or electrical outlets. Always cut from the back of the stone to prevent chipping the visible face.
Heavy stones, particularly large fieldstones or thick slate profiles, will slide down the wall before the mortar sets. To counteract this, use a brad nailer to shoot a 1-inch galvanized finish nail into the scratch coat just beneath the bottom edge of the heavy stone. The nail acts as a temporary shelf, bearing the vertical load until the mortar achieves its initial set (usually 45 to 60 minutes). Remove or countersink the nails before grouting.
Grouting, Cleaning, and Sealing
Once all stones are set and the mortar has firmed up (typically 2 to 4 hours depending on humidity), it is time to strike the joints. Load a canvas mortar bag with a slightly wetter batch of Type S mortar or a specialized sanded grout. Fill the joints completely, then use a concave jointing tool or a stiff bristle brush to compact and texture the mortar.
Cleaning: Do not use a wire brush to clean mortar smears off the stone face; wire bristles will embed in the mortar joints and rust, and they will scratch manufactured stone pigments. Instead, wait for the smears to dry completely, then knock them off with a stiff nylon brush and a specialized masonry cleaner. For natural stone, ensure the cleaner is pH-neutral to avoid etching calcium-based stones like limestone or marble.
Sealing the Installation
While not strictly required for interior applications, applying a breathable, silane-siloxane penetrating sealer protects the fireplace from soot stains, heat-induced dust accumulation, and accidental spills. Avoid film-forming acrylic sealers, which will yellow over time when exposed to the UV radiation from nearby windows or the ambient heat of the firebox.
Troubleshooting Common Installation Failures
- Efflorescence (White Powdery Residue): This occurs when water-soluble salts migrate to the surface of the stone or mortar. It is usually caused by trapping moisture behind the veneer during installation or applying stones to a damp scratch coat. Remove it using a diluted solution of white vinegar and water, or a commercial efflorescence remover, followed by a thorough rinse.
- Hollow Sounding Stones: Tap the installed stones with the plastic handle of your trowel. A dull thud indicates a solid bond; a sharp, hollow click means the mortar failed to adhere to the back of the stone. This is almost always caused by failing to butter the back of the stone adequately or applying stones to a dusty, unprimed scratch coat. Hollow stones must be pried off and reset.
- Mortar Shrinkage Cracks: Fine, spider-web cracks in the joints indicate the mortar was mixed too wet or dried too quickly. Prevent this by strictly following the manufacturer's water-to-mix ratio and misting the joints with water during the first 24 hours of curing in low-humidity environments.
For advanced techniques on integrating stone veneer with specific zero-clearance gas firebox inserts, consult the masonry installation guidelines published by For Construction Pros, which detail the thermal expansion gaps required between the stone facing and the metal firebox chassis.
Written by
Priya KapoorPriya Kapoor is a real estate market analyst and construction economics researcher with expertise in housing affordability, development feasibility, and infrastructure investment. She holds a Master of Regional Planning from Cornell University and previously worked as a senior analyst at CBRE's Investment Properties group, where she modeled returns for $4B in mixed-use development pipelines. Priya now runs an independent research practice advising developers, municipalities, and REITs on construction cost forecasting and market timing. She publishes the quarterly "BuildMat Market Pulse" report tracking material price indices across 12 commodity categories. Based in Austin, TX, Priya serves on the board of Habitat for Humanity Austin and is a marathon runner.
More from Priya Kapoor
View all
Construction Cost
Cost to Build a 1600 Sq Ft Home in 2026: Full Breakdown
Accurate 2026 cost to build a 1600 sq ft home—material, labor, and regional pricing breakdowns included. Plan your budget with real-time estimates.
Aug 11, 2026

Wood & Lumber
Name the Types of Wood for Pressure Treatment and Preservation
Learn how to name the types of wood best suited for pressure treatment. Compare species treatability, chemical retention levels, and 2026 preservation costs.
Aug 4, 2026

Stone & Masonry
Stone Veneer Suppliers Lindenhurst: 2026 Cost Analysis
Analyze 2026 stone veneer costs in Lindenhurst, NY. Compare local supplier pricing, delivery fees, and Suffolk County installation labor rates.
Aug 4, 2026