Weep Screed for Stone Veneer: Types, Specs, and Installation Guide
Master weep screed for stone veneer installation. Compare PVC vs. metal types, review ASTM C1063 specs, and prevent moisture failure with expert tips.

The Critical Role of Reservoir Cladding Drainage
Exterior stone veneer is classified as a reservoir cladding system. Unlike vinyl or metal siding, natural and manufactured stone absorbs significant quantities of wind-driven rain. When the sun hits the damp masonry, solar vapor drive forces that moisture inward toward the sheathing and framing. Without a continuous drained air cavity and a dedicated exit point at the base of the wall, this trapped moisture leads to catastrophic wood rot, mold proliferation, and masonry spalling. The weep screed is the foundational component that manages this hydrostatic pressure, providing a capillary break and a drainage pathway to evacuate water from the wall assembly.
The Anatomy of a Weep Screed
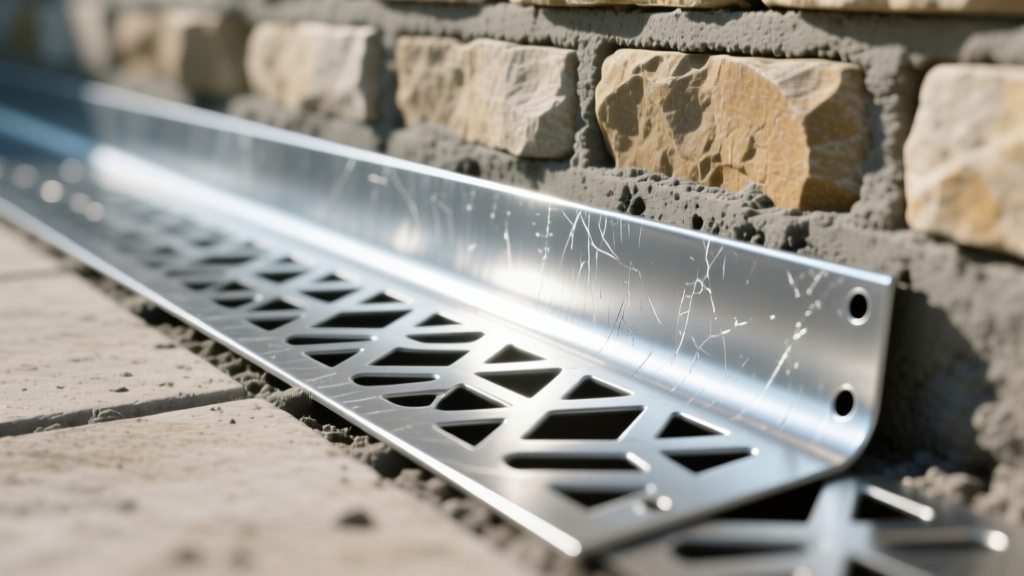
A properly engineered weep screed consists of four distinct functional zones. Understanding these zones is essential for selecting the right profile for your specific stone veneer application.
- Attachment Flange (Nailing Fin): Typically 3.5 to 4 inches tall, this flange secures the screed to the structural framing and overlaps the water-resistive barrier (WRB). It must be long enough to maintain a minimum 2-inch shingle-lap over the WRB below.
- The V-Bend (Slope): The angled transition that directs water outward and away from the sheathing. This slope is critical for preventing water from pooling against the structural base.
- Weep Holes or Continuous Slots: Stamped circular holes or continuous corrugated slots that allow water to exit while permitting air to enter the cavity, facilitating convective drying.
- Drip Edge (Leg): The vertical or slightly angled bottom lip that forces water droplets to detach and fall clear of the foundation, preventing capillary wicking back into the wall assembly.
Material Comparison Matrix
Selecting the correct weep screed material depends on your environmental conditions, budget, and the specific mortar mix being used. Below is a comparative analysis of the three primary materials available on the market in 2026.
| Material | Thickness / Gauge | Avg. Cost (per LF) | Corrosion Risk | Best Application Scenario |
|---|---|---|---|---|
| Galvanized Steel | 26-gauge (0.0179") | $2.10 - $3.40 | Moderate (if scratched) | Standard residential exteriors, commercial masonry, high-impact zones. |
| PVC / Extruded Plastic | 0.040" - 0.060" wall | $1.40 - $2.20 | None (immune to rust) | Coastal environments, high-humidity regions, DIY installations. |
| Aluminum | 0.019" - 0.024" | $2.50 - $3.80 | High (with alkaline mortar) | Stucco transitions, interior applications, or where non-magnetic properties are required. |
Code Requirements and ASTM Standards
Compliance with building codes is non-negotiable for moisture management. The installation of weep screeds for stone veneer is governed by strict parameters outlined in the International Residential Code (IRC) Chapter 7 and industry standards.
Clearance Mandates (IRC R703.7.4.1)
To prevent ground moisture from wicking into the screed and to keep soil and mulch from blocking the weep holes, the IRC mandates specific minimum clearances:
- 4 Inches (102 mm) minimum clearance above exposed earth or grade.
- 2 Inches (51 mm) minimum clearance above concrete steps, patios, driveways, or other paved surfaces.
ASTM C1063 Compliance
While ASTM C1063 primarily addresses lathing and furring for Portland cement plaster, its principles are universally adopted by the stone veneer industry for base coat integration. The standard requires that the weep screed flange extend a minimum of 3.5 inches vertically and that weep holes be spaced no more than 33 inches on center if using stamped hole profiles, though continuous corrugated weep slots are heavily preferred by building scientists for superior drainage capacity.
Step-by-Step Installation Protocol
Proper integration with the water-resistive barrier (WRB) is where most failures occur. Follow this sequence to ensure a watertight base.
- Prepare the WRB: Ensure your weather barrier (e.g., Tyvek CommercialWrap or a fluid-applied membrane) extends down to the foundation sill plate. Do not cut it flush at the bottom.
- Position the Screed: Measure exactly 4 inches up from the final grade line (or 2 inches from concrete). Snap a level chalk line across the entire wall elevation.
- Fasten to Framing: Secure the weep screed using 1-inch to 1.5-inch galvanized roofing nails or wide-crown staples. Fasteners must penetrate the structural framing (studs) by at least 3/4 inch. Space fasteners every 6 to 8 inches along the flange.
- Shingle-Lap the WRB: Fold the excess WRB hanging below the chalk line down over the attachment flange of the weep screed. Tape the top edge of the WRB to the flange using approved flashing tape to create a continuous drainage plane.
- Install Wire Lath: Drape your self-furring metal lath over the weep screed flange, ensuring it extends past the V-bend. The lath must never touch the sheathing; the self-furring dimples maintain the crucial 1/4-inch air cavity.
- Apply the Scratch Coat: Trowel the mortar scratch coat so it terminates cleanly at the V-bend. Do not pack mortar into the weep holes or over the drip edge.
Troubleshooting Moisture Failures
When a weep screed is omitted, improperly flashed, or blocked, the wall assembly will exhibit distinct pathological symptoms. Recognizing these early can save tens of thousands of dollars in structural remediation.
Efflorescence and Spalling
If you observe heavy white, powdery salt deposits (efflorescence) concentrated at the bottom 12 inches of the stone veneer, it indicates that water is pooling at the base rather than draining. In freeze-thaw climates, this trapped water expands, causing the face of the manufactured or natural stone to crack and pop off (spalling).
Interior Drywall Staining and Rot
Water that cannot exit through the weep screed will eventually saturate the OSB or plywood sheathing. Capillary action will draw this water upward into the wall cavity, manifesting as brown water stains on interior baseboards or drywall. By the time interior stains appear, the bottom plates of the wall framing are often heavily compromised by fungal wood rot, requiring full wall teardown.
2026 Cost Breakdown for Material and Labor
Budgeting for weep screed installation requires looking beyond the raw material cost. Because it is a critical flashing component, labor precision is paramount. Below is an estimated cost breakdown for a standard 2,000 sq. ft. single-story residential footprint, requiring approximately 160 linear feet of base flashing.
| Cost Component | Unit Rate | Total (160 LF Project) |
|---|---|---|
| PVC Weep Screed Material | $1.80 / LF | $288.00 |
| Galvanized Fasteners & Flashing Tape | $0.60 / LF | $96.00 |
| Specialized Masonry Labor (Flashing Integration) | $4.50 / LF | $720.00 |
| Total Estimated Base Flashing Cost | $6.90 / LF | $1,104.00 |
While $1,100 may seem like a distinct line item, it represents less than 3% of the total installed cost of a premium stone veneer project. Value-engineering this component out of the assembly, or hiring inexperienced labor to rush the WRB integration, risks the entire structural integrity of the building envelope. For comprehensive masonry veneer drainage principles and long-term durability strategies, refer to the Brick Industry Association Technical Notes, which outline the universal physics of cavity drainage that apply equally to natural and manufactured stone systems.
Written by
Elena RodriguezElena Rodriguez is a civil engineer and technical writer specializing in concrete technology, masonry systems, and ASTM/ACI compliance. She earned her B.S. in Civil Engineering from Texas A&M University and spent a decade at a materials testing laboratory, performing over 2,000 concrete compressive strength tests and masonry prism evaluations. Elena is an ACI-certified Field Testing Technician (Grade I) and a member of ASTM Committee C12 on Natural Building Stone. She currently consults on forensic engineering cases involving concrete failures and moisture intrusion. Based in San Antonio, TX, Elena is a proud member of the Society of Women Engineers (SWE) and coaches her daughter's FIRST Robotics team.
More from Elena Rodriguez
View all
Walls & Panels
Cost Analysis: Light Gauge Steel Framing Advantages and Disadvantages
Evaluate light gauge steel framing advantages and disadvantages through a strict cost analysis lens, comparing material, labor, and lifecycle expenses.
Aug 4, 2026

Walls & Panels
Gypsum Board Types: Exact Specifications, Thickness & Dimensions
Compare standard, Type X, and moisture-resistant gypsum board types. Get exact specifications, thicknesses, dimensions, and ASTM standards for your project.
Aug 4, 2026

Fire Resistance
Best Fire-Resistant Outdoor Decking Materials: 2026 Buyer Guide
Discover the best fire-resistant outdoor decking materials for 2026. Compare Class A PVC, aluminum, and hardwood options for WUI compliance and safety.
Aug 4, 2026