Snow Guards for Metal Roofs: Taxonomy, Selection, and Load Engineering
Master the taxonomy of snow guards for metal roofs. Compare pad, pipe, and rail systems, attachment methods, and load engineering to prevent roof avalanches.
The Physics of Snow Shedding and the "Zipper Effect"
Metal roofing systems, particularly standing seam and corrugated profiles, possess exceptionally low coefficients of friction. When ambient temperatures rise slightly above freezing, or when solar radiation hits the dark metal surface, the boundary layer of snow melts. This creates a hydroplaning effect, causing the entire snowpack to release simultaneously in a massive, destructive sheet. This phenomenon, known as a roof avalanche, can sheer off gutters, crush HVAC equipment, and pose lethal hazards to pedestrians below.
The primary engineering objective of snow guards for metal roofs is not to hold the snow indefinitely, but to interrupt the sliding plane and force the snow to melt and shed as water, or to release in small, manageable increments. When designing a retention system, structural engineers must account for the "zipper effect." If a single mechanically fastened snow guard is overloaded and pulls out of the roof deck, the immense kinetic load transfers instantly to the adjacent guards, causing a cascading failure up the roof slope. Preventing this requires rigorous adherence to ASCE 7-22 sliding snow load calculations and precise fastener placement.
Taxonomy of Snow Retention Systems
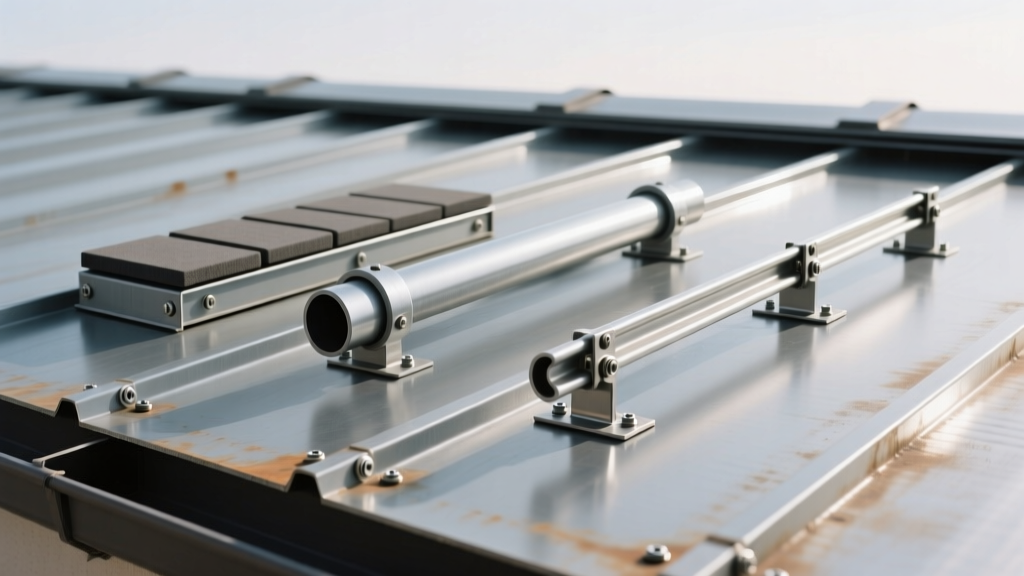
Selecting the correct profile is the first step in material taxonomy. The industry categorizes snow guards into three primary families based on their load-bearing mechanics and visual profile.
1. Pad-Style Cleats (Dispersed Retention)
Pad-style guards are small, individual cleats typically made from UV-stabilized polycarbonate or stamped aluminum. They are installed in a staggered, multi-row grid pattern across the lower half of the roof.
- Best Application: Residential standing seam, metal shingles, and light commercial buildings with ground snow loads under 40 psf.
- Material Reality: Polycarbonate pads (e.g., SnoBlox-Snojax) are cost-effective and blend into the roof, but they are susceptible to long-term UV degradation if the proprietary UV cap is compromised. Cast aluminum pads offer a 50-year lifespan matching the metal roof but cost 3x to 4x more per unit.
- Spacing Metric: Typically spaced 12 to 24 inches apart laterally, with rows staggered every 18 to 36 inches vertically, depending on the roof pitch.
2. Tubular Pipe Systems (Continuous Retention)
Pipe systems utilize 1-inch to 1.5-inch extruded aluminum or galvanized steel pipes held parallel to the eave by heavy-duty brackets. They are available in 2-pipe and 3-pipe configurations.
- Best Application: Steep-slope commercial metal roofs, agricultural buildings, and areas with extreme snow loads (60+ psf).
- Load Mechanics: The continuous pipe distributes the sliding snow load evenly across all brackets, virtually eliminating the zipper effect. A 3-pipe system is required when the rafter length exceeds 40 feet or the roof pitch exceeds 6:12 in heavy snow zones.
- Thermal Expansion: Aluminum pipes expand and contract significantly. Installers must use slip joints or expansion couplers every 40 to 50 feet to prevent the pipes from buckling or pulling the brackets out of the seam during thermal cycling.
3. Snow Rails and Fences (Architectural & Extreme Load)
Snow rails are heavy-gauge, angular aluminum or steel extrusions that mount directly to the roof. Snow fences feature vertical pickets mounted above a horizontal rail.
- Best Application: High-end architectural metal roofs, historic restorations, and extreme alpine environments.
- Aesthetic vs. Function: Rails provide a clean, modern sightline that architects prefer over tubular pipes. Fences physically break up the snowpack, allowing larger chunks to pass through safely, which reduces the total static load on the brackets compared to a solid rail that holds 100% of the snow.
Attachment Methodologies: The Weakest Link
The failure of a snow retention system rarely originates from the guard itself; it originates from the attachment. The taxonomy of attachment methods dictates the longevity and warranty compliance of the metal roof.
Many contractors attempt to glue polycarbonate pad-style guards to the flat pan of metal roofs using chemical adhesives (like SureBond SB-190) to avoid piercing the roof. This is a catastrophic error for most modern metal roofs. The coefficient of thermal expansion for steel and aluminum is vastly different from polycarbonate and cured urethane adhesives. Over 12 to 18 months of seasonal thermal cycling (freezing nights to hot days), the adhesive bond shears. Furthermore, attaching snow guards to the flat pan ignores the structural framing. Always prioritize mechanical attachment to the structural rib or seam, or use engineered clamp-on systems.
Mechanically Fastened (Screw-Down)
Screws must penetrate through the metal panel, through any rigid insulation, and bite at least 1 inch into the structural steel purlin or wood framing below. This requires using self-drilling TEK screws with oversized EPDM sealing washers. This method is mandatory for through-fastened roofs (like R-Panel or Corrugated) and is common for residential standing seam applications where clamp-on hardware is cost-prohibitive.
Clamp-On (Standing Seam Only)
For standing seam metal roofs, clamp-on technology is the industry gold standard. Manufacturers like S-5! engineer specific clamps (e.g., the S-5! N for nail strip profiles, S-5! S for snap-lock, and S-5! E for mechanical seam) that utilize stainless steel cup-tipped set screws. These screws dimple the seam without piercing it, preserving the roof's weathertight integrity and manufacturer warranty. The clamps are tested to withstand thousands of pounds of tensile pull-out force.
Selection Matrix: Matching the Guard to the Roof Profile
Use the following decision matrix to align the roof profile with the optimal snow guard taxonomy and attachment method.
| Roof Profile | Optimal Guard Type | Attachment Method | Critical Constraint |
|---|---|---|---|
| Standing Seam (Snap-Lock) | Pipe System or Pad Cleats | Clamp-On (Set Screw) | Never screw through the seam; voids warranty. |
| Standing Seam (Mechanical) | Pipe System or Snow Rail | Clamp-On (S-5! E or equivalent) | Requires specialized torque wrenches for set screws. |
| Corrugated / R-Panel | Pad Cleats or 2-Pipe | Mechanical (Screw to Purlin) | Must mount on the high rib, never the flat pan. |
| Metal Shingles / Tile | Pad Cleats (Polycarbonate) | Mechanical (Under-shingle mount) | Requires lifting adjacent shingles; high labor cost. |
| Batten / Shake Profile | Snow Rails | Mechanical (Through-batten to deck) | Load must transfer to the batten, not just the deck. |
Engineering the Layout: Spacing and ASCE 7-22 Loads
Snow guard layout is not an aesthetic choice; it is a structural calculation governed by the American Society of Civil Engineers (ASCE) 7-22 standard. The total sliding snow load is calculated based on the ground snow load ($p_g$), the roof slope, the thermal factor ($C_t$), and the length of the rafter from the ridge to the eave.
- Determine the Sliding Load: For a slippery metal roof, the sliding load per foot of eave is calculated by multiplying the sloped roof snow load by the rafter length (from ridge to guard). If a roof has a 30-foot rafter length and a sloped snow load of 20 psf, the total sliding load hitting the snow guard line is 600 lbs per linear foot of eave.
- Establish the Bearing Line: Snow guards must be installed in a straight line directly above the structural bearing wall or beam. If placed too high up the roof (e.g., halfway up a 40-foot rafter), the snow accumulating below the guards will overhang the eave, creating a massive cantilevered ice dam that can collapse the roof edge.
- Calculate Bracket Spacing: If your pipe system brackets are rated for 1,500 lbs of pull-out force, and your calculated sliding load is 600 lbs/ft, you must space the brackets no further than 2.5 feet apart (1500 / 600 = 2.5). Industry best practice dictates applying a 2.0 safety factor, reducing that spacing to 1.25 feet.
Real-World Installation Gotchas and Edge Cases
Even with perfect material selection, field conditions introduce variables that cause system failures. Address these edge cases during the design phase:
The Dormer and Valley Avalanche
Standard snow guard layouts protect the main eave, but upper roof sections that shed onto lower roof valleys or dormers create concentrated "snow drifts." These localized areas can experience loads 300% higher than the main roof. You must install localized, heavy-duty pipe systems or dense pad clusters directly above valleys and lower roof intersections to catch the secondary avalanche.
Thermal Bridging and Ice Damming
On unvented metal roofs or buildings with high interior heat loss (like heated warehouses), the bottom of the snowpack melts continuously. If the snow guards hold this wet, heavy slush at the eave where the roof overhangs an unheated soffit, the water will refreeze at night. This creates massive ice dams behind the snow guards, forcing water back up under the metal panel laps. In heated buildings, extend the snow retention system further up the roof slope to keep the snowpack off the cold eave overhang entirely.
Galvanic Corrosion in Coastal Environments
When installing aluminum snow guards or pipes on a steel roof (or vice versa) in high-humidity or coastal environments, direct contact will trigger rapid galvanic corrosion. Always use dielectric separators, such as PVC or EPDM pads, between dissimilar metals, and ensure all fasteners are 304 or 316 stainless steel. Never use standard zinc-plated screws with aluminum pipe brackets.
For further technical bulletins on metal roof accessories and load testing, consult the Metal Roofing Alliance resource library to verify regional code requirements before finalizing your snow retention layout.