Flowable Fill vs Concrete: Trench Backfill Installation Guide
Compare flowable fill vs concrete for trench backfill. Learn installation steps, curing times, material costs, and when to use CLSM over compacted soil.

Defining the Materials: CLSM vs. Standard Concrete
When backfilling utility trenches, abandoning old pipelines, or stabilizing retaining wall bases, contractors must choose between traditional compacted fill, standard structural concrete, and Controlled Low-Strength Material (CLSM), commonly known as flowable fill. Understanding the rheology and structural limitations of each is critical for a successful installation.
Standard concrete is engineered for high compressive strength (typically 3,000 to 5,000+ psi) and structural load-bearing. It requires mechanical vibration to consolidate and eliminate voids. Flowable fill, governed by ACI Committee 229 standards, is a self-consolidating, highly flowable cementitious slurry. It is intentionally designed to achieve low compressive strengths—usually between 50 and 200 psi at 28 days—allowing for future excavation with standard hand tools while providing superior soil stabilization and eliminating the need for mechanical compaction.
Application Decision Framework
- Choose Flowable Fill (CLSM) when: Backfilling deep, narrow utility trenches where mechanical tampers cannot reach; filling abandoned storm drains or culverts; working in wet trenches where dewatering is cost-prohibitive; or requiring a guaranteed 95%+ Proctor density without soil testing.
- Choose Standard Concrete when: The application requires structural load transfer (e.g., bridge abutments, footing pads, heavy traffic aprons); or when a high-abrasion surface is required.
- Choose Compacted Aggregate/Soil when: The trench is wide, shallow, and easily accessible to vibratory rollers or plate compactors, and future excavation is highly unlikely.
Mix Designs and 2026 Material Economics
The mix design for flowable fill relies heavily on high volumes of fly ash or slag to maintain workability and retard setting times, drastically reducing the Portland cement content compared to structural concrete. Below is a comparative breakdown of typical mix proportions and current regional pricing.
| Material Property | Excavatable Flowable Fill (CLSM) | Standard 3,000 PSI Concrete |
|---|---|---|
| Portland Cement (per cu yd) | 40 - 90 lbs | 450 - 500 lbs |
| Fly Ash / SCMs (per cu yd) | 200 - 350 lbs | 0 - 100 lbs |
| Water-to-Cementitious Ratio | High (Fluid slurry, 8-12 inch slump) | Low (0.40 - 0.50, 4-5 inch slump) |
| 28-Day Compressive Strength | 50 - 200 psi | 3,000 - 4,000+ psi |
| 2026 Delivered Material Cost | $95 - $135 / cubic yard | $135 - $165 / cubic yard |
| Installation Labor & Equipment | Low (No compaction, minimal labor) | High (Vibration, finishing, compaction) |
While the raw material cost of flowable fill is slightly lower than standard concrete, the true financial advantage lies in the installed cost. Eliminating the need for backhoes, jump-pack tampers, and nuclear density testing saves an average of $18 to $28 per cubic yard in field labor and equipment overhead.
Step-by-Step Installation Guide for Flowable Fill
Installing CLSM requires a different approach than placing structural concrete. Because it behaves like a dense liquid, hydrostatic pressure and buoyancy become the primary engineering concerns during the pour.
Step 1: Trench Preparation and Shoring
Unlike granular backfill, flowable fill does not require a perfectly dry trench. The slurry will displace minor standing water. However, large pockets of trapped water or thick layers of organic muck must be removed. Ensure all trench shoring and trench boxes comply with OSHA trenching and excavation safety standards. If utilizing a trench box, plan the box-pulling sequence carefully; CLSM can seep into the small gaps between the box and the trench wall, potentially locking the box in place if left too long before pulling.
Step 2: Pipe Bedding and Buoyancy Management
This is the most critical phase of the installation. Flowable fill exerts significant hydrostatic pressure on utility pipes. An empty 24-inch diameter PVC pipe displaces approximately 3.14 cubic feet of material per linear foot. Given that CLSM weighs roughly 140 lbs per cubic foot, the upward buoyant force exceeds 430 lbs per linear foot. If you pour 4 feet of flowable fill over an unanchored, empty pipe, the pipe will float to the surface, ruining the grade and requiring a complete teardown.
Never pour flowable fill in a single deep lift over empty utility lines. To counteract buoyancy, pour the initial 'haunch' and bedding layer to the pipe's centerline (springline) and allow it to achieve initial set (typically 2 to 4 hours, depending on ambient temperature and mix design). Once the lower haunch has stiffened and locked the pipe in place, you can safely pour the remaining overfill in continuous lifts.
Step 3: Slurry Placement and Lift Thickness
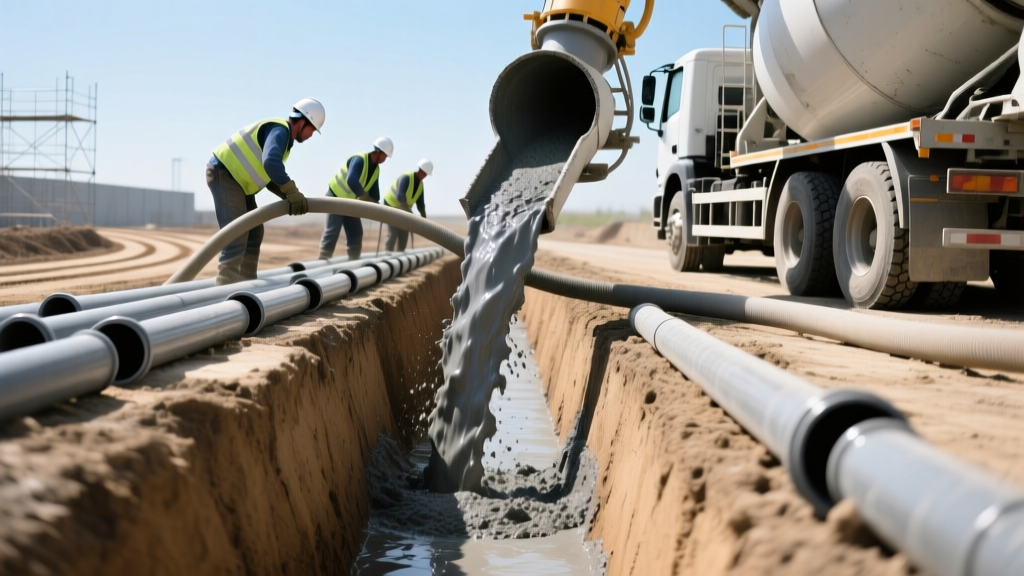
Flowable fill can be placed directly from the chute of a ready-mix truck, via a concrete pump, or through a tremie pipe for deep, narrow shafts. Because it is self-consolidating, do not use mechanical vibrators. Vibration will cause the heavy aggregates to segregate from the cementitious slurry, ruining the homogeneity of the fill.
For massive fills (such as abandoning large culverts), restrict continuous pour lifts to a maximum of 4 feet per day. This limits the lateral hydrostatic pressure exerted on adjacent retaining walls or existing foundations to manageable levels (roughly 300 lbs per square foot at the base of a 4-foot lift).
Step 4: Curing, Bleed Water, and Finishing
Flowable fill typically exhibits 'bleeding'—a phenomenon where excess mixing water rises to the surface as the solids settle. A 1/2-inch to 2-inch layer of bleed water on top of the pour is normal and expected. Do not attempt to trowel or finish the surface while bleed water is present. If the trench must be paved over immediately, pump off the excess bleed water or broadcast a thin layer of dry sand or fly ash to absorb it before placing the asphalt base.
Common Installation Failures and Troubleshooting
Despite its forgiving nature, improper handling of CLSM leads to specific failure modes that contractors must monitor.
- Premature Excavation (The 'Green' Dig): Excavating CLSM before it reaches 50 psi can cause trench wall collapse. Always request a 24-hour or 48-hour break-test cylinder from the ready-mix supplier to verify the material has achieved sufficient green strength before sending a backhoe back into the trench.
- Segregation from Over-Mixing: If the ready-mix truck sits on site for too long, the driver may add water to maintain flowability. Adding water beyond the designed slump (usually 8 inches maximum for trench fill) breaks the suspension matrix, causing the sand to drop out and leaving a weak, chalky cement layer on top. Reject loads that show severe aggregate separation in the chute.
- Shrinkage Cracking in Mass Fills: When filling large voids or abandoned tanks, the high cementitious content can generate heat of hydration, leading to thermal shrinkage cracks. For mass pours, specify a 'lean' CLSM mix with higher fly ash replacement (up to 80% of the cementitious material) to lower the thermal output.
Sourcing and Quality Assurance
When ordering from a batch plant, do not simply ask for 'flowable fill.' Specify the exact application to ensure the plant utilizes the correct National Ready Mixed Concrete Association (NRMCA) guidelines for your region. Request an 'excavatable' mix if the trench will ever need to be opened for future utility repairs, or a 'structural' CLSM (300+ psi) if the material will serve as a permanent foundation sub-base.
"The success of a CLSM installation relies 90% on the pour sequence and 10% on the mix design. Managing the hydrostatic head during the initial set is the difference between a perfectly graded utility line and a catastrophic pipe floatation event." — Field Engineering Best Practices for Trench Stabilization.
By leveraging the self-consolidating properties of flowable fill and strictly managing lift heights and buoyancy forces, contractors can drastically reduce backfill time, eliminate compaction testing delays, and ensure long-term subsurface stability without the permanent lock-in of structural concrete.
Written by
Marcus ChenMarcus Chen is a licensed structural engineer (PE) and building materials analyst with over 12 years of experience across residential, commercial, and industrial construction. He holds a Master of Science in Civil Engineering from UC Berkeley and spent six years at Thornton Tomasetti before transitioning to independent consulting and technical writing. Marcus specializes in material selection for seismic-prone regions, concrete reinforcement strategies, and lifecycle cost analysis. His work has been cited by the American Concrete Institute (ACI) and the Structural Engineers Association of California (SEAOC). When he is not on a job site or at his desk, you will find him hiking the Sierra Nevada or restoring a 1920s craftsman bungalow in Oakland, CA.
More from Marcus Chen
View all
Construction Cost
How Much Did the Eiffel Tower Cost to Build?
How much did the Eiffel Tower cost to build in 1889? We adjust for inflation and compare its budget to modern skyscraper construction.
Aug 4, 2026

Fire Resistance
What Is a Fire Resistant Material? Testing & Certification Guide
Discover what is a fire resistant material through ASTM and UL testing. Learn how fire ratings, certifications, and assemblies work in construction.
Aug 4, 2026

Construction Cost
How Much Did the Burj Khalifa Cost to Build?
How much did the Burj Khalifa cost to build? We break down the $1.5B project and extract 5 money-saving strategies for your next build.
Jul 30, 2026