Paver Driveway vs Concrete: Installation Guide & Cost Breakdown
Compare paver driveway vs concrete installation. Get 2026 costs, base prep specs, failure modes, and a step-by-step guide to choose the right material.

The Core Installation Differences at a Glance
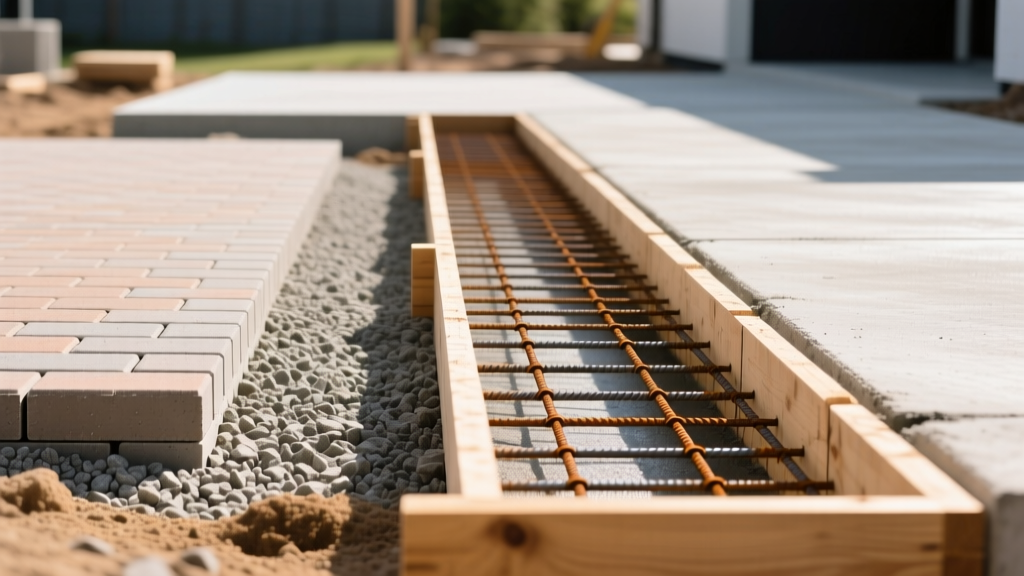
Choosing between a paver driveway vs concrete is rarely just an aesthetic decision; it is fundamentally a choice between two entirely different installation methodologies. Interlocking concrete pavers rely on a flexible, unbound aggregate base system that distributes loads through particle-to-particle friction. Poured concrete relies on a rigid, monolithic slab system that distributes loads through the structural tensile and compressive strength of the cement matrix itself.
For homeowners and contractors weighing these options, understanding the physical labor, technical tolerances, and curing requirements of each system is critical. A flaw in the subgrade will destroy a paver driveway through differential settling, while a flaw in the finishing process will destroy a concrete driveway through surface spalling. This guide breaks down the exact installation realities, material specifications, and 2026 cost metrics for both systems.
Paver Driveway Installation: Step-by-Step Realities
The installation of an interlocking paver driveway is heavily front-loaded with earthwork and base preparation. According to the Interlocking Concrete Pavement Institute (ICPI), up to 80% of a paver system's long-term performance is dictated by the sub-base preparation.
Excavation and Base Preparation
You must excavate to a depth of 7 to 9 inches below the desired finish grade. The base material should be ASTM D2940 graded aggregate (crushed stone with fines), not clean gravel. Clean gravel lacks the fines necessary to lock together under compaction. The base must be installed and compacted in 2-inch lifts using a vibratory plate compactor with a minimum of 5,000 lbs of compaction force. Achieving 98% Proctor density is non-negotiable for driveways handling vehicle loads.
Laying the Sand Bed and Pavers
Over the compacted base, spread exactly 1 inch of ASTM C33 coarse concrete sand. Never use masonry sand; its fine particles will wash out and cause the pavers to settle unevenly. Screed the sand using steel pipes and a straight edge. Lay the pavers tightly together, working from a fixed corner or edge restraint outward. Do not drag your feet or kneel directly on the screeded sand bed.
Edge Restraints and Joint Sand
Pavers require rigid edge restraints to prevent lateral creep. Use heavy-duty polypropylene or steel snap-edge restraints, secured with 10-inch steel spikes driven every 12 inches into the compacted base. Once the field is cut and restrained, sweep polymeric joint sand (such as Techniseal or SureBond) into the joints. Compact the entire surface with a plate compactor fitted with a urethane pad to vibrate the sand deep into the joints, then activate the polymers with a fine mist.
Poured Concrete Driveway Installation: Step-by-Step Realities
Unlike pavers, poured concrete is a rigid system that requires precise formwork, reinforcement, and a race against the clock during the chemical hydration process. The National Ready Mixed Concrete Association (NRMCA) emphasizes that proper finishing and curing are just as critical as the mix design itself.
Formwork and Reinforcement
Excavate 5 to 7 inches deep and install 2x4 wooden formwork, staked securely every 3 feet to prevent blowouts under the hydrostatic pressure of wet concrete. The slab must be a minimum of 4 inches thick, increasing to 6 inches if the driveway will support heavy RVs or dump trucks. Reinforce the slab using #4 (1/2-inch) steel rebar tied on a 2-foot grid, or 6x6 W1.4xW1.4 welded wire mesh. Crucially, the steel must be elevated on plastic dobies (chairs) so it sits in the upper third of the slab where tensile stresses occur.
The Pour, Screeding, and Finishing
Order a 4,000 PSI air-entrained mix (4% to 6% air content is mandatory in freeze-thaw climates to prevent winter spalling) with a 3/4-inch aggregate and a slump of 4 to 5 inches. Once the truck arrives, you have a narrow window. Strike off the concrete with a screed board, then use a bull float to push down the aggregate and bring the cream (cement paste) to the surface.
Curing and Control Joints
Cut control joints to a depth of 25% of the slab thickness (1 inch deep for a 4-inch slab) every 10 feet to control where the concrete cracks as it shrinks. After finishing with a broom for slip resistance, the concrete must be kept continuously moist or sealed with a liquid curing compound for a minimum of 7 days. It takes 28 days for the concrete to reach its full design strength.
2026 Installation Cost & Timeline Matrix
The financial and temporal investments for these two systems vary significantly, particularly when factoring in professional labor versus DIY execution. Below is a comparative matrix based on average 2026 national contractor rates for a standard 600-square-foot driveway.
| Feature | Interlocking Paver Driveway | Poured Concrete Driveway |
|---|---|---|
| Professional Cost (per sq ft) | $14.00 - $22.00 | $9.00 - $15.00 (standard broom finish) |
| DIY Material Cost (per sq ft) | $4.50 - $7.50 | $3.50 - $5.50 |
| Base Material Depth | 6 to 8 inches (compacted) | 4 inches (compacted gravel) |
| Installation Time (Pro Crew) | 3 to 5 days | 1 to 2 days (pour and finish) |
| Cure / Wait Time | Immediate (drive on same day) | 7 days minimum (28 days for heavy loads) |
| DIY Skill Level Required | Moderate (heavy labor, forgiving timeline) | Advanced (unforgiving timeline, high risk) |
Common Installation Failure Modes & How to Avoid Them
Both systems have specific vulnerabilities during installation. Recognizing these edge cases is the hallmark of professional-grade workmanship.
Paver System Failures
- Edge Creep and Joint Widening: Caused by inadequate edge restraints or failing to compact the base under the restraints. Fix: Pour a concrete collar (curb) along the perimeter instead of using plastic restraints if the soil is highly expansive or clay-heavy.
- Differential Settling (Birdbaths): Caused by compacting the base in lifts thicker than 2 inches, leaving the bottom layer loose. Fix: Strict adherence to 2-inch compaction lifts and verifying grade with a laser level before laying sand.
- Polymeric Sand Hazing: Caused by leaving dust on the paver surface before activating the sand with water. Fix: Use a leaf blower to thoroughly remove all residual dust from the paver surface before misting.
Concrete System Failures
- Plastic Shrinkage Cracking: Occurs when surface moisture evaporates faster than bleed water rises, usually on hot or windy days. Fix: Use an evaporation retardant spray or erect temporary windbreaks during the finishing process.
- Spalling and Scaling: The surface flakes off after winter freeze-thaw cycles. Caused by finishing the surface while bleed water is present, or omitting air-entrainment admixtures in the batch. Fix: Always verify the batch ticket from the ready-mix truck to ensure 4-6% air content before the truck begins pouring.
- Random Map Cracking: A network of fine cracks caused by an excessively wet mix or adding water to the truck chute on-site to make it 'easier to work.' Fix: Never add water to the truck. If the slump is too low, reject the load or have the driver add a superplasticizer admixture.
The Final Verdict: Which Installation Fits Your Project?
Use this decision framework to finalize your material choice based on your specific site conditions and project constraints:
- Choose Pavers If: Your site has poor drainage, expansive clay soils, or heavy tree root intrusion. Pavers are flexible and can be easily unzipped, the base regraded, and the pavers reinstalled without demolition. They are also the superior choice for steep gradients where poured concrete would require deep, expensive scoring for traction.
- Choose Poured Concrete If: You require the lowest initial installation cost, you plan to park heavy motorhomes or commercial trucks on the surface, or you want a seamless, low-maintenance surface that doesn't require periodic joint sand replenishment or weed control.
- Choose Stamped/Decorative Concrete If: You want the aesthetic of stone but the structural rigidity of a monolithic slab. Note that stamped concrete requires a highly skilled finishing crew and must be resealed every 2 to 3 years to protect the color hardeners from UV degradation and moisture ingress.
For deeper technical specifications regarding concrete mix designs and aggregate proportions, refer to the guidelines published by the Portland Cement Association (PCA). Ultimately, the success of either a paver driveway vs concrete installation relies entirely on the integrity of the subgrade and the patience of the installer during the critical preparation phases.
Written by
Priya KapoorPriya Kapoor is a real estate market analyst and construction economics researcher with expertise in housing affordability, development feasibility, and infrastructure investment. She holds a Master of Regional Planning from Cornell University and previously worked as a senior analyst at CBRE's Investment Properties group, where she modeled returns for $4B in mixed-use development pipelines. Priya now runs an independent research practice advising developers, municipalities, and REITs on construction cost forecasting and market timing. She publishes the quarterly "BuildMat Market Pulse" report tracking material price indices across 12 commodity categories. Based in Austin, TX, Priya serves on the board of Habitat for Humanity Austin and is a marathon runner.
More from Priya Kapoor
View all
Construction Cost
Cost to Build a 1600 Sq Ft Home in 2026: Full Breakdown
Accurate 2026 cost to build a 1600 sq ft home—material, labor, and regional pricing breakdowns included. Plan your budget with real-time estimates.
Aug 11, 2026

Wood & Lumber
Name the Types of Wood for Pressure Treatment and Preservation
Learn how to name the types of wood best suited for pressure treatment. Compare species treatability, chemical retention levels, and 2026 preservation costs.
Aug 4, 2026

Stone & Masonry
Stone Veneer Suppliers Lindenhurst: 2026 Cost Analysis
Analyze 2026 stone veneer costs in Lindenhurst, NY. Compare local supplier pricing, delivery fees, and Suffolk County installation labor rates.
Aug 4, 2026