Rebar vs Wire Mesh in Concrete: Troubleshooting Cracks and Repair Strategies
Diagnose slab failures and choose the right reinforcement. Expert troubleshooting guide on rebar vs wire mesh in concrete repair and overlay projects.

Diagnosing Concrete Failure: The Reinforcement Factor
Concrete possesses immense compressive strength but virtually no tensile strength. When a slab, footing, or retaining wall cracks under tension, the underlying cause is almost always a failure in reinforcement strategy, placement, or material degradation. Troubleshooting these failures requires understanding the fundamental debate of rebar vs wire mesh in concrete not just as a design choice, but as a diagnostic framework. Reinforcement does not prevent concrete from cracking; it controls crack width, transfers loads across fractures, and maintains structural integrity post-cracking.
When assessing a failed slab for repair or overlay, identifying the original reinforcement type dictates your demolition boundaries, doweling requirements, and the specific materials needed for the patch. According to the Portland Cement Association, improper reinforcement placement—such as mesh left at the bottom of the slab rather than lifted to the upper third—renders it entirely useless against drying shrinkage and thermal tension.
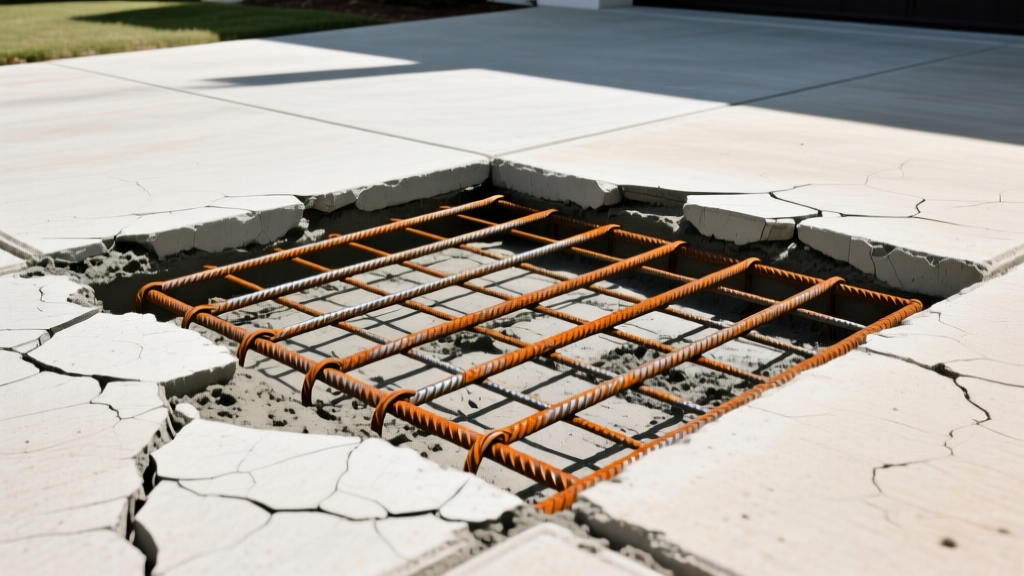
Symptom-to-Reinforcement Diagnostic Matrix
Before ordering materials for a repair, map the visible distress to the likely reinforcement deficiency. Use this matrix to determine whether the original pour lacked rebar, lacked wire mesh, or suffered from improper installation.
| Visible Symptom | Probable Root Cause | Original Reinforcement Failure | Required Repair Strategy |
|---|---|---|---|
| Map cracking (shallow, random spiderweb) | Plastic shrinkage or rapid surface drying | Wire mesh absent or placed too low to restrain surface tension. | Surface routing and epoxy injection; no structural reinforcement needed. |
| Wide, jagged structural shear cracks (45° angles) | Differential settlement or heavy point loads | Lack of Grade 60 rebar; wire mesh cannot handle high-tensile shear. | Full-depth saw-cut demolition, subgrade compaction, and rebar doweled into adjacent slab. |
| Linear cracking directly above joints | Thermal expansion/contraction without load transfer | Missing dowel bars (rebar) across transverse joints. | Dowel bar retrofit (DBR) using high-modulus epoxy and #4 or #5 rebar. |
| Spalling and rust staining (concrete cancer) | Moisture ingress causing steel oxidation and expansion | Rebar placed with insufficient concrete cover (less than 2 inches). | Chipping to sound concrete, treating steel with zinc-rich primer, and patching with polymer-modified mortar. |
Rebar vs Wire Mesh in Concrete: Repair Scenarios and Solutions
When executing a repair, partial demolition, or structural overlay, you must select the correct reinforcement for the specific stress profile of the patch. The Wire Reinforcement Institute emphasizes that welded wire fabric (WWF) and reinforcing steel bars serve fundamentally different mechanical purposes.
When to Specify Rebar for Structural Repairs
Rebar (typically ASTM A615 Grade 60) is mandatory when the repair area will be subjected to heavy bending moments, shear forces, or significant differential settlement. Rebar provides high-yield tensile strength (60,000 psi) and can be bent to conform to complex geometries.
- Footings and Grade Beams: If a foundation footing cracks due to soil subsidence, wire mesh is entirely inadequate for the repair. You must chip out the failed section, drive #5 (5/8-inch) rebar vertically into the earth or underlying pile, and tie it to horizontal #4 continuous bars before repouring.
- Heavy-Duty Driveway Overlays: For residential or commercial driveways supporting RVs, dump trucks, or forklifts, a 2-inch concrete overlay requires #3 or #4 rebar spaced at 18-inch centers. Wire mesh will yield under the dynamic wheel loads of heavy vehicles, leading to reflective cracking.
- Dowel Bar Retrofits (DBR): When rehabilitating jointed plain concrete pavements (JPCP) that are faulting at the seams, contractors rout slots across the joints and embed #5 rebar dowels using methyl methacrylate or high-modulus epoxy to restore load transfer efficiency.
When to Specify Wire Mesh for Surface and Slab Repairs
Welded Wire Fabric (WWF), governed by ASTM A1064, is designed primarily for temperature and shrinkage reinforcement. It holds micro-cracks tightly together but lacks the bending capacity to hold together a structurally failed slab.
- Interior Topping Slabs: When pouring a 2.5-inch composite topping slab over a damaged structural base, 6x6 W1.4xW1.4 (formerly known as 6x6 10/10) wire mesh is the industry standard. It prevents the thin overlay from curling and shrinking away from the base slab.
- Sidewalk and Patio Patches: For pedestrian-scale flatwork repairs where the subgrade is stable and well-compacted, W2.0xW2.0 wire mesh placed in the upper third of the slab provides excellent shrinkage control without the labor cost of tying rebar.
- Stucco and Shotcrete Overlays: When repairing vertical concrete retaining walls using pneumatically applied mortar (shotcrete), galvanized welded wire mesh is mechanically anchored to the existing wall to provide a tensile skin for the new material.
Step-by-Step: Retrofitting and Doweling Reinforced Concrete
Tying a new repair section into an existing reinforced slab requires precise execution to ensure the two masses act as a monolithic unit. Improper doweling is the leading cause of reflective cracking at repair perimeters.
- Saw-Cut and Demolish: Saw-cut the perimeter of the failed concrete to a depth of at least 1.5 inches to create a clean, straight edge and prevent spalling during jackhammering. Demolish the interior concrete, being highly careful not to sever the existing rebar or mesh that extends beyond the cut line.
- Subgrade Preparation: Excavate unstable soil and replace it with a 4-inch layer of compacted 3/4-inch crushed aggregate. Moisture-optimize the base to prevent it from sucking water out of the repair concrete.
- Drill for Dowels: Using a rotary hammer with a carbide bit, drill holes into the exposed edge of the existing slab. For #4 rebar dowels, drill 5/8-inch holes to a depth of 6 inches. Space the dowels at 12-inch centers along the joint.
- Clean and Epoxy: Blow out the drilled holes with compressed air and wire-brush the interior dust. Inject a two-part structural epoxy (such as Simpson Strong-Tie HIT-RE 500 V3) into the back of the hole. Insert the #4 rebar dowels, twisting slightly to ensure complete epoxy encapsulation.
- Tie and Elevate: Tie the new rebar grid or wire mesh to the protruding dowels. Critical Step: Use plastic rebar chairs (bolsters) to elevate the reinforcement. For a 4-inch slab, the steel must sit exactly 2 inches below the surface (the upper third of the tension zone).
- Pour and Finish: Pour a minimum 4,000 PSI air-entrained concrete mix (essential for freeze-thaw climates). Screed, float, and apply a broom finish. Spray with a silane-based curing compound immediately after the bleed water evaporates.
Material Specifications for Modern Repair Projects
When procuring materials for concrete rehabilitation, relying on generic terms leads to structural underperformance. Specify the exact ASTM standards and dimensions to ensure the repair outlasts the original pour.
Procurement Cheat Sheet
- Rebar Standard: ASTM A615 Grade 60. Use epoxy-coated (ASTM A775) or galvanized rebar if the repair is in a marine environment or exposed to de-icing salts to prevent future spalling.
- Wire Mesh Standard: ASTM A1064. Specify 'W' sizes rather than legacy gauge numbers. W1.4xW1.4 is standard for light slabs; W2.9xW2.9 is required for heavy-duty industrial overlays.
- Lap Splice Lengths: When overlapping rebar in a large repair zone, ACI 318 mandates a minimum lap splice. For #4 rebar in 4,000 PSI concrete, the minimum overlap is 18 inches. For wire mesh, overlap a minimum of one full grid square (6 inches) plus 2 inches.
- Cover Requirements: Maintain a minimum 2-inch concrete cover over rebar for exterior slabs exposed to earth or weather, and 1.5 inches for interior slabs.
Common Repair Mistakes and How to Avoid Them
'The most expensive concrete repair is the one you have to do twice. Ninety percent of overlay failures are not due to the concrete mix, but due to a failure to properly integrate the new reinforcement with the old substrate.' — Structural Forensics Engineering Guidelines
Avoid these critical field errors when troubleshooting and repairing reinforced concrete:
- Using Wire Mesh for Structural Shear Repairs: Wire mesh cannot be bent into 'U' shapes or stirrups to resist shear forces in beams or thick footings. Attempting to use WWF in these scenarios will result in catastrophic brittle failure under load.
- Neglecting the Bond Breaker: When pouring an unbonded overlay (where the new slab is designed to slide independently over the old one to prevent reflective cracking), you must lay a 6-mil polyethylene slip sheet. If you tie the new mesh directly into the old slab without a slip sheet, thermal expansion will tear the new overlay apart.
- Over-Watering the Repair Mix: Adding water to the truck on-site to increase workability drastically increases the water-cement ratio, leading to massive drying shrinkage. The new patch will shrink away from the dowels, rendering the rebar vs wire mesh integration completely ineffective. Use a polycarboxylate-based superplasticizer instead.
For further reading on advanced load-transfer mechanisms and joint rehabilitation, consult the technical bulletins published by the Concrete Construction trade archives, which detail the latest field-tested methodologies for integrating modern reinforcement into legacy structures.
Written by
Sarah WhitfieldSarah Whitfield is a chartered quantity surveyor (MRICS) and construction cost analyst with 15 years of experience in material pricing, procurement strategy, and project budgeting. She earned her degree in Construction Management from the University of Reading (UK) and has worked on projects ranging from $2M custom homes to $180M mixed-use developments across North America and Europe. Sarah currently leads cost estimating for BuildMat Insight, maintaining a proprietary database of 4,000+ material price points updated quarterly. She is a frequent contributor to RSMeans cost data panels and has presented at the International Cost Engineering Council (ICEC) congress. Based in Denver, CO, Sarah is an avid trail runner and volunteer mentor for Women in Construction.
More from Sarah Whitfield
View all
Wood & Lumber
What Are the Different Types of Wood? A Builder's Guide
Compare structural softwoods, finish hardwoods, and engineered lumber. Analyze Janka ratings, MOE values, and 2026 pricing for construction.
Aug 4, 2026

Walls & Panels
Steel Framing vs Wood Framing: Corrosion and Moisture Defense
Compare steel framing vs wood framing for moisture resistance. Learn about galvanized coatings, condensation risks, and corrosion protection strategies.
Jul 21, 2026

Stone & Masonry
How to Cut Stone Veneer: Wet Saw vs Grinder Comparison
Compare the best tools for cutting stone veneer. We review wet saws, angle grinders, and chop saws to help you achieve clean, chip-free cuts.
Jul 21, 2026