Foundation Crack Repair Cost Guide: Epoxy vs Polyurethane Methods
Compare foundation crack repair costs for epoxy, polyurethane, and carbon fiber. Get 2026 pricing, material specs, and structural decision frameworks.

The True Cost of Ignoring Foundation Cracks
A foundation crack is never just a cosmetic flaw; it is a physical manifestation of structural stress, hydrostatic pressure, or concrete shrinkage. The foundation crack repair cost varies drastically based on the chemical properties of the repair material and the mechanical failure mode of the concrete. According to the Portland Cement Association, while micro-cracking is an inherent byproduct of concrete curing, cracks exceeding 1/16 of an inch compromise the structural continuity and waterproofing envelope of a below-grade space.
Homeowners who delay repair face compounding expenses. A $400 polyurethane injection can prevent the $15,000+ interior remediation required when hydrostatic pressure forces groundwater through an unsealed vertical fissure, destroying drywall, flooring, and HVAC systems.
Decision Matrix: Matching Crack Type to Repair Method
Selecting the wrong repair material is the leading cause of callback failures. Use this diagnostic framework to determine the required intervention before calculating costs.
| Crack Morphology | Primary Cause | Required Material | Estimated Cost Tier |
|---|---|---|---|
| Hairline (<1/16') | Plastic shrinkage | Elastomeric sealant / Low-viscosity epoxy | $ |
| Vertical (1/16' - 1/4') | Minor differential settlement | Polyurethane (wet) or Epoxy (dry) | $$ |
| Stair-Step (CMU/Brick) | Severe differential settlement | Carbon Fiber Stitching + Epoxy | $$$ |
| Horizontal (Bowing) | Lateral hydrostatic pressure | Carbon Fiber Straps + Exterior Drainage | $$$$ |
Method 1: Epoxy Injection (Structural Welding)
Epoxy injection is the industry standard for restoring the structural integrity of cracked concrete. When cured, high-modulus epoxy possesses a tensile strength exceeding 7,000 PSI, effectively welding the concrete back together to a strength greater than the original pour.
Material Specifications & Application
Professional contractors utilize 100% solids, moisture-insensitive bisphenol-A resins (such as Sikadur 35 Hi-Mod or CrackWeld Pro). The viscosity of the epoxy must be matched to the crack width:
- Ultra-Low Viscosity (100-200 cps): Required for hairline cracks (1/32' to 1/16'). The fluid must wick deep into the capillary network of the fissure.
- Standard Viscosity (400-800 cps): Used for cracks 1/8' and wider, preventing the material from draining out the back of the wall before curing.
The process requires surface-sealing the crack with an epoxy paste and installing injection ports every 6 to 8 inches. The resin is then pumped under pressure (typically 20-40 PSI) from the bottom port upward until it extrudes from the port above.
Epoxy Injection Profile
Pros: Restores structural load-bearing capacity; permanent bond; prevents future crack propagation at the same site.
Cons: Cannot be applied to actively leaking cracks (water prevents adhesion); rigid bond will snap if the foundation undergoes new, significant settlement.
Method 2: Polyurethane Foam Injection (Waterproofing)
While epoxy welds concrete, polyurethane seals it. Polyurethane injection is the definitive solution for actively leaking vertical cracks where hydrostatic pressure is forcing groundwater into the basement or crawl space.
Hydrophobic vs. Hydrophilic Chemistry
Contractors must choose between two distinct chemical formulations based on the moisture environment:
- Hydrophobic Polyurethane (e.g., Alchemy Polymers AP Fill 700): Reacts with moisture to expand 20x to 30x its liquid volume, forming a rigid, closed-cell foam gasket that fills the entire void and pushes into the exterior soil. It will not shrink or degrade in wet environments.
- Hydrophilic Polyurethane: Absorbs water and turns into a flexible gel. While it seals well initially, it can desiccate and shrink if the exterior soil dries out completely, leading to recurring leaks.
Because polyurethane remains slightly flexible after curing, it accommodates minor thermal expansion and contraction of the concrete, making it highly resistant to callback failures in regions with extreme freeze-thaw cycles.
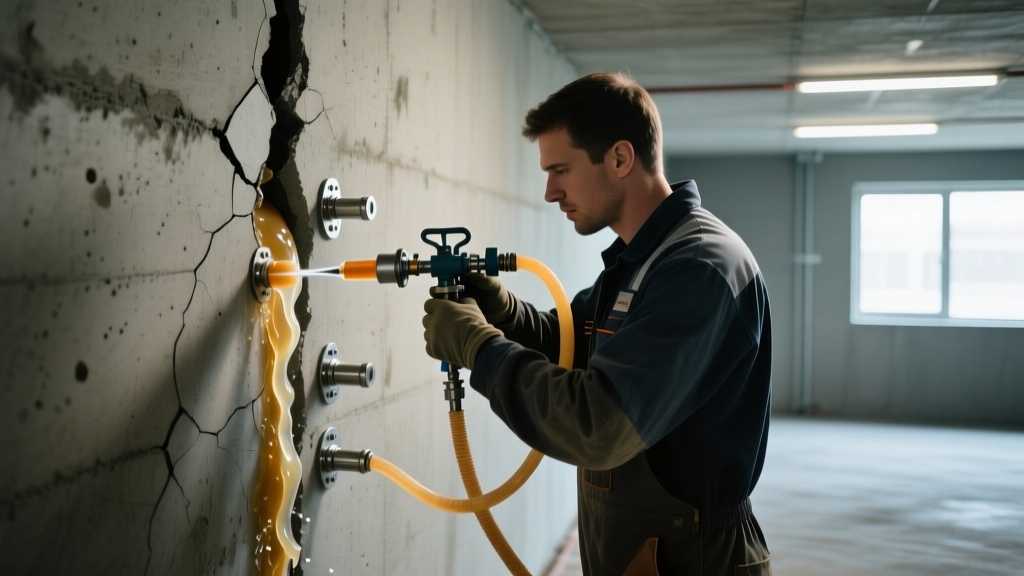
Method 3: Carbon Fiber Stitching & Strapping
When foundation cracks indicate active structural failure—such as horizontal bowing from expansive clay soils or stair-step cracking in CMU block walls—injection alone is insufficient. The wall requires mechanical reinforcement.
Carbon Fiber Straps: Kevlar-carbon weaves saturated in structural epoxy are bonded vertically to bowed walls. Materials like Fortress Carbon Fiber offer a tensile strength 10 times greater than steel at a fraction of the thickness. According to InterNACHI foundation inspection standards, horizontal cracks accompanied by wall deflection exceeding 1/2 inch require immediate structural reinforcement, not just sealing.
Carbon Fiber Stitching: For stair-step cracks, structural staples (stitches) are embedded across the fissure and locked in with epoxy, preventing the masonry units from continuing to separate under shear stress.
2026 Pricing Breakdown: National Averages & Variables
The foundation crack repair cost is dictated by linear footage, material chemistry, and required prep work. Below is the current market pricing for professional remediation.
| Repair Method | Material Cost (DIY Kit) | Professional Cost | Best Application | Expected Lifespan |
|---|---|---|---|---|
| Polyurethane Injection | $85 - $150 per kit | $25 - $45 per linear foot | Actively leaking vertical cracks | 15 - 20+ years |
| Epoxy Injection | $120 - $200 per kit | $35 - $55 per linear foot | Dry, structural vertical/diagonal cracks | Permanent (Life of structure) |
| Carbon Fiber Straps | N/A (Pro only) | $800 - $1,200 per strap | Horizontal bowing, severe deflection | Permanent |
| Carbon Fiber Stitching | N/A (Pro only) | $250 - $350 per linear foot | Stair-step CMU/brick shear cracks | Permanent |
Hidden Cost Variables
When budgeting, homeowners must account for secondary costs that inflate the final invoice:
- Drywall & Insulation Removal ($2 - $4 per sq. ft.): Contractors require bare concrete to seal the surface and install ports. Replacing finished basement walls adds significant carpentry costs.
- Exterior Excavation ($50 - $100+ per linear foot): If interior injection fails or the crack is inaccessible, exterior trenching to apply a rubberized asphalt membrane and French drain is required.
- Sump Pump Integration ($1,500 - $3,500): Sealing cracks without addressing the root hydrostatic pressure via interior drainage and a high-capacity sump pump (e.g., Zoeller M53) will result in water finding a new, weaker entry point.
DIY vs. Professional: Where the Hidden Costs Lie
Hardware stores sell surface-level crack fillers and low-pressure DIY injection kits. While adequate for non-structural, above-grade cosmetic shrinkage cracks, these kits routinely fail on below-grade basement walls.
The DIY Injection Trap
DIY kits rely on low-pressure caulk guns (generating less than 5 PSI). Professional polyurethane pumps operate at 1,500 to 3,000 PSI. Without high pressure, the DIY resin rarely penetrates past the interior 2 inches of a 10-inch thick foundation wall, leaving the exterior portion of the crack open to water ingress and freeze-thaw spalling. The Federal Trade Commission advises that when hiring professionals for structural repairs, homeowners must demand transferable, lifetime warranties that specifically cover hydrostatic pressure failures, not just material defects.
Frequently Asked Questions
Does home insurance cover foundation crack repair?
Standard HO-3 homeowners insurance policies explicitly exclude foundation settling, shrinking, and expansion. Coverage is typically only granted if the crack was caused by a sudden, covered peril, such as a plumbing leak (sudden pipe burst) or a vehicle striking the foundation.
How long does a polyurethane injection take to cure?
Hydrophobic polyurethane reacts and expands within 10 to 30 seconds of contacting moisture inside the crack, and reaches full structural cure within 4 to 6 hours. The injection process for a standard 8-foot vertical basement crack takes approximately 45 to 60 minutes.
Can I paint over an epoxy-repaired crack?
Yes, but surface preparation is mandatory. Once the epoxy cures and the surface paste is ground flush, the concrete must be etched or primed with a masonry bonding agent before applying latex or epoxy-based basement paints to prevent peeling.
Written by
David NakamuraDavid Nakamura is a licensed architect (AIA) and construction technology writer focused on sustainable building methods, mass timber engineering, and high-performance building envelopes. He holds a Master of Architecture from the University of Washington and is a certified Passive House Consultant (CPHC). David spent eight years at the Seattle firm Mithun, where he led the design of three LEED Platinum projects, before founding his own practice specializing in net-zero residential design. He serves on the editorial advisory board of GreenBuilder Magazine and has authored peer-reviewed papers on cross-laminated timber (CLT) connections for the Journal of Structural Engineering. In his spare time, David teaches woodworking at Pratt Fine Arts Center and kayaks the Puget Sound.
More from David Nakamura
View all
Construction Cost
Labor Cost to Build a Deck Per Sq Ft: 2026 Installation Guide
Discover the exact labor cost to build a deck per sq ft in 2026. This installation guide breaks down contractor rates, complexity factors, and hidden fees.
Aug 4, 2026

Construction Cost
How Much Does It Cost to Build a 3 Bedroom House? Financing Guide
Learn exactly how much it costs to build a 3 bedroom house and explore 2026 financing options, construction loan types, and budget frameworks for your build.
Aug 4, 2026

Construction Cost
Cost to Build a Tennis Court: 2026 Guide
How much does it cost to build a tennis court in 2026? Breakdowns for asphalt, concrete, and synthetic surfaces plus fencing and lighting.
Jul 30, 2026