How to Install Concrete and Clay Roof Tile Material Correctly
Expert guide to roof tile material installation. Learn structural limits, batten layouts, fastening patterns, and valley flashing for clay and concrete roofs.
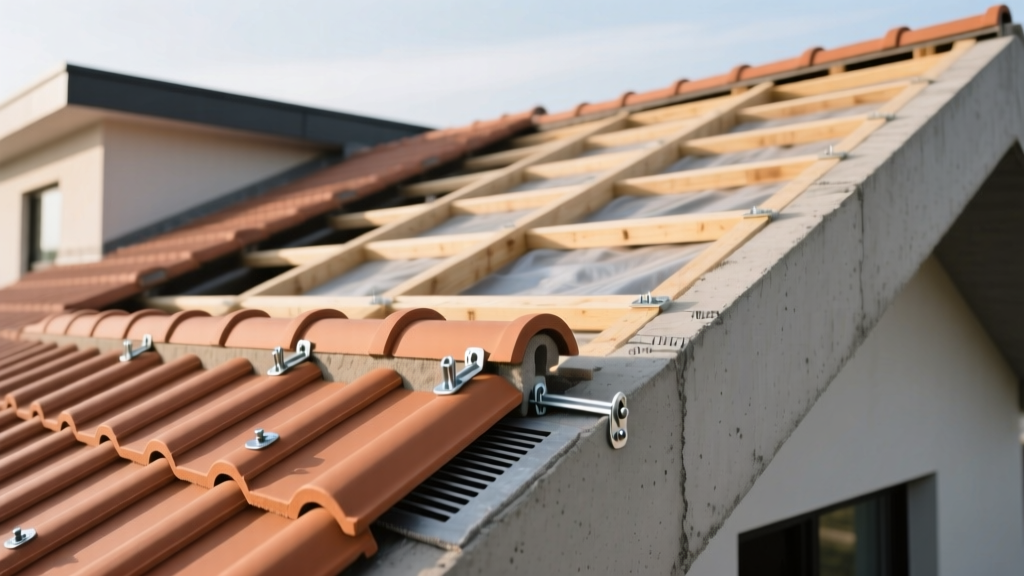
Structural Load Verification and Engineering
Before unloading a single pallet, you must verify the roof framing can support the immense dead load of roof tile material. Concrete tiles typically weigh between 900 and 1,100 pounds per square (100 square feet), while clay tiles range from 600 to 800 pounds per square. By comparison, standard architectural asphalt shingles weigh only 200 to 300 pounds per square.
If the structure was not originally engineered for tile, or if the building was constructed before modern load codes were standardized, a licensed structural engineer must evaluate the truss system. The engineer will check for deflection limits (typically L/240 for live loads and L/360 for dead loads) and may prescribe reinforcement, such as sistering rafters or adding mid-span purlins. Skipping this step risks catastrophic truss failure or severe sagging over time.
Underlayment and Batten System Matrix
The underlayment and batten system form the secondary water barrier and the critical ventilation matrix for your roof tile material. According to the Tile Roofing Institute Alliance (TRIA), a counter-batten system is highly recommended to allow air to flow from the eave to the ridge, reducing thermal transfer and preventing moisture buildup.
| Component | Standard Specification | Premium / High-Wind Specification |
|---|---|---|
| Underlayment | ASTM D226 Type II Asphalt Felt | Synthetic (e.g., GAF TigerPaw) + Ice & Water Shield at eaves |
| Vertical Battens | 1x2 Pressure-Treated Pine | 2x2 Pressure-Treated or Composite |
| Horizontal Counter-Battens | Not required (direct nail to deck) | 1x4 Pressure-Treated (creates air channel) |
| Fasteners for Battens | 8d galvanized ring-shank nails | 3-inch structural screws into rafters |
Step-by-Step Installation Sequence
Proper sequencing ensures water shedding and wind resistance. Follow these precise steps when installing heavy roof tile material.
1. Drip Edge and Ice & Water Shield
Install a heavy-duty drip edge at the eaves. Over the drip edge, apply a minimum 36-inch wide self-adhering ice and water barrier (such as Grace Ice & Water Shield). This protects the vulnerable eave area from ice damming and wind-driven rain.
2. Underlayment Application
Roll out the synthetic or felt underlayment horizontally, starting at the eave. Maintain a strict 2-inch headlap for horizontal seams and a 6-inch end lap for vertical seams. Secure with cap nails spaced no more than 12 inches apart along the overlaps.
3. Batten Layout and Chalk Lines
Determine the exposure of your specific tile profile. Measure the distance from the ridge to the eave and divide by the number of courses to find the exact batten spacing. Snap horizontal chalk lines across the roof deck. Nail the horizontal battens directly over the chalk lines, ensuring every batten seam falls directly over a rafter.
4. Field Tile Placement and Fastening
Begin laying the field tiles from the lower right corner (or left, depending on the interlocking design). The National Roofing Contractors Association (NRCA) emphasizes that fastening schedules must adapt to local wind zones.

Fastening Schedule by Wind Zone
Wind uplift is the primary enemy of tile roofs. The Florida Building Code and TRIA guidelines dictate strict fastening patterns based on the roof's wind zone classification.
- Perimeter and Ridge Zones (All Regions): Every single tile must be mechanically fastened with a minimum 11-gauge copper or stainless steel ring-shank nail, plus a mechanical nose clip.
- Field Zone (Wind Speed < 110 mph): Fasten every other tile in every other course (staggered pattern), provided the tile weight exceeds 9 lbs per piece.
- Field Zone (Wind Speed > 110 mph / HVHZ): Every tile must be nailed, and a two-part polyurethane tile adhesive must be applied to the interlocking lugs to prevent chatter and uplift.
Valley and Ridge Execution
Flashing details dictate the lifespan of the roof. For valleys, always use an open W-pan metal valley system constructed from minimum 24-gauge galvanized steel or 16oz copper. The W-pan features a central raised rib that prevents water from crossing over to the opposite side during heavy, wind-driven downpours. Maintain a minimum 4-inch clear channel in the center of the valley; do not let roof tile material encroach into this waterway.
For the ridge cap, abandon traditional mortar bedding. Mortar cracks due to thermal expansion and framing deflection, eventually allowing water ingress and blocking ridge ventilation. Instead, use a mechanical dry ridge system. This involves installing a ridgeline vent roll (like Klober Permo Vent) over the ridge board, followed by an aluminum ridge batten bracket system. The ridge tiles are then screwed to the batten and sealed with EPDM rubber gaskets, ensuring both weatherproofing and continuous exhaust ventilation.
Cost Breakdown and Project Timeline
Installing roof tile material is a premium investment. Below is a realistic 2026 cost matrix for a standard 2,000 sq. ft. residential roof (20 squares).
| Project Phase | Estimated Cost Range | Timeline |
|---|---|---|
| Structural Engineering & Reinforcement | $1,500 - $6,000+ | 1 - 3 Weeks |
| Tear-off and Decking Prep | $2,000 - $3,500 | 1 - 2 Days |
| Underlayment, Flashing, and Battens | $4,000 - $6,500 | 2 - 3 Days |
| Tile Material and Installation Labor | $18,000 - $32,000 | 5 - 8 Days |
Common Installation Defects to Avoid
Even experienced asphalt shingle crews make critical errors when transitioning to roof tile material. Watch for these specific failure modes:
- Over-driven Nails: Driving the nail head too deep into the concrete or clay tile creates a stress point that will crack the tile when weight is applied. The nail head should sit flush, not countersunk.
- Improper Headlap: Failing to adjust batten spacing for roof pitch. On lower pitches (e.g., 4:12), the headlap between tiles must be increased to prevent capillary action and wind-driven rain from breaching the interlocks.
- Blocked Soffit Vents: Dropping mortar or tile debris into the eave trough during installation, which blocks the intake ventilation and causes the attic to overheat, drastically reducing the lifespan of the underlayment.
Mastering the installation of heavy roof tile material requires strict adherence to engineering limits, precise fastening schedules, and meticulous flashing details. By prioritizing a ventilated batten system and mechanical dry-ridge components, you ensure the roof system performs flawlessly for its expected 50-to-75-year lifespan.
Written by
Elena RodriguezElena Rodriguez is a civil engineer and technical writer specializing in concrete technology, masonry systems, and ASTM/ACI compliance. She earned her B.S. in Civil Engineering from Texas A&M University and spent a decade at a materials testing laboratory, performing over 2,000 concrete compressive strength tests and masonry prism evaluations. Elena is an ACI-certified Field Testing Technician (Grade I) and a member of ASTM Committee C12 on Natural Building Stone. She currently consults on forensic engineering cases involving concrete failures and moisture intrusion. Based in San Antonio, TX, Elena is a proud member of the Society of Women Engineers (SWE) and coaches her daughter's FIRST Robotics team.
More from Elena Rodriguez
View all
Walls & Panels
Cost Analysis: Light Gauge Steel Framing Advantages and Disadvantages
Evaluate light gauge steel framing advantages and disadvantages through a strict cost analysis lens, comparing material, labor, and lifecycle expenses.
Aug 4, 2026
Walls & Panels
Gypsum Board Types: Exact Specifications, Thickness & Dimensions
Compare standard, Type X, and moisture-resistant gypsum board types. Get exact specifications, thicknesses, dimensions, and ASTM standards for your project.
Aug 4, 2026
Fire Resistance
Best Fire-Resistant Outdoor Decking Materials: 2026 Buyer Guide
Discover the best fire-resistant outdoor decking materials for 2026. Compare Class A PVC, aluminum, and hardwood options for WUI compliance and safety.
Aug 4, 2026