Best Roofing Material for Flat Roofs: TPO Installation Guide
Learn how to properly install TPO, the leading roofing material for flat roofs. Step-by-step guide covering decking, insulation, and membrane seaming.

Why TPO is the Premier Roofing Material for Flat Roofs
Thermoplastic Polyolefin (TPO) has dominated the commercial and residential low-slope market, accounting for over 40% of single-ply installations. Governed by the ASTM D6878 standard, TPO offers a highly reflective surface that reduces cooling loads by up to 15%, a benefit heavily documented by the U.S. Department of Energy. When evaluating the best roofing material for flat roofs, TPO strikes the optimal balance between puncture resistance, UV stability, and cost-effectiveness compared to EPDM or PVC.
This guide details the professional installation of a 60-mil mechanically attached TPO system over polyisocyanurate (ISO) insulation, the most common and code-compliant assembly for modern flat roofs.
Substrate Preparation and Insulation Layout
The longevity of any flat roof system relies entirely on the substrate. TPO membranes will telegraph any irregularities, and trapped moisture will cause blisters or rot.
- Deck Inspection: Ensure the structural deck (concrete, steel, or wood) is clean, dry, and free of protruding fasteners. Moisture content in wood decks must not exceed 19%.
- Vapor Retarder: In climates with high indoor humidity or cold winter temperatures, install a self-adhering modified bitumen vapor retarder directly over the steel or wood deck.
- Polyiso Insulation: Use 4x8-foot polyisocyanurate boards (R-value of 5.6 per inch). Stagger all joints in a shingle pattern to prevent thermal bridging.
- Fastening the ISO: Secure insulation boards using corrosion-resistant heavy-duty screws and 3-inch steel plates. In the field, space fasteners 24 inches on center (o.c.). In the perimeter (within 8 feet of the roof edge), increase density to 12 inches o.c. to resist wind uplift.
Attachment Methods: Mechanical vs. Fully Adhered
Before unrolling the membrane, you must select the attachment method based on the building's wind uplift requirements and deck type.
Mechanically Attached System
The most cost-effective approach for steel and wood decks. The TPO membrane is fastened through the seams using specialized plates and screws, and the overlapping membrane is then heat-welded over the fasteners. This system accommodates minor substrate movement but requires precise fastener placement to meet FM Global or UL wind uplift ratings.
Fully Adhered System
Required for concrete decks or buildings with strict aesthetic requirements (no visible fastener lines). A low-rise polyurethane adhesive is applied in ribbons (typically 12 to 24 inches apart) across the ISO board, and the TPO is rolled into the adhesive. This method provides superior wind uplift resistance but increases material costs by approximately 20%.
Step-by-Step TPO Membrane Installation and Heat Welding
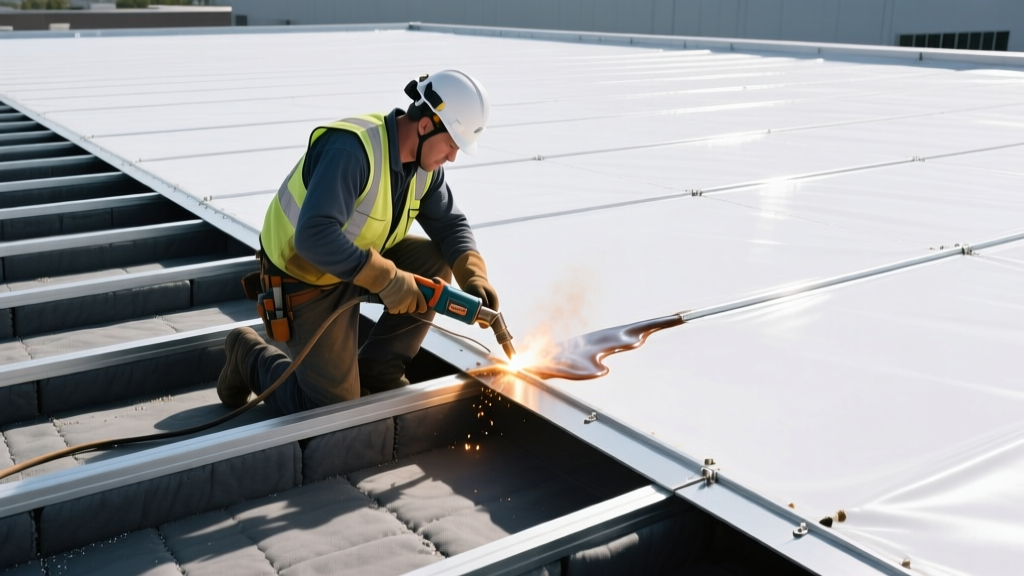
Proper seam welding is the single most critical factor in TPO installation. A failed seam guarantees a leak.
- Roll Acclimation: Unroll the TPO sheets and allow them to relax for at least 30 minutes before fastening. This prevents "fishmouths" (wrinkles) caused by membrane tension.
- Positioning and Overlap: Align the sheets to ensure a minimum 6-inch overlap. For mechanically attached systems, position the overlap directly over the insulation board joints where the fastener plates are located.
- Pre-Weld Cleaning: Wipe the overlap area with a TPO-approved cleaning solvent to remove dust, plasticizers, and dirt. A dirty seam will result in a false weld.
- Automatic Heat Welding: Use an automatic hot-air welder (e.g., LEISTER VARIMAT V2) for long, straight seams. Set the temperature between 950°F and 1,100°F (510°C - 590°C) and the speed to 10-15 feet per minute. Adjust based on ambient temperature and wind conditions.
- Hand Welding Details: Use a hand-held welder (e.g., Leister Triac) and a silicone pressure roller for inside corners, outside corners, and pipe penetrations where the automatic welder cannot reach.
- Seam Probing: Once the seam cools (usually within 3 minutes), run a blunt cotter pin or specialized seam probe along the edge of the weld. If the probe catches or penetrates the seam, mark it for immediate re-welding.
Flashing, Penetrations, and Edge Metal
The National Roofing Contractors Association (NRCA) reports that 90% of flat roof leaks occur at penetrations and edges, not in the field of the membrane.
- Pipe Boots: Use pre-molded TPO pipe boots rather than field-fabricated patches. Slide the boot over the pipe, weld the flange to the field membrane, and secure the top of the boot to the pipe with a stainless steel clamping ring and pourable polyurethane sealant.
- Inside/Outside Corners: Never stretch the membrane tight into a 90-degree corner. Use pre-fabricated TPO corner pieces. For field-fabricated corners, make relief cuts and overlap the patches by at least 3 inches, ensuring all edges are heat-welded.
- Edge Metal: Install a TPO-coated metal termination bar at the roof perimeter. Fasten it to the structural wall, fold the membrane over the bar, weld it, and seal the top edge with a continuous bead of high-quality polyurethane caulking.
Common Installation Failure Modes
Understanding how TPO systems fail allows installers to proactively mitigate risks during the installation process.
| Failure Mode | Primary Cause | Prevention Strategy |
|---|---|---|
| Cold Welds | Welder temperature too low, speed too fast, or welding over damp insulation. | Perform hourly test welds; clean seams with solvent; verify moisture levels. |
| Membrane Shrinkage | Using non-reinforced TPO or improper formulation (more common in early 2000s TPO). | Specify polyester-reinforced, 60-mil or 80-mil TPO from top-tier manufacturers (e.g., Carlisle, Elevate). |
| Billowing / Ballooning | Inadequate fastener density in the perimeter or failure to install vapor retarders. | Increase perimeter fasteners to 12" o.c.; seal all deck penetrations to prevent air infiltration. |
| Fishmouths | Membrane installed under high tension without adequate relaxation time. | Allow 30-60 minutes of relaxation time after unrolling before fastening or welding. |
2026 Cost Breakdown for TPO Flat Roof Systems
Pricing for TPO installations has stabilized following the supply chain disruptions of the early 2020s. The following table outlines the average installed costs per square foot for a commercial-grade 60-mil mechanically attached system in 2026.
| Component | Material Cost (per sq. ft.) | Labor Cost (per sq. ft.) | Total Installed Cost |
|---|---|---|---|
| Polyiso Insulation (2 layers, R-30) | $1.80 - $2.20 | $0.60 - $0.85 | $2.40 - $3.05 |
| 60-Mil Reinforced TPO Membrane | $1.10 - $1.40 | $1.20 - $1.60 | $2.30 - $3.00 |
| Fasteners, Plates, and Flashing | $0.45 - $0.65 | $0.30 - $0.50 | $0.75 - $1.15 |
| Total System Cost | $3.35 - $4.25 | $2.10 - $2.95 | $5.45 - $7.20 |
Note: Fully adhered systems will add approximately $1.20 to $1.80 per square foot due to the cost of low-rise adhesive and increased labor time. Upgrading to an 80-mil membrane adds roughly $0.35 per square foot to material costs but significantly extends the warranty period and puncture resistance.
By strictly adhering to substrate preparation protocols, precise heat-welding parameters, and rigorous seam testing, contractors can ensure that TPO performs flawlessly as the chosen roofing material for flat roofs, delivering decades of watertight, energy-efficient service.
Written by
David NakamuraDavid Nakamura is a licensed architect (AIA) and construction technology writer focused on sustainable building methods, mass timber engineering, and high-performance building envelopes. He holds a Master of Architecture from the University of Washington and is a certified Passive House Consultant (CPHC). David spent eight years at the Seattle firm Mithun, where he led the design of three LEED Platinum projects, before founding his own practice specializing in net-zero residential design. He serves on the editorial advisory board of GreenBuilder Magazine and has authored peer-reviewed papers on cross-laminated timber (CLT) connections for the Journal of Structural Engineering. In his spare time, David teaches woodworking at Pratt Fine Arts Center and kayaks the Puget Sound.
More from David Nakamura
View all
Construction Cost
Labor Cost to Build a Deck Per Sq Ft: 2026 Installation Guide
Discover the exact labor cost to build a deck per sq ft in 2026. This installation guide breaks down contractor rates, complexity factors, and hidden fees.
Aug 4, 2026

Construction Cost
How Much Does It Cost to Build a 3 Bedroom House? Financing Guide
Learn exactly how much it costs to build a 3 bedroom house and explore 2026 financing options, construction loan types, and budget frameworks for your build.
Aug 4, 2026

Construction Cost
Cost to Build a Tennis Court: 2026 Guide
How much does it cost to build a tennis court in 2026? Breakdowns for asphalt, concrete, and synthetic surfaces plus fencing and lighting.
Jul 30, 2026