How to Apply Stone Veneer to Fireplace: Step-by-Step Pro Guide
Learn how to apply stone veneer to fireplace surrounds with this pro guide. Covers prep, mortar mixing, lath installation, and finishing techniques.

Project Scope and Structural Prerequisites
Applying manufactured or natural stone veneer to a fireplace surround requires strict adherence to substrate preparation, mortar chemistry, and fire safety clearances. A standard fireplace surround ranges from 25 to 40 square feet. Unlike standard tile installations, stone veneer varies wildly in thickness (from 1/2 inch to 3 inches), demanding a robust mortar bed and mechanical fastening system. This guide details the industry-standard lath-and-scratch method, which ensures long-term adhesion and accommodates the irregular profiles of stacked stone, fieldstone, and ashlar patterns.
Phase 1: Substrate Preparation and Fire Clearances
Stone veneer cannot be applied directly to painted drywall, plaster, or wood paneling. The existing wall must be stripped down to the studs or covered with a code-approved cementitious backer board. For interior fireplace surrounds, install 1/2-inch cement backer board (such as James Hardie HardieBacker 500 or USG Durock) over wood or metal studs.
Fasten the cement board using 1-5/8-inch corrosion-resistant cement board screws, spacing them 8 inches apart on center. Tape and mud the seams using alkali-resistant fiberglass mesh tape and polymer-modified thinset mortar. Allow the thinset to cure for 24 hours before proceeding.
Phase 2: Weather Barrier and Metal Lath Installation
While interior fireplaces do not strictly require a weather-resistant barrier (WRB), applying a layer of Grade D building paper or 4-mil polyethylene over the cement board protects the substrate from moisture drawn out by the cementitious scratch coat. Overlap horizontal seams by 2 inches and vertical seams by 6 inches.
Next, install 2.5 lb self-furring galvanized diamond mesh metal lath. This specific weight and self-furring dimple design are non-negotiable; they provide the mechanical key necessary to hold heavy stone profiles.
- Orientation: Ensure the lath cups (the raised dimples) face outward, away from the wall.
- Fastening: Use 1-1/4-inch galvanized roofing nails or corrosion-resistant staples with a 1-inch crown. Fasten every 6 inches along the studs.
- Overlaps: Overlap horizontal seams by 1 inch and vertical seams by 2 inches. Wrap the lath around all outside corners by at least 6 inches; never terminate lath exactly on a corner, as this creates a natural fault line for cracking.
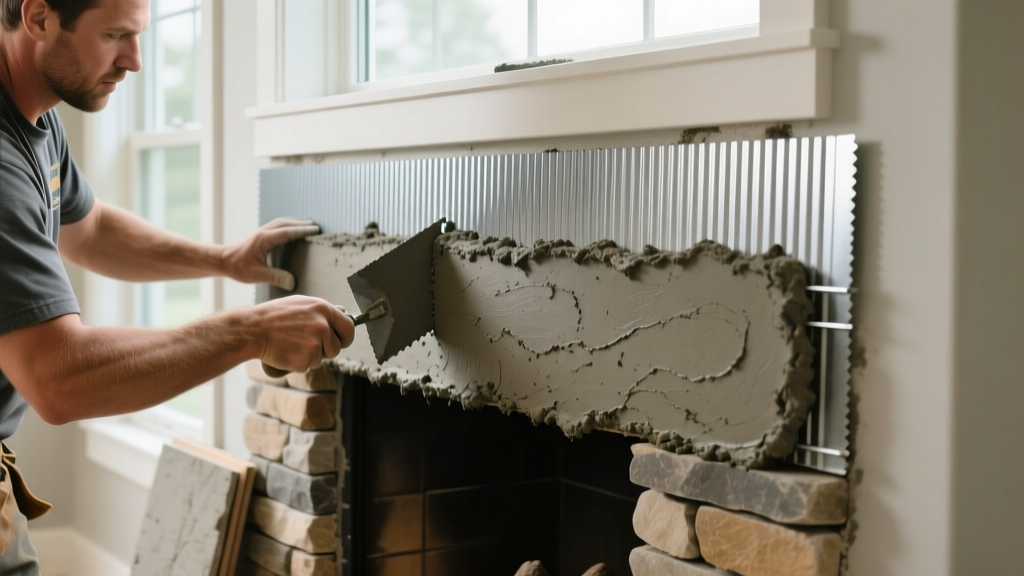
Phase 3: The Scratch Coat Application
The scratch coat is a 3/8-inch to 1/2-inch layer of mortar applied directly over the metal lath. It encapsulates the wire mesh and creates a uniform, scored surface for the final stone adhesion. Use a high-quality Type S Veneer Stone Mortar (such as Quikrete Veneer Stone Mortar), which is specifically formulated with polymers for high bond strength and reduced sag.
Mortar Selection Matrix
| Mortar Type | Best Application | Compressive Strength | Working Time |
|---|---|---|---|
| Type S Veneer Mortar | Lath & Scratch coat, irregular natural stone | 1,800+ PSI | 60-90 Minutes |
| Polymer-Modified Thinset (ANSI A118.4) | Uniform manufactured stone over flat cement board | 400+ PSI (Bond) | 30-45 Minutes |
| Type N Mortar | Historic masonry restoration, soft brick | 750 PSI | 90-120 Minutes |
Mix the Type S mortar to a thick, peanut-butter consistency. Using a 1/2-inch x 1/2-inch square-notched trowel, press the mortar firmly through the lath to ensure complete encapsulation. Before the mortar sets (usually within 30 to 45 minutes), use a masonry raking tool or a heavy wire brush to score horizontal lines into the surface. These horizontal grooves provide a mechanical lock for the final setting bed. Allow the scratch coat to cure for 24 to 48 hours, misting it lightly with water if the ambient humidity is below 40% to prevent rapid drying and shrinkage cracks.
Phase 4: Stone Layout and Mortar Application
Never pull stones directly from the box and apply them to the wall. Manufactured and natural stones vary in color and size. Open 3 to 5 boxes and dry-lay the stones on the floor, blending corner pieces, large field stones, and small filler pieces to ensure a randomized, natural aesthetic.
According to the Masonry Veneer Manufacturers Association (MVMA) Installation Guide, proper mortar application requires a dual-bonding technique:
- Wall Application: Apply a 1/2-inch layer of fresh Type S mortar to the scratch coat using a flat trowel.
- Back-Buttering: Apply a 1/2-inch layer of mortar to the back of the stone. For manufactured stone, press the mortar into the grooves; for natural stone, ensure complete coverage.
- Setting: Press the stone firmly into the wall mortar with a slight twisting motion until the mortar squeezes out the sides. Do not tap the stone after the initial set, as this breaks the chemical bond.
Phase 5: Pointing, Grouting, and Final Cleanup
Once all stones are set and the mortar has stiffened (typically 4 to 6 hours, depending on temperature), address the joints. For a standard grouted joint (1/2-inch to 1-inch wide), use a pointing bag—similar to a pastry bag—to inject mortar deeply into the voids. This prevents air pockets and ensures structural integrity. For a dry-stack profile, no pointing is required, but the back-buttering must be meticulous to prevent visible gaps.
Tool the joints using a convex jointing iron or a stiff bristle brush to compress the mortar and create a weather-resistant seal. Never use acid-based cleaners (like muriatic acid) to remove mortar haze from manufactured stone veneer. Acid will permanently etch the cementitious surface and expose the lightweight aggregates. Instead, wait 7 days for the mortar to fully cure, then use a stiff nylon brush and a specialized, non-acidic masonry cleaner to remove any remaining haze.
Troubleshooting Common Veneer Failure Modes
| Failure Mode | Root Cause | Prevention & Fix |
|---|---|---|
| Stone Popping Off | Applying stone to painted drywall; failing to back-butter; breaking the bond by tapping after initial set. | Always install over cement board and metal lath. Back-butter 100% of stones. |
| Efflorescence (White Powdery Stains) | Moisture migrating through the wall, bringing soluble salts to the surface. | Ensure proper WRB installation. Use white Portland cement-based mortars. Seal the stone with a breathable, penetrating silane/siloxane sealer after 28 days. |
| Mortar Cracking | Scratch coat dried too quickly; improper water-to-mortar ratio. | Mist the scratch coat during curing. Follow the manufacturer's exact water measurements; never re-temper (add water to) mortar that has begun to set. |
Material Cost Breakdown (30 Sq. Ft. Surround)
Understanding the material costs helps in budgeting accurately. The following table outlines the estimated material costs for a standard 30-square-foot interior fireplace surround using mid-grade manufactured stacked stone and Type S mortar in 2026.
| Material Component | Quantity Needed | Unit Cost (Approx.) | Total Cost |
|---|---|---|---|
| Cement Backer Board (3x5 ft) | 2 sheets | $35.00 / sheet | $70.00 |
| 2.5 lb Galvanized Metal Lath | 1 roll (50 sq ft) | $42.00 / roll | $42.00 |
| Type S Veneer Stone Mortar (80 lb) | 4 bags | $28.00 / bag | $112.00 |
| Manufactured Stone Veneer | 30 sq ft (+10% waste) | $14.00 / sq ft | $462.00 |
| Fasteners, Tape, and Pointing Bag | Miscellaneous | -- | $45.00 |
| Total Material Cost | $731.00 |
By adhering to these substrate preparation, lath installation, and mortar application protocols, you ensure a fireplace surround that is structurally sound, fire-code compliant, and visually indistinguishable from full-bed natural masonry. Always defer to the specific manufacturer's installation instructions for the exact mortar additives and curing times required for your chosen stone profile.
Written by
Sarah WhitfieldSarah Whitfield is a chartered quantity surveyor (MRICS) and construction cost analyst with 15 years of experience in material pricing, procurement strategy, and project budgeting. She earned her degree in Construction Management from the University of Reading (UK) and has worked on projects ranging from $2M custom homes to $180M mixed-use developments across North America and Europe. Sarah currently leads cost estimating for BuildMat Insight, maintaining a proprietary database of 4,000+ material price points updated quarterly. She is a frequent contributor to RSMeans cost data panels and has presented at the International Cost Engineering Council (ICEC) congress. Based in Denver, CO, Sarah is an avid trail runner and volunteer mentor for Women in Construction.
More from Sarah Whitfield
View all
Wood & Lumber
What Are the Different Types of Wood? A Builder's Guide
Compare structural softwoods, finish hardwoods, and engineered lumber. Analyze Janka ratings, MOE values, and 2026 pricing for construction.
Aug 4, 2026

Walls & Panels
Steel Framing vs Wood Framing: Corrosion and Moisture Defense
Compare steel framing vs wood framing for moisture resistance. Learn about galvanized coatings, condensation risks, and corrosion protection strategies.
Jul 21, 2026

Stone & Masonry
How to Cut Stone Veneer: Wet Saw vs Grinder Comparison
Compare the best tools for cutting stone veneer. We review wet saws, angle grinders, and chop saws to help you achieve clean, chip-free cuts.
Jul 21, 2026