Interior Design Showcase: Styling a Stone Veneer Panel Wall
Discover how to integrate a stone veneer panel into modern interiors. Explore design pairings, lighting techniques, and architectural styling tips.

The Shift: From Rustic Cladding to Architectural Focal Point
The application of stone in interior design has undergone a radical transformation. Historically relegated to rustic fireplaces or heavy exterior facades, the modern stone veneer panel is now a precision-engineered architectural element. Designers leverage these panels to introduce tactile contrast, acoustic dampening, and biophilic grounding into minimalist, Japandi, and contemporary spaces. Unlike full-thickness masonry, modern veneer panels—ranging from 1-inch thick cementitious casts to high-density polyurethane replicas—allow for rapid installation on standard 2x4 framed walls without requiring structural reinforcement. This guide deconstructs the spatial, material, and illumination strategies required to elevate a stone veneer panel from a basic wall covering to a high-end design centerpiece.
Material Matrix: Selecting the Right Stone Veneer Panel Profile
The visual weight of your wall is dictated entirely by the panel profile. Choosing the wrong texture for your architectural style creates immediate visual dissonance. Below is a decision matrix for matching panel profiles to contemporary design languages.
| Panel Profile | Material Base | Relief Depth | Best Architectural Style | Visual Impact |
|---|---|---|---|---|
| Dry-Stack Ledge | Cementitious / Pumice | 1.0" - 1.5" | Contemporary, Minimalist | Linear, clean, low-shadow |
| Stacked Fieldstone | Cementitious Cast | 2.0" - 3.5" | Transitional, Modern Farmhouse | Organic, heavy, high-shadow |
| Faux Brick/Stone | High-Density Polyurethane | 0.75" - 1.25" | Industrial, Commercial, Lofts | Gritty, uniform, lightweight |
| Honed Marble Slab | Natural Stone Veneer (2cm) | 0.75" | Luxury Modern, Art Deco | Reflective, seamless, premium |
For high-traffic residential interiors, cementitious panels (such as those manufactured by Eldorado Stone or Coronado Stone) offer superior impact resistance compared to polyurethane. While polyurethane panels are exceptionally lightweight (roughly 1 lb per square foot), they are prone to denting if struck by furniture or vacuum cleaners, making them strictly suitable for upper-wall or ceiling applications in residential settings.
Spatial Choreography: Sizing and Scaling Your Accent
A common failure in stone veneer design is improper scaling. Covering an entire 40-foot wall in a heavy stacked ledge profile will visually crush the room. Instead, apply the 60/30/10 rule of interior proportion: 60% dominant neutral wall color, 30% secondary texture (wood or metal), and 10% high-impact stone veneer panel accents.
Strategic Placement Zones
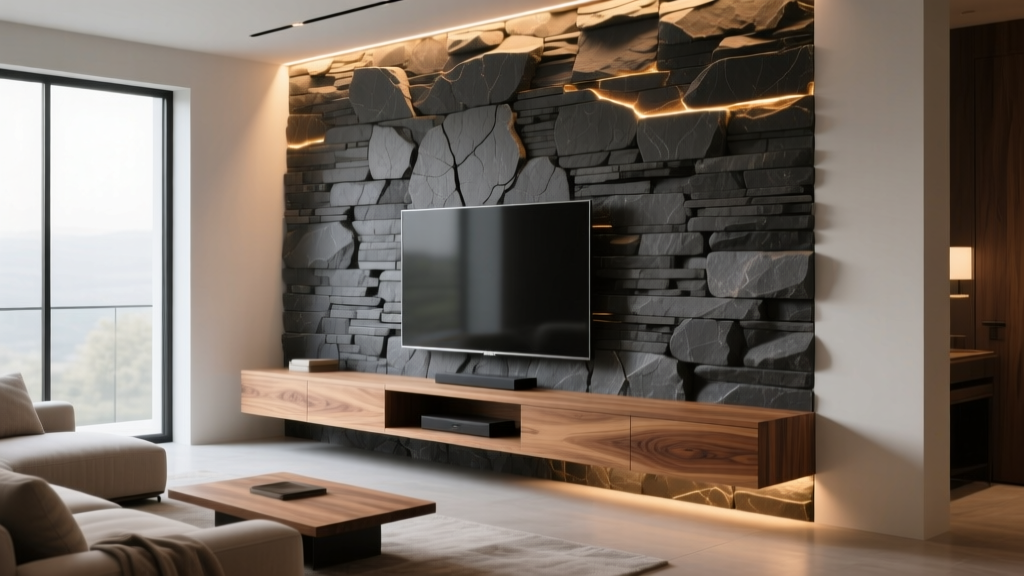
- The Floating Media Wall: Anchor a floating oak or walnut media console with a 6-foot-wide vertical column of dry-stack ledge stone. This draws the eye upward, emphasizing ceiling height while hiding media wiring within the furred-out wall cavity.
- The Wet Room Niche: In master bathrooms, apply a honed natural stone veneer panel strictly within the shower niche or behind a freestanding tub. Ensure the panel is sealed with a penetrating siloxane sealer (like Miracle Sealants 511 Impregnator) to prevent soap scum buildup in the micro-fissures.
- The Entryway Reveal: Clad the return wall of a front entryway. When the front door opens, the raking light from exterior windows will catch the stone's texture, creating an immediate premium first impression.
The Illumination Blueprint: Lighting a Textured Surface
A stone veneer panel relies entirely on shadow to reveal its topography. Flat, ambient lighting will render a 3-inch deep stacked stone wall looking like flat, printed wallpaper. You must engineer the lighting specifically for the stone's relief.
Lighting Specification Rule: To properly graze a stone veneer panel with a 2-inch relief, utilize recessed adjustable gimbal fixtures or linear LED wall grazers positioned exactly 12 to 18 inches away from the wall face. Use a narrow 15-degree beam angle and a Color Rendering Index (CRI) of 90 or higher to accurately display the natural mineral variances in the stone.
Avoid "washing" the wall with wide 60-degree floodlights. Wide beams push light into the crevices of the stone, eliminating the shadows that give the material its perceived depth. For a luxury finish, specify a color temperature of 2700K for living spaces to warm up grey and charcoal tones, or 3000K for kitchens and bathrooms to keep white limestone and marble panels looking crisp and clean.
Material Pairings: The Rule of Tactile Contrast
Stone is cold, heavy, and opaque. To achieve a balanced interior design showcase, you must pair the stone veneer panel with materials that offer opposing physical properties. Never pair heavy stone with other heavy, opaque materials like dark painted MDF or thick brick.
High-End Pairing Combinations
- Fluted Walnut Slats: Install 3/4-inch wide black walnut vertical slats with 1/2-inch acoustic felt backing adjacent to the stone. The warmth and acoustic softness of the wood perfectly counterbalance the cold hardness of the stone.
- Matte Black Z-Frame Steel: Frame the perimeter of the stone accent wall with 1/4-inch by 1-inch matte black powder-coated flat bar steel. This provides a sharp, architectural boundary that prevents the stone from visually "bleeding" into the adjacent drywall.
- Reeded Glass Partitions: If using the stone wall as a backdrop for a room divider, pair it with 1/2-inch fluted reeded glass in a brass channel. The translucency of the glass lightens the visual mass of the stone.
Code, Clearance, and the Combustibility Trap
When designing a stone veneer panel surround for a fireplace, aesthetic vision must yield to fire code. This is where many DIY designers and general contractors make catastrophic errors. The NFPA 211 standard strictly governs clearances for solid fuel-burning appliances.
If you specify a high-density polyurethane faux stone veneer panel, you are installing a combustible material. NFPA 211 mandates a minimum 6-inch clearance from the facing of combustible materials to the firebox opening, and often requires a 12-inch clearance above the opening, depending on the mantel projection. Conversely, true cementitious manufactured stone veneer (like Cultured Stone) is classified as non-combustible (ASTM E136 compliant) and can typically be installed flush to the firebox edge, provided the firebox manufacturer's specific zero-clearance instructions are followed. Always verify the ASTM fire rating of your specific panel SKU before finalizing the fireplace elevation drawing.
Budgeting for High-End Design
The cost of achieving a luxury stone aesthetic varies wildly based on material selection and substrate preparation. According to current remodeling cost data tracked by platforms like Angi, national averages for stone veneer installation range significantly based on the product tier.
- Polyurethane Faux Panels: $6 to $12 per square foot (material only). Installation is DIY-friendly using construction adhesive and trim-head screws, keeping labor costs near zero.
- Manufactured Cementitious Veneer: $10 to $18 per square foot (material). Requires a professional mason, metal lath, a scratch coat of Type S mortar, and specialized grout bags, pushing installed costs to $25 to $40 per square foot.
- Natural Thin Stone Veneer: $18 to $35+ per square foot (material). Harvested and sliced from real quarried stone (such as Oklahoma ledgerock or Vermont slate), this requires the highest level of masonry skill to blend color variations and manage irregular thicknesses, with installed costs frequently exceeding $50 per square foot.
For a true design showcase, allocate your budget toward natural thin stone veneer or premium manufactured profiles, and invest heavily in the lighting architecture. A $5,000 natural stone wall lit by $200 worth of poorly placed floodlights will look cheaper than a $1,500 manufactured panel lit by precision 15-degree architectural grazers. Design is ultimately about the manipulation of light and shadow; treat your stone veneer panel as the canvas, and your lighting plan as the brush.
Written by
Marcus ChenMarcus Chen is a licensed structural engineer (PE) and building materials analyst with over 12 years of experience across residential, commercial, and industrial construction. He holds a Master of Science in Civil Engineering from UC Berkeley and spent six years at Thornton Tomasetti before transitioning to independent consulting and technical writing. Marcus specializes in material selection for seismic-prone regions, concrete reinforcement strategies, and lifecycle cost analysis. His work has been cited by the American Concrete Institute (ACI) and the Structural Engineers Association of California (SEAOC). When he is not on a job site or at his desk, you will find him hiking the Sierra Nevada or restoring a 1920s craftsman bungalow in Oakland, CA.
More from Marcus Chen
View all
Construction Cost
How Much Did the Eiffel Tower Cost to Build?
How much did the Eiffel Tower cost to build in 1889? We adjust for inflation and compare its budget to modern skyscraper construction.
Aug 4, 2026

Fire Resistance
What Is a Fire Resistant Material? Testing & Certification Guide
Discover what is a fire resistant material through ASTM and UL testing. Learn how fire ratings, certifications, and assemblies work in construction.
Aug 4, 2026

Construction Cost
How Much Did the Burj Khalifa Cost to Build?
How much did the Burj Khalifa cost to build? We break down the $1.5B project and extract 5 money-saving strategies for your next build.
Jul 30, 2026