Gold Bond XP Gypsum Board Installation Guide for Wet Areas
Master Gold Bond XP gypsum board installation in high-moisture areas. Learn framing, fastening, and finishing techniques to prevent mold and water damage.

Core Material Specifications and Handling Protocols
Gold Bond XP (eXtreme Protection) gypsum board is engineered specifically for high-humidity and moisture-prone environments. Manufactured by National Gypsum, this product features a moisture- and mold-resistant green face paper and a water-resistant core treated with specialized additives to meet ASTM C1396 standards for water-resistant gypsum panels. While standard drywall degrades rapidly when exposed to ambient humidity exceeding 60%, Gold Bond XP maintains structural integrity and limits mold propagation on its surface.
- Thicknesses: 1/2 in. (12.7 mm) and 5/8 in. (15.9 mm)
- Standard Widths: 48 in. (1220 mm)
- Standard Lengths: 8 ft to 12 ft
- Weight: Approx. 1.6 lbs./sq. ft. (1/2 in.) and 2.2 lbs./sq. ft. (5/8 in.)
- Core Compliance: ASTM C1396, Section 7 (Water-Resistant Gypsum Board)
Proper handling on the job site is critical. Store Gold Bond XP boards flat, off the ground, and under cover. While the core is water-resistant, prolonged exposure to standing water or direct weathering before enclosure will compromise the paper facing. Always lift panels using a drywall carrier or two-person team to prevent edge crushing, which compromises the taper and complicates finishing.
Framing Tolerances and Fastener Selection
The longevity of a moisture-resistant wall assembly depends heavily on the underlying framing and the fasteners used to secure it. According to the Gypsum Association's GA-216 Application and Finishing Guide, framing members must be straight, true, and properly spaced to prevent fastener pop and joint ridging.
For 1/2 in. Gold Bond XP, frame walls at a maximum of 16 inches on center (o.c.). For 5/8 in. panels, you may increase spacing to 24 inches o.c. on walls, though 16 inches o.c. is recommended for ceilings regardless of thickness to prevent sagging in humid conditions.
Fastener Schedule and Corrosion Requirements
Never use standard black phosphate drywall screws in wet areas. The phosphate coating offers zero corrosion resistance, and rust will quickly bleed through the joint compound and paint. You must use screws with a ceramic, epoxy, or hot-dipped galvanized coating.
| Panel Thickness | Wood Framing Screw Length | Metal Framing Screw Length | Field Spacing (Walls) |
|---|---|---|---|
| 1/2 in. XP Board | 1-1/4 in. Coarse Thread | 1 in. Fine Thread (Type S) | Max 16 in. o.c. |
| 5/8 in. XP Board | 1-3/8 in. Coarse Thread | 1-1/4 in. Fine Thread (Type S) | Max 24 in. o.c. |
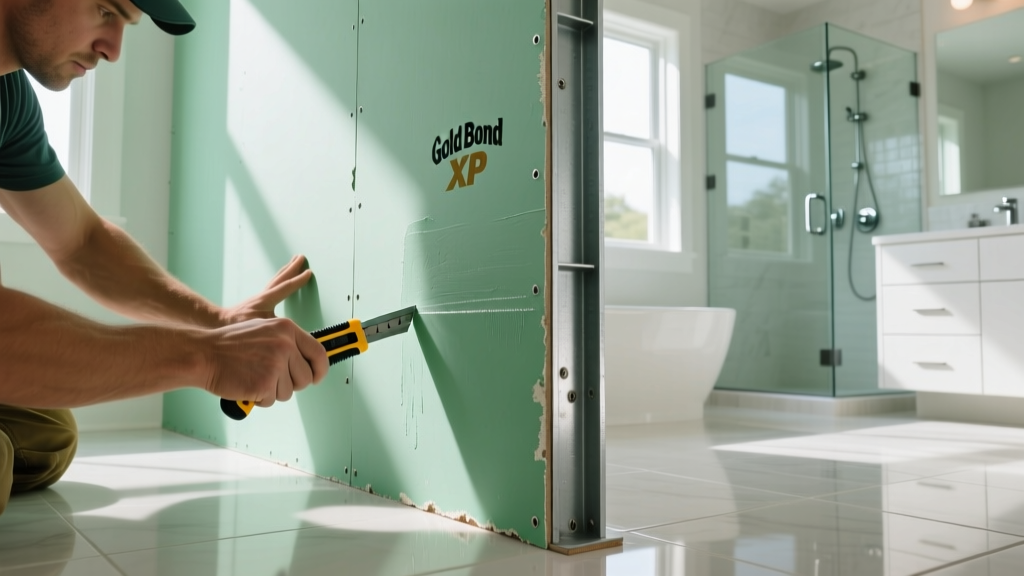
Step-by-Step Hanging Technique
Executing a precise hang minimizes the amount of joint compound required, reducing the overall moisture load introduced to the room during the finishing phase.
- Measure and Score: Measure the panel and mark the green face paper. Use a sharp utility knife to score deeply through the face paper and into the gypsum core. Avoid using drywall routers inside finished homes, as they generate excessive airborne dust that settles into HVAC systems.
- Snap and Cut: Apply firm, even pressure to snap the core along the scored line. Cut the back paper to separate the piece. Use a drywall rasp to smooth the cut edge for a tight butt joint.
- Cutouts for Plumbing: For electrical boxes and plumbing penetrations, measure from the edge of the installed panel to the center of the obstruction. Transfer these measurements to the board and cut using a drywall keyhole saw. Cut the hole 1/8 in. larger than the pipe or box to allow for structural expansion.
- Maintain the Expansion Gap: When installing the bottom course of Gold Bond XP, maintain a strict 1/4 in. to 1/2 in. gap between the bottom edge of the board and the subfloor or bathtub flange. This prevents wicking of standing water into the gypsum core via capillary action.
- Secure the Panel: Starting from the center of the panel and working outward, drive corrosion-resistant screws into the framing. Keep fasteners at least 3/8 in. from the edges and ends of the board to prevent edge blowouts.
Joint Treatment and Waterproofing Membranes
A common misconception among general contractors is that Gold Bond XP is a standalone waterproof tile backer. It is not. It is a water-resistant panel designed to withstand high ambient humidity and occasional splashes. For direct, continuous water exposure (such as inside a shower surround or tub alcove), local building codes and the National Gypsum Construction Guide dictate the use of a continuous waterproofing strategy.
Compound Selection Matrix
In high-moisture environments, the type of joint compound used is just as critical as the board itself. Standard drying-type compounds re-emulsify when exposed to water, leading to joint failure behind tile.
| Compound Type | Best Application | Moisture Resistance |
|---|---|---|
| Setting-Type (45 or 90 min) | Taping and first coat in wet areas | High (Chemical cure, won't re-emulsify) |
| Lightweight All-Purpose | Topping coats in humid (non-wet) rooms | Low (Dries by evaporation) |
| Silicone/Polyurethane Sealant | Bottom edge gaps and tub transitions | Absolute (Flexible waterproof barrier) |
Waterproofing Protocol for Showers: If using Gold Bond XP as a substrate for a tiled shower, you must apply a liquid-applied waterproofing membrane (such as a ANSI A118.10 compliant liquid membrane) or a sheet membrane over the taped and finished XP board before applying thin-set mortar and tile. Ensure the membrane wraps over the shower pan liner or tub flange to direct water into the drain.
Troubleshooting Common Installation Failures
Even with premium materials, poor execution leads to callbacks. Review these common failure modes specific to moisture-resistant drywall installations:
- Rust Bleed-Through: Cause: Using standard black phosphate screws or leaving uncoated metal corner beads exposed. Fix: Always use vinyl or PVC corner beads in wet areas, or stainless-steel beads. Ensure all fasteners are rated for wet environments.
- Edge Wicking and Swelling: Cause: The bottom edge of the drywall rests directly on the concrete slab or tub ledge. Fix: Cut out the swollen bottom 2 inches of the board, install a backing strip, patch with a new piece of XP board, and seal the bottom gap with 100% silicone.
- Joint Ridging: Cause: Framing lumber shrinks or trusses uplift, pushing the panel edges outward. Fix: In areas prone to truss uplift, float the joints at the ceiling-to-wall intersection by withholding fasteners on the ceiling panel within 16 inches of the wall edge.
- Mold Behind the Membrane: Cause: Trapping existing moisture inside the wall cavity before sealing it with a waterproofing membrane. Fix: Ensure the framing is completely dry (below 19% moisture content) before hanging the board. Do not install vapor barriers on both the interior and exterior sides of the wall assembly, as this creates a 'mold sandwich'.
Code Compliance and Testing Standards
When specifying and installing Gold Bond XP, contractors must adhere to the International Building Code (IBC) and International Residential Code (IRC) regarding water-resistant wall coverings. The board must be tested and certified to ASTM C1396 for water resistance, which requires the panel to absorb no more than 5% water by weight after a 2-hour surface water exposure test. Furthermore, the mold resistance of the facing and core is validated via ASTM D3273, achieving a panel score of 10 (the highest possible rating, indicating no mold growth). Always verify that the specific product batch installed on site carries the UL or Intertek certification mark on the back paper to satisfy municipal inspections.
Written by
David NakamuraDavid Nakamura is a licensed architect (AIA) and construction technology writer focused on sustainable building methods, mass timber engineering, and high-performance building envelopes. He holds a Master of Architecture from the University of Washington and is a certified Passive House Consultant (CPHC). David spent eight years at the Seattle firm Mithun, where he led the design of three LEED Platinum projects, before founding his own practice specializing in net-zero residential design. He serves on the editorial advisory board of GreenBuilder Magazine and has authored peer-reviewed papers on cross-laminated timber (CLT) connections for the Journal of Structural Engineering. In his spare time, David teaches woodworking at Pratt Fine Arts Center and kayaks the Puget Sound.
More from David Nakamura
View all
Construction Cost
Labor Cost to Build a Deck Per Sq Ft: 2026 Installation Guide
Discover the exact labor cost to build a deck per sq ft in 2026. This installation guide breaks down contractor rates, complexity factors, and hidden fees.
Aug 4, 2026

Construction Cost
How Much Does It Cost to Build a 3 Bedroom House? Financing Guide
Learn exactly how much it costs to build a 3 bedroom house and explore 2026 financing options, construction loan types, and budget frameworks for your build.
Aug 4, 2026

Construction Cost
Cost to Build a Tennis Court: 2026 Guide
How much does it cost to build a tennis court in 2026? Breakdowns for asphalt, concrete, and synthetic surfaces plus fencing and lighting.
Jul 30, 2026