Cedar Wood Decking Material: Installation Best Practices & Hidden Costs
Master cedar wood decking material installation with expert framing, fastening, and sealing techniques to prevent warping, rot, and hidden cost overruns.

The Reality of Cedar Decking in 2026: Why Installation Makes or Breaks Your Investment
Cedar wood decking material remains a premium choice for builders and homeowners seeking a natural, decay-resistant surface without the plastic aesthetic of composites. Western Red Cedar (Thuja plicata) offers exceptional dimensional stability, natural tannins that repel insects, and a high strength-to-weight ratio. However, the failure rate for cedar decks within the first five years is heavily skewed toward improper installation rather than material defects. When cedar cupping, checking, or premature rot occurs, 80% of the time the root cause traces back to inadequate joist spacing, incorrect fastener metallurgy, or improper acclimation.
This guide bypasses generic advice and provides the exact structural, metallurgical, and finishing protocols required to install cedar wood decking material that survives extreme weather cycles while maintaining its structural integrity and aesthetic appeal.
Lumber Selection: Grading and Moisture Content Tolerances
Before a single board is laid, the moisture content (MC) of the cedar must be verified. Cedar wood decking material is typically sold either Kiln-Dried (KD) at 12-15% MC, or Green/Wet (S-GRN) at 19%+ MC. Installing S-GRN cedar in a dry climate without acclimation guarantees severe longitudinal checking and fastener pop-outs as the wood rapidly sheds moisture.
Understanding Cedar Grades for Decking
- Clear Vertical Grain (CVG): The most stable and expensive grade. Growth rings are perpendicular to the board face, minimizing cupping and shrinkage. Best for high-visibility, low-maintenance applications.
- C-Better / Select Tight Knot (STK): Contains small, tight knots. Offers 90% of the structural stability of CVG at roughly 60% of the cost. The most common choice for premium residential cedar decks.
- Construction / Standard Grade: Contains larger knots and occasional sapwood. Sapwood lacks the natural decay-resistant extractives found in cedar heartwood, making it highly susceptible to rot if left untreated or in ground contact.
Substructure Engineering: Joist Spacing and Ventilation
Cedar is softer than tropical hardwoods (Janka hardness of 350 lbf for Western Red Cedar vs. 3,680 lbf for Ipe). Consequently, it requires stricter joist spacing to prevent sagging and bounce under live loads.
| Board Profile | Maximum Joist Spacing (Perpendicular) | Maximum Joist Spacing (45° Diagonal) | Required Fasteners per Joist |
|---|---|---|---|
| 5/4 x 6 (1" x 5.5" Actual) | 16 inches on center (O.C.) | 12 inches O.C. | 2 |
| 2 x 6 (1.5" x 5.5" Actual) | 24 inches O.C. | 16 inches O.C. | 2 |
| 5/4 x 4 (1" x 3.5" Actual) | 12 inches O.C. | 12 inches O.C. | 2 |
Joist Protection and Airflow
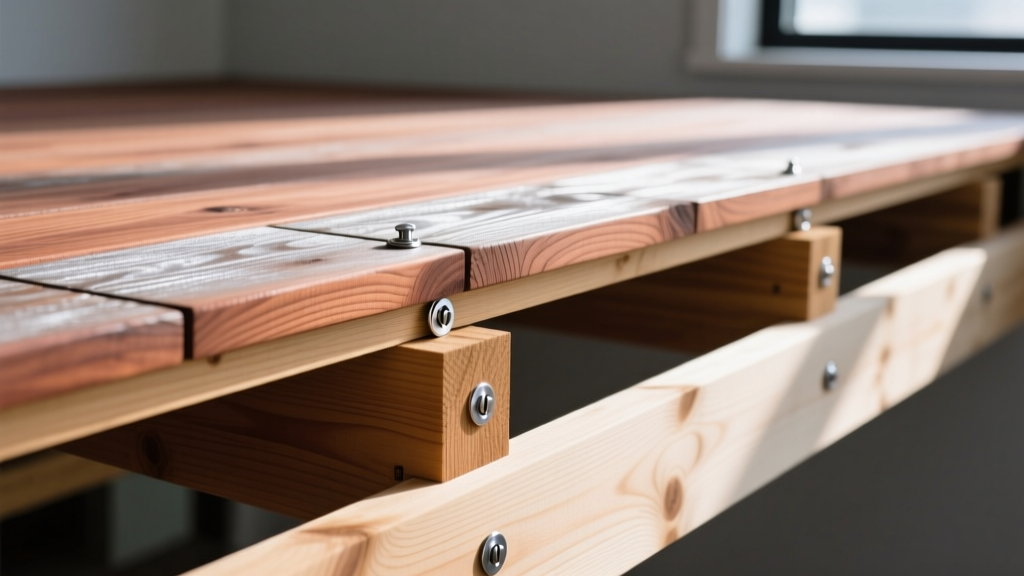
The leading cause of cedar deck failure is substructure rot. When cedar decking traps moisture against standard pressure-treated (PT) joists, the PT chemicals can accelerate the degradation of the cedar's underside. In 2026, best practice dictates applying a butyl-based joist tape (such as Trex Protect or G-Tape) over all framing members. This creates an impermeable barrier that prevents moisture pooling on the joists and stops galvanic corrosion between the fasteners and the PT lumber.
Furthermore, cedar wood decking material requires a minimum of 18 inches of unobstructed cross-ventilation beneath the deck. If building a low-level deck (under 18 inches), you must incorporate perimeter venting grates and a 6-mil polyethylene vapor barrier over the soil to prevent ground moisture from wicking into the cedar.
Fastening Protocols: Metallurgy and Spacing
Cedar contains natural acids and tannins that will rapidly corrode standard zinc-plated or electro-galvanized fasteners, leading to unsightly black halos (tannin bleed) and structural failure. Hot-dipped galvanized (HDG) fasteners are the absolute minimum requirement, but they can still react with certain modern ACQ (Alkaline Copper Quaternary) pressure-treated framing.
Face Fastening vs. Hidden Fasteners
While hidden clip systems (like Camo or Eb-Ty) offer a clean, screw-free surface, they restrict the natural lateral expansion and contraction of cedar. If using hidden edge-fasteners, you must leave a 3/16-inch gap between boards. If face-screwing, use a 3-inch #8 or #10 stainless steel trim-head screw. Pre-drilling is mandatory within 1 inch of the board ends to prevent splitting, especially with brittle CVG cedar in low-humidity environments.
Acclimation, Gapping, and Board Orientation
Wood moves tangentially (across the width) far more than radially (through the thickness). Western Red Cedar shrinks approximately 5.1% tangentially and 2.6% radially from green to oven-dry. How you orient the grain dictates how the board will cup over time.
The "Bark Side Up" Debate
Look at the end grain of the cedar board. The growth rings form arcs. Install the boards with the growth rings curving downward (like a rainbow, or "bark side up"). When installed this way, any water that pools on the surface will run off the edges of the cup rather than pooling in the center. If installed "bark side down," the board will cup upwards, creating a trough that holds water, accelerating rot and algae growth.
Calculating the Exact Gap
Do not blindly use a 1/4-inch spacer for every board. The gap must be calculated based on the wood's current MC and the local seasonal humidity swing.
- Wet Cedar (19%+ MC) installed in a dry season: Install tight (0 gap). The wood will shrink to a 1/4-inch or 3/8-inch gap naturally over the first 6 months.
- Kiln-Dried Cedar (12% MC) installed in a humid season: Use a 1/8-inch to 3/16-inch spacer. The wood will expand slightly; a 1/4-inch gap will shrink to a tight 1/16-inch joint, preventing buckling.
Finishing: Sealing the Wood Without Trapping Moisture
The biggest mistake contractors make with cedar wood decking material is applying a film-forming finish (like polyurethane or heavy solid-color stains) to horizontal surfaces. UV radiation will break down the film, and moisture vapor escaping from the wood will cause the finish to blister and peel within 14 months, requiring an expensive and labor-intensive chemical strip and sand.
The Penetrating Oil Strategy
Use a high-quality, penetrating alkyd or plant-based oil finish (such as Penofin Hardwood Formula or Armstrong-Clark). These finishes soak into the wood's cellular structure rather than sitting on top, allowing the cedar to breathe and release moisture vapor without peeling.
| Finish Type | UV Protection | Maintenance Cycle | Failure Mode |
|---|---|---|---|
| Clear Water Repellent | None (Grays in 6 mos) | Annual | Water spotting, rapid UV graying |
| Semi-Transparent Oil | Moderate (1-2 years) | Every 2-3 years | Fades gradually, no peeling |
| Solid Color Stain | High (3-5 years) | Every 3-5 years | Peeling, blistering, difficult prep |
Application Timing: Do not seal the deck immediately after installation if the cedar is S-GRN or has been exposed to rain. Allow the wood to weather and dry to below 15% MC (typically 3 to 6 weeks depending on climate) before applying the first coat of penetrating oil. Sealing wet cedar traps moisture inside the cellular structure, guaranteeing internal rot.
Hidden Cost Overruns to Anticipate
When budgeting a cedar deck project, contractors and homeowners often only calculate the cost per linear foot of the decking boards. To prevent budget shock, factor in these critical ancillary costs:
- Waste Factor: Cedar boards, especially STK and lower grades, often contain unusable sections due to loose knots or end splits. Budget a 12-15% waste factor, compared to the standard 10% for composite.
- Stainless Steel Premium: 305 stainless steel trim-head screws cost roughly 4x more than standard HDG deck screws. For a 400 sq. ft. deck, this adds $250-$400 to the hardware budget.
- Joist Tape and Flashing: Butyl joist tape adds approximately $0.45 to $0.60 per linear foot of framing. While optional in older building codes, it is a non-negotiable best practice for maximizing the lifespan of a cedar surface.
By adhering strictly to these moisture, structural, and metallurgical guidelines, your cedar wood decking material will perform flawlessly, offering decades of natural beauty and structural reliability without the premature failures that plague poorly executed installations.
Written by
Elena RodriguezElena Rodriguez is a civil engineer and technical writer specializing in concrete technology, masonry systems, and ASTM/ACI compliance. She earned her B.S. in Civil Engineering from Texas A&M University and spent a decade at a materials testing laboratory, performing over 2,000 concrete compressive strength tests and masonry prism evaluations. Elena is an ACI-certified Field Testing Technician (Grade I) and a member of ASTM Committee C12 on Natural Building Stone. She currently consults on forensic engineering cases involving concrete failures and moisture intrusion. Based in San Antonio, TX, Elena is a proud member of the Society of Women Engineers (SWE) and coaches her daughter's FIRST Robotics team.
More from Elena Rodriguez
View all
Walls & Panels
Cost Analysis: Light Gauge Steel Framing Advantages and Disadvantages
Evaluate light gauge steel framing advantages and disadvantages through a strict cost analysis lens, comparing material, labor, and lifecycle expenses.
Aug 4, 2026

Walls & Panels
Gypsum Board Types: Exact Specifications, Thickness & Dimensions
Compare standard, Type X, and moisture-resistant gypsum board types. Get exact specifications, thicknesses, dimensions, and ASTM standards for your project.
Aug 4, 2026

Fire Resistance
Best Fire-Resistant Outdoor Decking Materials: 2026 Buyer Guide
Discover the best fire-resistant outdoor decking materials for 2026. Compare Class A PVC, aluminum, and hardwood options for WUI compliance and safety.
Aug 4, 2026