Sauna Insulation Material Selection: A Pro Builder's Framework
Discover the definitive sauna insulation material selection framework. Compare foil barriers, mineral wool, and rigid foam for optimal heat retention.

The Physics of Sauna Insulation: Why Standard Rules Fail
Designing a thermal envelope for a residential home is fundamentally different from engineering a sauna. A standard home experiences a seasonal temperature delta of perhaps 70°F to 100°F between the conditioned interior and the exterior. A traditional Finnish-style sauna operates at interior temperatures between 150°F and 195°F (65°C to 90°C), while the exterior wall sheathing may sit at freezing temperatures during winter. This creates a massive thermal gradient and an extreme, unidirectional vapor drive that pushes moisture aggressively outward through the wall assembly.
Selecting the correct sauna insulation material requires a framework that addresses three non-negotiable physical demands: extreme thermal resistance, absolute vapor impermeability, and high-temperature material stability. Standard building practices—such as using kraft-faced fiberglass batts or relying on closed-cell spray foam as a dual-purpose air and vapor barrier—frequently result in catastrophic failures, including toxic off-gassing, hidden mold proliferation, and rapid heat degradation. This selection framework provides the exact specifications required to build a durable, high-performance sauna envelope.
Pillar 1: Thermal Resistance and Radiant Reflection
The primary goal of the insulation layer is to minimize conductive heat loss, allowing the sauna heater to reach target temperatures efficiently without overworking. For standard 2x4 framed walls, the target is R-13 to R-15. For 2x6 framed ceilings, where heat naturally rises and accumulates, the target increases to R-22 to R-26.
However, conductive resistance (the R-value of the batt) is only half the equation. Saunas generate immense amounts of radiant heat. To achieve rapid heat-up times and maintain an even ambient temperature, the insulation assembly must incorporate a radiant barrier. Pure aluminum foil reflects up to 97% of radiant heat back into the room, effectively boosting the perceived performance of the thermal envelope and reducing the load on the electric or wood-burning heater.
Pillar 2: Vapor Management and the Dew Point
When water is thrown onto hot sauna rocks, the interior humidity spikes dramatically. According to the U.S. Department of Energy, vapor retarders are critical in assemblies with high moisture generation to prevent condensation within the wall cavity. In a sauna, the vapor drive is entirely outward. If this moisture reaches the cold exterior sheathing and drops below the dew point, it will condense into liquid water, rotting the studs and breeding black mold.
Standard polyethylene sheeting (6-mil poly) is entirely inappropriate for saunas. Polyethylene degrades under sustained high heat and can become brittle, tearing easily during the installation of the interior cedar paneling. The mandatory standard for sauna construction is a continuous, unbroken layer of pure aluminum foil (minimum 1.4 mil thickness), taped at every seam with high-temperature aluminum foil tape.
Pillar 3: Thermal Degradation and Off-Gassing
The interior surface of the insulation layer will routinely experience temperatures exceeding 120°F, with localized spikes near the ceiling and heater reaching much higher. Many synthetic insulation materials are not engineered for these sustained thermal loads.
While ccSPF offers an excellent R-value (R-6.5 per inch) and acts as its own vapor barrier, most standard formulations have a maximum service temperature of 180°F. In the upper third of a sauna wall or the ceiling, surface temperatures can exceed this threshold, causing the foam to degrade, delaminate, and release volatile organic compounds (VOCs). The EPA warns against VOC exposure in enclosed, high-heat environments. Unless you are using a specialized, high-temp rated spray foam explicitly warranted for sauna applications, avoid it entirely.
Sauna Insulation Material Matrix
The following matrix evaluates common insulation materials against the strict requirements of the sauna environment.
| Material | R-Value / Inch | Max Temp Tolerance | Vapor Permeability | Verdict |
|---|---|---|---|---|
| Mineral Wool (Unfaced) | R-4.2 | 2,150°F (Non-combustible) | Permeable (Requires Foil) | Best Overall |
| Fiberglass (Unfaced) | R-3.1 to R-3.4 | Up to 350°F (Binder limits) | Permeable (Requires Foil) | Good / Budget Option |
| XPS Rigid Foam | R-5.0 | 165°F (Melts/Degrades) | Semi-Impermeable | Do Not Use |
| ccSPF (Spray Foam) | R-6.5+ | 180°F (Standard Formulations) | Impermeable | High Risk / Avoid |
The Mandatory Radiant Vapor Barrier
Regardless of whether you choose mineral wool or unfaced fiberglass for the stud cavities, the continuous interior barrier must be pure aluminum foil. Products like Reflectix or dedicated sauna foil rolls (typically 1.4 to 2.0 mil thick) are the industry standard.
- Never use Kraft-faced batts: The asphalt-impregnated paper backing is a vapor retarder, but it is highly susceptible to mold growth in the humid sauna environment and can emit an unpleasant odor when heated.
- Never use standard duct tape: The adhesive on standard cloth-backed duct tape will melt and fail at 150°F. You must use UL-listed, pure aluminum foil tape (such as Nashua 322 or 3M 3340) to seal every overlap and staple puncture.
- Overlap and Seal: Run the foil horizontally, overlapping seams by at least 2 inches, and tape them continuously. Bring the foil down over the top plate and overlap it with the wall foil to create a seamless envelope.
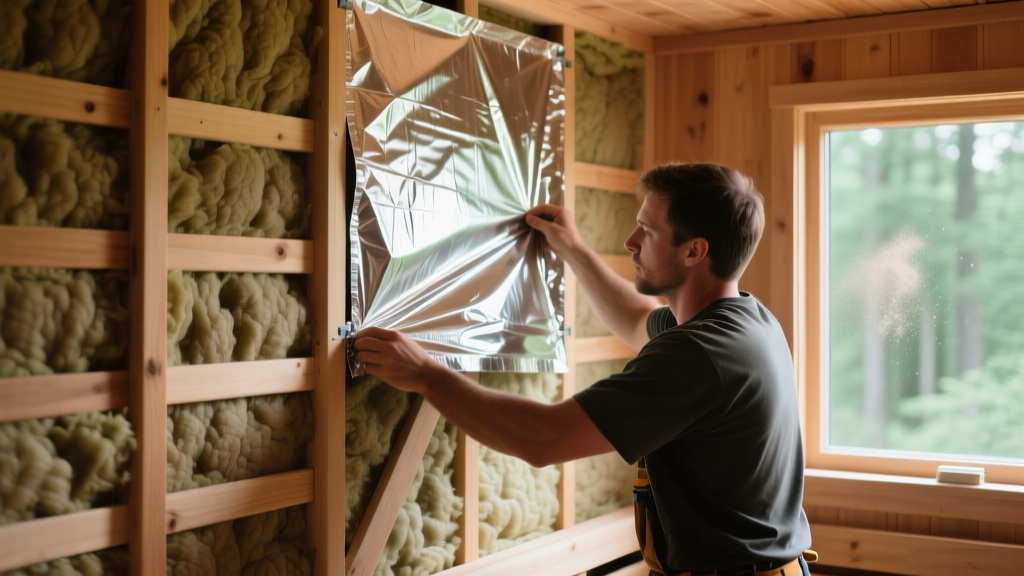
Step-by-Step Wall Assembly Sequence
Executing the correct order of operations is just as critical as material selection. Follow this precise layering sequence from the exterior sheathing inward:
- Exterior Sheathing & Housewrap: Standard OSB or plywood sheathing covered with a breathable exterior weather-resistive barrier (WRB).
- Stud Cavity Insulation: Friction-fit unfaced mineral wool batts (e.g., Rockwool Comfortbatt) into the 2x4 or 2x6 cavities. Ensure there are no gaps around electrical boxes or plumbing penetrations. Mineral wool is preferred here for its acoustic dampening properties and absolute fire resistance.
- Continuous Foil Barrier: Staple the pure aluminum foil directly to the interior face of the studs. Tape all seams and staple marks with aluminum foil tape.
- Furring Strips (The Air Gap): Nail 1x2 or 1x3 cedar or spruce furring strips horizontally over the foil, aligned directly over the wall studs. This step is critical. This creates a 3/4-inch dead air space between the foil and the interior paneling, which acts as a secondary insulating layer and allows the back of the cedar to breathe, preventing the wood from warping or cupping.
- Interior Paneling: Install tongue-and-groove clear cedar or hemlock vertically or horizontally onto the furring strips, leaving a 1/2-inch gap at the floor and ceiling for air circulation.
Common Failure Modes and Troubleshooting
When saunas fail to reach temperature or develop structural issues, the root cause almost always traces back to the insulation and vapor barrier assembly.
Symptom: The Sauna Takes Too Long to Heat Up
Cause: Missing air gap or inadequate ceiling insulation. If the cedar paneling is nailed directly to the foil without furring strips, conductive heat loss increases dramatically. Furthermore, if the ceiling was only insulated to R-13 instead of the required R-22+, the rising heat will escape through the roof assembly.
Fix: Ensure the ceiling cavity is fully packed with mineral wool and verify the 3/4-inch furring strip air gap is continuous across walls and ceilings.
Symptom: Chemical Odors During Heating
Cause: Off-gassing from inappropriate materials. This occurs when builders use XPS foam board, standard spray foam, or plastic vapor barriers that exceed their thermal decomposition thresholds.
Fix: The wall assembly must be stripped down to the studs. Replace all synthetic foams and plastics with unfaced mineral wool and pure aluminum foil.
Symptom: Black Mold on Exterior Sheathing
Cause: Compromised vapor barrier. If the foil was torn during wiring installation and not taped, or if standard poly sheeting was used and degraded, moisture bypasses the barrier and condenses on the cold exterior OSB.
Fix: Inspect the exterior sheathing for rot. Replace damaged wood, and reinstall a continuous, meticulously taped aluminum foil barrier on the warm-in-winter side of the assembly.
Final Material Procurement Checklist
Before framing begins, verify your materials against this strict procurement list to ensure longevity and safety:
- Insulation: Unfaced Mineral Wool Batts (R-15 for 2x4 walls, R-23 for 2x6 ceilings).
- Vapor/Radiant Barrier: Pure Aluminum Foil Roll (Minimum 1.4 mil thickness, pure aluminum, not metalized polyester).
- Seam Tape: UL-Listed Aluminum Foil Tape (2-inch or 3-inch width, acrylic adhesive rated for 200°F+).
- Furring Strips: 1x2 or 1x3 Cedar or Kiln-Dried Spruce (Untreated, no pressure-treated chemicals).
- Fasteners: Stainless steel or hot-dipped galvanized nails for the furring strips to prevent rust stains from bleeding through the cedar over time.
By adhering to this selection framework, you eliminate the guesswork and structural liabilities inherent in high-heat, high-humidity construction. The combination of mineral wool's thermal stability, pure aluminum's radiant reflection, and a ventilated cedar air gap yields a sauna that heats rapidly, retains temperature efficiently, and remains structurally sound for decades.
Written by
David NakamuraDavid Nakamura is a licensed architect (AIA) and construction technology writer focused on sustainable building methods, mass timber engineering, and high-performance building envelopes. He holds a Master of Architecture from the University of Washington and is a certified Passive House Consultant (CPHC). David spent eight years at the Seattle firm Mithun, where he led the design of three LEED Platinum projects, before founding his own practice specializing in net-zero residential design. He serves on the editorial advisory board of GreenBuilder Magazine and has authored peer-reviewed papers on cross-laminated timber (CLT) connections for the Journal of Structural Engineering. In his spare time, David teaches woodworking at Pratt Fine Arts Center and kayaks the Puget Sound.
More from David Nakamura
View all
Construction Cost
Labor Cost to Build a Deck Per Sq Ft: 2026 Installation Guide
Discover the exact labor cost to build a deck per sq ft in 2026. This installation guide breaks down contractor rates, complexity factors, and hidden fees.
Aug 4, 2026

Construction Cost
How Much Does It Cost to Build a 3 Bedroom House? Financing Guide
Learn exactly how much it costs to build a 3 bedroom house and explore 2026 financing options, construction loan types, and budget frameworks for your build.
Aug 4, 2026

Construction Cost
Cost to Build a Tennis Court: 2026 Guide
How much does it cost to build a tennis court in 2026? Breakdowns for asphalt, concrete, and synthetic surfaces plus fencing and lighting.
Jul 30, 2026