Best Wall Sound Insulation Material for Interior Partitions
Compare the best wall sound insulation material options. Learn STC ratings, installation techniques, and costs for quiet interior partitions.

The Physics of Sound Transmission in Walls
Selecting the correct wall sound insulation material requires understanding how acoustic energy moves through building assemblies. Sound travels in two primary forms: airborne noise (voices, television) and impact noise (footsteps, vibrating machinery). Standard interior walls built with 2x4 wood studs, uninsulated cavities, and a single layer of 1/2-inch drywall on each side yield a Sound Transmission Class (STC) rating of roughly 33. At STC 33, loud speech is easily understood through the wall.
To achieve true acoustic privacy in bedrooms, home theaters, or home offices, the target is an STC rating of 50 or higher. Reaching this threshold relies on four core acoustic principles: mass, decoupling, damping, and absorption. No single product addresses all four; therefore, high-performance acoustic assemblies combine specific insulation materials with specialized framing and drywall techniques.
- STC 25-30: Normal speech easily understood.
- STC 35-40: Loud speech audible but not intelligible.
- STC 45-50: Loud speech barely audible; standard for premium hotel rooms.
- STC 55+: Most airborne noise effectively blocked; required for home theaters and recording studios.
Top Wall Sound Insulation Material Options Compared
Not all insulation blocks sound equally. Thermal insulation focuses on trapping air to slow heat transfer, while acoustic insulation utilizes dense, fibrous, or limp-mass structures to absorb and dissipate acoustic energy. Below is a comparison of the most effective materials currently available for interior partitions.
| Material Type | Specific Product Example | Density / Weight | STC Boost over Empty Cavity | Avg. Cost (per sq. ft.) |
|---|---|---|---|---|
| Mineral Wool Batts | Rockwool Safe'n'Sound | 2.5 lbs/cu ft | +8 to +10 STC | $1.15 - $1.40 |
| Acoustic Fiberglass | Owens Corning QuietZone | 2.2 lbs/cu ft | +5 to +7 STC | $0.85 - $1.05 |
| Mass Loaded Vinyl (MLV) | Acoustical Surfaces 1lb MLV | 1.0 lb/sq ft | +10 to +15 STC | $1.80 - $2.50 |
| Acoustic Sealant | OSI SC-175 Pro Series | N/A (Viscous) | +3 to +5 STC (System) | $7.50 / 28oz tube |
1. Mineral Wool (The Industry Standard for Absorption)
Mineral wool, specifically stone wool, is widely considered the best cavity-fill wall sound insulation material. Products like Rockwool Safe'n'Sound are engineered with a higher density (2.5 pounds per cubic foot) and a randomized fibrous matrix that creates immense internal friction. When sound waves enter the cavity, the friction converts acoustic energy into trace amounts of heat. Unlike standard thermal fiberglass, mineral wool does not compress easily, ensuring it completely fills the stud bay without leaving acoustic gaps at the edges.
2. Mass Loaded Vinyl (MLV) for Limp Mass
MLV is a flexible, high-density polymer sheeting loaded with barium sulfate. It operates on the principle of 'limp mass'—it adds significant weight to the wall assembly without adding rigid structural connections that could transmit vibrations. MLV is typically stapled to the studs behind the drywall or sandwiched between two layers of gypsum. While highly effective at blocking low-frequency noise (like bass from a subwoofer), it is expensive and requires meticulous taping of seams with acoustic caulk to prevent flanking.
3. Acoustic Foam (A Common Misconception)
It is critical to distinguish between soundproofing and sound absorption. Egg-crate acoustic foam panels absorb high-frequency reverberation within a room, improving internal audio clarity. However, foam adds virtually zero mass and will not stop sound from transmitting through a wall to an adjacent room. Never use acoustic foam as a wall cavity insulation material for sound blocking.
Advanced Framing Techniques for Maximum Soundproofing
The most expensive wall sound insulation material will fail if the wall framing creates a rigid bridge for vibrations. Decoupling the drywall from the structural framing is mandatory for STC 50+ assemblies. The Building Science Corporation emphasizes that structural discontinuities are the most reliable method for halting impact and low-frequency airborne noise.
- Resilient Channels (RC-1): Thin metal channels screwed horizontally to the studs at 24 inches on-center. The drywall is then screwed only to the channel. The channel's flexible flange absorbs vibration. Cost: ~$1.20 per linear foot.
- Staggered Stud Walls: Built on a wide 2x6 bottom plate, with 2x4 studs alternating sides. The drywall on one side of the wall never touches the studs supporting the drywall on the opposite side. Excellent for new construction.
- Double Stud Walls: Two entirely separate 2x4 walls built with a 1-inch air gap between them. This provides the highest possible decoupling and is the gold standard for recording studios and luxury home theaters.
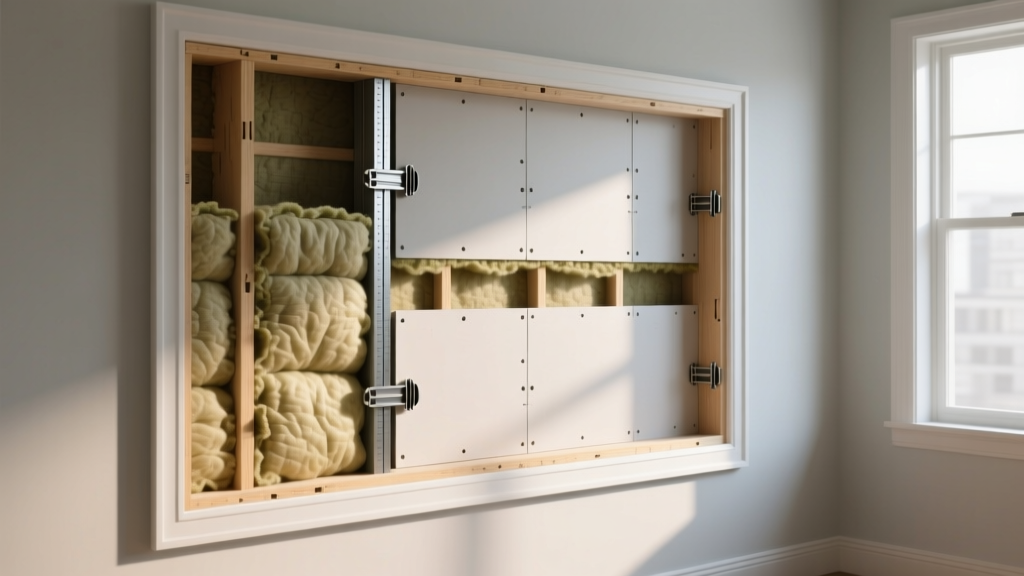
Step-by-Step Installation Workflow for an STC 52 Wall
Follow this exact sequence to construct a high-performance interior partition using 2x4 wood framing, mineral wool, and constrained layer damping.
- Seal the Bottom Plate: Apply a continuous 3/8-inch bead of acoustical sealant (e.g., OSI SC-175) under the bottom wall plate before nailing it to the subfloor. This eliminates the primary flanking path for airborne noise.
- Frame and Insulate: Frame the wall with 2x4 studs at 16 inches on-center. Friction-fit Rockwool Safe'n'Sound 3-inch batts into every cavity. Do not leave gaps around plumbing or electrical runs.
- Treat Electrical Boxes: Install acoustic putty pads (like TradeService Putty Pads) over all recessed electrical boxes. Never place two electrical boxes back-to-back on opposite sides of the same stud bay; offset them by at least 24 inches.
- Hang the First Drywall Layer: Install 5/8-inch Type X gypsum board vertically. Leave a 1/4-inch gap at the floor and ceiling. Do not use screws to attach the drywall to the studs if using resilient channels; attach to the channels only.
- Apply Damping Compound: Apply Green Glue Noiseproofing Compound to the back of the second layer of drywall. Use exactly two tubes per 4x8 sheet, applied in a random squiggly pattern. This viscoelastic compound converts shear stress into heat, dramatically reducing resonance.
- Hang the Second Layer: Screw the second layer of 5/8-inch drywall to the first layer (not into the studs or channels). Offset all seams by at least 16 inches.
- Seal the Perimeter: Fill the 1/4-inch floor and ceiling gaps with acoustical sealant. Standard drywall mud will crack and create acoustic leaks; flexible sealant maintains the airtight seal as the building settles.
Acoustic testing by the Gypsum Association demonstrates that an unsealed penetration comprising just 1% of a wall's total surface area can reduce the assembly's STC rating by up to 50%. A single unsealed gap around an HVAC register or a recessed light fixture will render thousands of dollars in premium wall sound insulation material completely ineffective. Airtight drywall detailing is non-negotiable.
Common Mistakes That Ruin Acoustic Performance
Over-compressing Insulation
Thermal fiberglass loses R-value when compressed, but mineral wool loses its acoustic efficacy when compressed. The random fiber matrix requires the full 3-inch depth to create the necessary friction. If you must fit insulation around a pipe, cut the batt to size and piece it together rather than jamming it into a smaller space.
Short-Circuiting Resilient Channels
When hanging drywall on resilient channels, installers frequently use screws that are too long, penetrating through the channel and biting directly into the wood stud behind it. This creates a rigid mechanical bridge, entirely bypassing the decoupling effect. Use coarse-thread drywall screws no longer than 1-1/8 inches for the final layer.
Ignoring the Ceiling and Floor Connections
Sound behaves like water; it will find the path of least resistance. If the wall drywall is screwed rigidly to the ceiling joists, impact noise from the floor above will travel down the wall. Always maintain a 1/4-inch isolation gap where the wall meets the ceiling, and fill it with non-hardening acoustic sealant.
Frequently Asked Questions
Is blown-in cellulose a good wall sound insulation material?
While dense-packed cellulose (blown in at 3.5 lbs/cu ft) offers excellent thermal performance and decent mid-to-high frequency sound absorption, it is difficult to achieve consistent density in existing closed wall cavities without specialized equipment. For retrofit soundproofing, injecting two-part acoustic expanding foam or removing drywall to install mineral wool batts yields far more predictable STC results.
Does adding more layers of standard drywall work better than specialized materials?
Adding mass does improve sound blocking, following the 'mass law' which states that doubling the mass of a partition yields a theoretical 6 dB (roughly 4-5 STC points) improvement. However, adding three layers of standard drywall adds immense weight and cost, and fails to address low-frequency resonance. Using a constrained layer damping system (two layers of drywall with Green Glue) provides a vastly superior STC boost at a fraction of the weight and labor.
How do I soundproof an existing wall without tearing down the drywall?
Retrofit soundproofing is inherently limited by flanking paths, but you can improve an existing STC 33 wall to roughly STC 42 by adding mass and damping. The most effective non-destructive method is to screw resilient channels directly to the existing drywall, apply a layer of MLV, and finish with a new layer of 5/8-inch drywall. Note that this will reduce the room's dimensions by approximately 1.5 inches on that wall and require extending all electrical outlets using box extenders.
Written by
Marcus ChenMarcus Chen is a licensed structural engineer (PE) and building materials analyst with over 12 years of experience across residential, commercial, and industrial construction. He holds a Master of Science in Civil Engineering from UC Berkeley and spent six years at Thornton Tomasetti before transitioning to independent consulting and technical writing. Marcus specializes in material selection for seismic-prone regions, concrete reinforcement strategies, and lifecycle cost analysis. His work has been cited by the American Concrete Institute (ACI) and the Structural Engineers Association of California (SEAOC). When he is not on a job site or at his desk, you will find him hiking the Sierra Nevada or restoring a 1920s craftsman bungalow in Oakland, CA.
More from Marcus Chen
View all
Construction Cost
How Much Did the Eiffel Tower Cost to Build?
How much did the Eiffel Tower cost to build in 1889? We adjust for inflation and compare its budget to modern skyscraper construction.
Aug 4, 2026

Fire Resistance
What Is a Fire Resistant Material? Testing & Certification Guide
Discover what is a fire resistant material through ASTM and UL testing. Learn how fire ratings, certifications, and assemblies work in construction.
Aug 4, 2026

Construction Cost
How Much Did the Burj Khalifa Cost to Build?
How much did the Burj Khalifa cost to build? We break down the $1.5B project and extract 5 money-saving strategies for your next build.
Jul 30, 2026