How to Evaluate James Hardie Shake Siding for Maintenance & Repair
Learn how to evaluate James Hardie shake siding for long-term maintenance and repair, covering failure modes, replacement steps, and lifecycle costs.

The Reality of HardieShingle Maintenance: Beyond the Warranty
When homeowners and builders evaluate the building materials company James Hardie on shake siding, the conversation usually centers on curb appeal and fire resistance. However, from a maintenance and repair perspective, fiber cement shakes—specifically the HardieShingle (5/16-inch thick with CedarTex texture) and the premium Artisan Shingle (5/8-inch thick with deep shadow lines)—present a unique set of long-term operational realities. Unlike real cedar, fiber cement does not rot, warp, or attract carpenter bees. But it is not entirely maintenance-free. It is a porous, cementitious material that requires precise installation detailing to prevent moisture-related degradation. Understanding how these products age, fail, and require repair is critical for evaluating their true lifecycle value in 2026.
Common Failure Modes in Fiber Cement Shake Siding
Fiber cement siding rarely fails due to material defects; it fails due to installation errors that trigger environmental degradation. When evaluating an existing James Hardie shake installation, inspect for these three specific failure modes:
Edge Spalling from Capillary Moisture Wicking
Fiber cement acts like a dense sponge at its cut edges. If the bottom edge of a shake course rests directly on a roofline, deck, or soil, it will wick moisture upward via capillary action. During freeze-thaw cycles, this trapped water expands, causing the bottom 1 to 2 inches of the shingle to delaminate and spall. James Hardie explicitly mandates a minimum 2-inch clearance above rooflines and a 6-inch clearance above grade. If you evaluate a property and see spalling at the bottom edges, the siding was likely installed without proper clearance or Z-flashing.
Fastener Bleed and Galvanic Corrosion
Shake siding requires thousands of fasteners. If the original installer used electroplated galvanized nails or standard steel nails instead of hot-dipped galvanized or stainless steel ring-shank nails, rust bleed will manifest as orange streaking below the nail heads. Over time, the corroding nail expands, cracking the brittle fiber cement around the fastener head and compromising the wind-uplift resistance of the shake.
The Caulking Trap: Why Bottom Edges Must Breathe
A frequent and severe maintenance error is caulking the horizontal bottom edge of the shingle courses to trim or flashing. According to building envelope principles documented by Building Science Corporation, cladding must be allowed to drain and dry. Caulking the bottom edge traps incidental moisture behind the shakes, leading to saturated sheathing and interior mold. Caulk should only be applied at vertical joints where shakes meet trim, never at horizontal laps.
Step-by-Step Repair: Replacing a Damaged HardieShingle Course
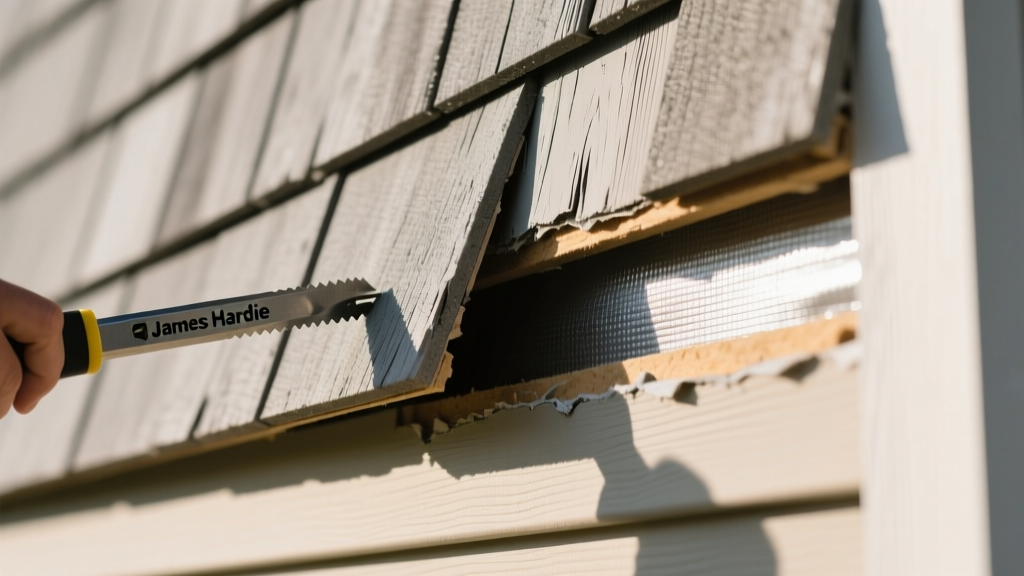
Repairing fiber cement shakes is more labor-intensive than replacing vinyl or cedar due to the material's brittleness and weight. If a shingle is cracked by impact (e.g., from a ladder or hail), follow this extraction and replacement protocol:
- Score and Snap the Replacement Piece: Never use a circular saw or grinder to cut fiber cement on-site without a HEPA vacuum attachment. The Occupational Safety and Health Administration (OSHA) strictly regulates respirable crystalline silica dust. Use a carbide-tipped scoring tool to score the shake along a straight edge, then snap it over your knee for a clean, dust-free break.
- Extract the Damaged Shingle: Slide a flat pry bar behind the damaged shingle. Place a wooden block behind the pry bar to protect the course above it. Gently lever the shingle outward to expose the face nails.
- Cut the Fasteners: Do not attempt to pull the nails out, as this will shatter the overlapping shingle above. Use a reciprocating saw with a metal-cutting blade, or a specialized siding nail puller, to cut the nail shafts flush with the sheathing.
- Install the New Shake: Slide the new replacement shake into the gap. Ensure it maintains a 1/8-inch gap at vertical joints. Blind-nail it just below the exposure line of the overlapping course. If face-nailing is unavoidable, use 1-1/4-inch stainless steel ring-shank nails, pre-drill the holes to prevent splitting, and immediately touch up the nail heads with matching acrylic exterior paint.
15-Year Maintenance Cost Matrix: HardieShingle vs. Real Cedar
To accurately evaluate James Hardie shake siding, you must compare its long-term maintenance costs against the material it mimics: Western Red Cedar. While the upfront material cost of fiber cement is competitive, the real financial divergence occurs in years 5 through 15.
| Maintenance Task (15-Year Period) | HardieShingle (ColorPlus) | Western Red Cedar |
|---|---|---|
| Routine Cleaning (Bi-annual) | $0.15 / sq ft (Garden hose) | $0.25 / sq ft (Soft wash) |
| Stain / Paint Refresh | $0.00 (Years 1-10) $3.50 / sq ft (Year 15) |
$4.00 / sq ft (Years 5, 10, 15) Total: $12.00 / sq ft |
| Pest / Rot Treatment | $0.00 (Inorganic material) | $1.50 / sq ft (Preventative) |
| Individual Shingle Replacement | $45 per panel (Labor heavy) | $25 per shingle (Easy extraction) |
| Estimated 15-Year Total | ~$3.65 / sq ft | ~$13.75 / sq ft |
Routine Maintenance Protocol for ColorPlus Finishes
James Hardie’s factory-applied ColorPlus Technology finish carries a 15-year limited warranty against fading and peeling. To ensure the finish reaches its maximum lifespan without voiding the warranty, adhere to this maintenance protocol:
- Washing: Clean the siding every 6 to 12 months using a standard garden hose and a soft-bristle nylon brush. Never use a pressure washer exceeding 1,500 PSI, and never use a zero-degree nozzle. High-pressure water can force moisture behind the shakes and physically erode the acrylic coating.
- Vegetation Management: Trim all bushes, vines, and tree branches at least 12 inches away from the shake surface. Organic debris holds moisture against the finish and accelerates UV degradation through trapped humidity.
- Joint Inspection: Annually inspect the vertical caulk joints where the shakes meet corner boards or window casings. Use a high-grade polyurethane sealant (such as OSI QUAD Max) for touch-ups. Do not use cheap silicone, which cannot be painted over when the eventual 15-year full repaint is required.
Final Evaluation: Is the Maintenance Trade-Off Worth It?
Evaluating James Hardie on shake siding requires accepting a fundamental trade-off. You are trading the frequent, costly, and messy maintenance of real cedar (staining every 5 years, treating for woodpeckers and rot) for a material that demands rigorous installation precision and specialized repair techniques. Fiber cement shakes will not forgive poor flashing details or ground contact. However, if installed with strict adherence to the manufacturer's clearance requirements and maintained with low-pressure washing and proper joint sealing, HardieShingle and Artisan Shingles offer a remarkably stable, fire-resistant, and cost-effective exterior that easily outperforms natural wood over a 30-year lifecycle.
Written by
Sarah WhitfieldSarah Whitfield is a chartered quantity surveyor (MRICS) and construction cost analyst with 15 years of experience in material pricing, procurement strategy, and project budgeting. She earned her degree in Construction Management from the University of Reading (UK) and has worked on projects ranging from $2M custom homes to $180M mixed-use developments across North America and Europe. Sarah currently leads cost estimating for BuildMat Insight, maintaining a proprietary database of 4,000+ material price points updated quarterly. She is a frequent contributor to RSMeans cost data panels and has presented at the International Cost Engineering Council (ICEC) congress. Based in Denver, CO, Sarah is an avid trail runner and volunteer mentor for Women in Construction.
More from Sarah Whitfield
View all
Wood & Lumber
What Are the Different Types of Wood? A Builder's Guide
Compare structural softwoods, finish hardwoods, and engineered lumber. Analyze Janka ratings, MOE values, and 2026 pricing for construction.
Aug 4, 2026

Walls & Panels
Steel Framing vs Wood Framing: Corrosion and Moisture Defense
Compare steel framing vs wood framing for moisture resistance. Learn about galvanized coatings, condensation risks, and corrosion protection strategies.
Jul 21, 2026

Stone & Masonry
How to Cut Stone Veneer: Wet Saw vs Grinder Comparison
Compare the best tools for cutting stone veneer. We review wet saws, angle grinders, and chop saws to help you achieve clean, chip-free cuts.
Jul 21, 2026