How to Tell What Type of Wood Floor You Have: Expert ID & Grade Guide
Learn how to tell what type of wood floor you have using grain patterns, Janka hardness, and grading marks. Expert tips for solid vs. engineered wood ID.
The Anatomy of a Wood Floor: Solid vs. Engineered
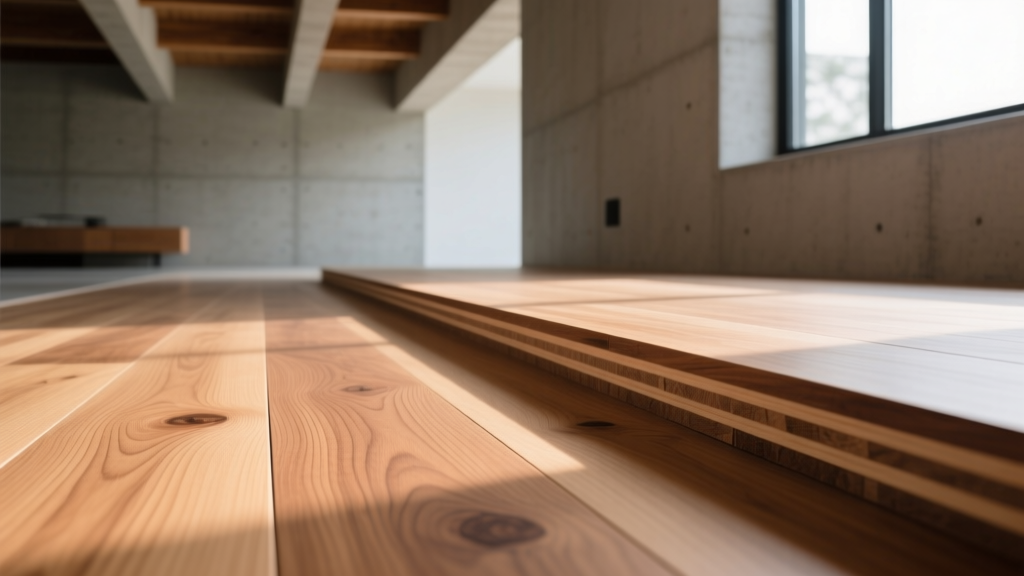
Before identifying the specific wood species, you must determine the structural construction of the flooring. The distinction between solid hardwood and engineered wood dictates your refinishing options, fastening methods, and moisture tolerance. Solid hardwood is milled from a single piece of timber, typically 3/4-inch thick, while engineered wood consists of a real hardwood veneer bonded over a multi-ply plywood or HDF core.
The Cross-Section Inspection
To perform this check, locate an exposed edge of the flooring. The most reliable access points include:
- HVAC Vent Covers: Remove a floor register to view the full thickness profile.
- Transition Strips: Check the edge where the wood meets tile or carpet.
- Baseboard Removal: Carefully pry up a small section of baseboard or shoe molding to reveal the uncut side profile.
If you see continuous, uniform grain running through the entire thickness of the board, you have solid hardwood. If you see a distinct top layer (veneer) ranging from 2mm to 6mm thick sitting atop stacked, perpendicular plywood layers, you have engineered wood. According to the National Wood Flooring Association (NWFA), engineered veneers thinner than 2mm generally cannot withstand a full drum sander refinishing, limiting your restoration options to screening and recoating.

Decoding Wood Species: Grain, Pore, and Color Profiles
Stain colors are highly deceptive. A dark espresso stain can make inexpensive ash look like premium walnut. To accurately identify the species, you must ignore the surface color and analyze the anatomical structure of the wood, specifically the pore distribution and medullary rays.
Ring-Porous vs. Diffuse-Porous
Hardwoods are categorized by how they transport water during the growing season. Ring-porous species (like oak and ash) have large, visible pores concentrated in the earlywood (spring growth) and smaller pores in the latewood (summer growth). This creates a highly textured, prominent grain pattern. Diffuse-porous species (like maple and cherry) have uniformly sized pores distributed evenly throughout the growth ring, resulting in a smoother, more subtle face grain.
Species Signature Matrix
| Species | Janka Hardness (lbf) | Pore Structure | Distinguishing Anatomical Feature |
|---|---|---|---|
| Red Oak | 1,290 | Ring-Porous | Open pores lacking tyloses; prominent dark latewood lines. |
| White Oak | 1,360 | Ring-Porous | Long medullary rays (ray flecks); pores plugged with tyloses. |
| Hard Maple | 1,450 | Diffuse-Porous | Extremely tight, uniform grain; occasional birdseye or curly figure. |
| Hickory | 1,820 | Ring-Porous | Extreme color contrast between pale sapwood and dark heartwood. |
| American Walnut | 1,010 | Diffuse-Porous | Rich chocolate heartwood; large, open pores; distinct burl patterns. |
| Yellow Pine | 870 | Softwood (Non-porous) | Pronounced earlywood/latewood density contrast; highly resinous. |
Reference data sourced from the Wood Database Janka Hardness Index.
The Red Oak vs. White Oak Dilemma
The most common misidentification in residential flooring occurs between Red Oak and White Oak. Because both are heavily stained in modern renovations, visual color is unreliable. Use these two botanical markers for definitive identification:
Additionally, examine the face grain for medullary rays. When quarter-sawn or rift-sawn, White Oak displays long, prominent ray flecks (often 1 to 2 inches long). Red Oak ray flecks are significantly shorter, rarely exceeding 1/2 inch. For deep botanical verification, the USDA Forest Products Laboratory Wood Handbook provides exhaustive microscopic cross-sections of North American timber.
Reading the Grade: NWFA Standards and Quality Markers
Once the species is confirmed, assessing the grade reveals the quality and intended aesthetic of the installation. The NWFA establishes strict grading rules for unfinished and prefinished solid hardwood based on the presence of natural characteristics and milling precision.
Standard Hardwood Flooring Grades
- Clear Grade: Virtually free of knots, sapwood, and mineral streaks. Heartwood only. Exhibits a highly uniform, consistent appearance. Often used in formal or mid-century modern restorations.
- Select Grade: Allows for minimal color variation, small tight knots (under 1/2 inch), and minor mineral streaks. The most common grade for high-end residential prefinished flooring.
- #1 Common Grade: Features prominent color variations, tight knots up to 1 inch, and open sapwood. Offers a traditional, slightly rustic look that hides daily wear exceptionally well.
- #2 Common Grade (Rustic/Tavern): Highly variable. Includes large open knots (often filled with epoxy), significant sapwood, mineral streaks, and shorter board lengths. Highly popular in modern farmhouse and industrial designs.
Expert Insight: When matching existing flooring for a repair or expansion, do not rely on the supplier's name for the stain color. Take a 6-inch sample of your existing floor (taken from a closet or under a vent) to a specialty mill. They will run it through a spectrophotometer to match the exact stain formulation and sheen level (e.g., 35 gloss vs. 45 gloss polyurethane).
Step-by-Step Field Identification Protocol
Follow this systematic approach when evaluating an unknown floor in the field:
- Locate the Unfinished Edge: Remove a floor vent to expose the raw, uncoated end-grain and side profile.
- Determine Construction: Verify if the board is solid (homogeneous) or engineered (plywood core).
- Analyze Pore Structure: Use a 10x jeweler's loupe on the end-grain. Identify if it is ring-porous (large earlywood pores), diffuse-porous (uniform pores), or non-porous (softwood).
- Check for Medullary Rays: Inspect the face grain at an angle under direct light. Look for the reflective ray flecks characteristic of oak or sycamore.
- Perform a Hardness Proxy Test: Press a thumbnail firmly into an inconspicuous area (like the edge of a board near a baseboard). If it dents easily with moderate pressure, you are likely dealing with Pine (Janka ~870) or American Cherry (Janka ~950). If it resists thumbnail pressure entirely, suspect Hickory (1,820) or Hard Maple (1,450).
Common Misidentifications and Edge Cases
Bamboo vs. Hardwood
Bamboo is a grass, not a wood. It lacks growth rings and medullary rays. Instead, look for the distinct vascular bundles (small dots) and the horizontal node lines that cross the grain at regular intervals. Strand-woven bamboo is exceptionally hard (up to 3,000 lbf) but will show compressed fiber tearing rather than clean wood splintering when scratched.
Laminate and LVP Masquerading as Wood
Photographic layers on laminate and Luxury Vinyl Plank (LVP) can mimic wood grain perfectly. The definitive test is the cross-section. Laminate will reveal a high-density fiberboard (HDF) core that looks like compressed cardboard, while LVP will show a homogeneous PVC or WPC (wood-plastic composite) core with no natural cellular structure. Furthermore, the grain pattern on synthetic floors will repeat every 8 to 12 boards; natural hardwood will never duplicate its grain pattern exactly.
Wood-Patterned Ceramic Tile
Wood-look porcelain tile is increasingly common. Tap the surface with a brass key or coin. Natural wood produces a dull, hollow thud. Porcelain tile produces a sharp, high-pitched 'clink' and will feel significantly colder to the touch due to its high thermal conductivity.
Frequently Asked Questions
Can I identify the wood species if the floor is heavily stained?
Yes, but you must ignore the surface color. Focus entirely on the anatomical features: pore size, medullary rays, and end-grain structure. Sanding a 2x2 inch test patch in a closet down to raw wood will also reveal the natural heartwood and sapwood colors, confirming the species.
What if the floor has no exposed edges or vents?
If you cannot access the cross-section, drill a 1/8-inch hole in an inconspicuous area (such as the back of a closet) using a brad-point bit. Extract the core sample. Solid wood will produce long, continuous shavings. Engineered wood will produce a mix of hardwood veneer shavings followed by rough, splintered plywood or MDF dust.
Written by
Sarah WhitfieldSarah Whitfield is a chartered quantity surveyor (MRICS) and construction cost analyst with 15 years of experience in material pricing, procurement strategy, and project budgeting. She earned her degree in Construction Management from the University of Reading (UK) and has worked on projects ranging from $2M custom homes to $180M mixed-use developments across North America and Europe. Sarah currently leads cost estimating for BuildMat Insight, maintaining a proprietary database of 4,000+ material price points updated quarterly. She is a frequent contributor to RSMeans cost data panels and has presented at the International Cost Engineering Council (ICEC) congress. Based in Denver, CO, Sarah is an avid trail runner and volunteer mentor for Women in Construction.
More from Sarah Whitfield
View all
Wood & Lumber
What Are the Different Types of Wood? A Builder's Guide
Compare structural softwoods, finish hardwoods, and engineered lumber. Analyze Janka ratings, MOE values, and 2026 pricing for construction.
Aug 4, 2026
Walls & Panels
Steel Framing vs Wood Framing: Corrosion and Moisture Defense
Compare steel framing vs wood framing for moisture resistance. Learn about galvanized coatings, condensation risks, and corrosion protection strategies.
Jul 21, 2026

Stone & Masonry
How to Cut Stone Veneer: Wet Saw vs Grinder Comparison
Compare the best tools for cutting stone veneer. We review wet saws, angle grinders, and chop saws to help you achieve clean, chip-free cuts.
Jul 21, 2026