Installing Tile Roof Material: Deck Prep and Fastening Guide
Master the installation of heavy tile roof material. Learn structural load limits, batten spacing, underlayment specs, and high-wind fastening protocols.
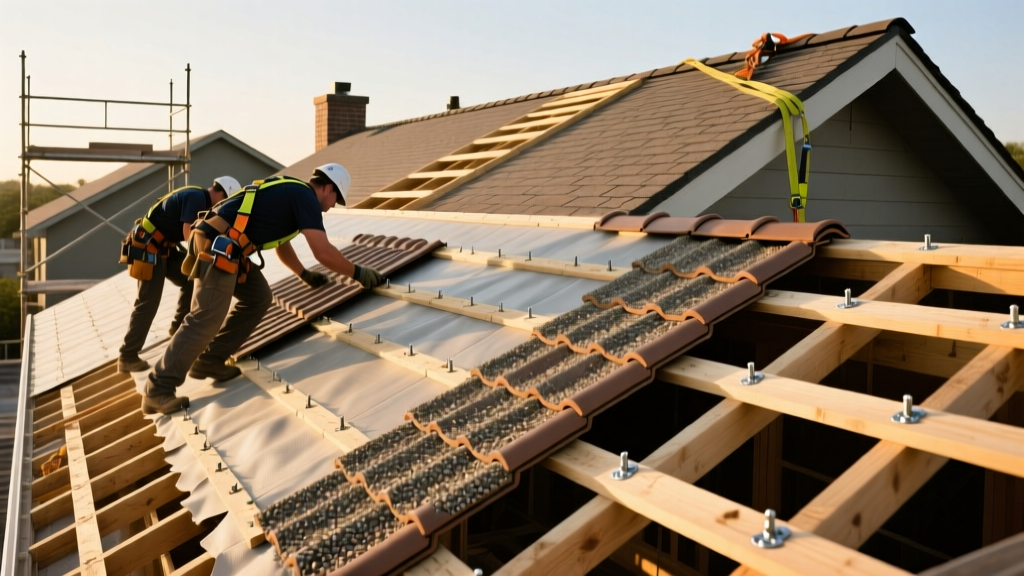
Structural Load Assessment: The Non-Negotiable First Step
Before unloading a single pallet, verifying the structural capacity of the roof framing is mandatory when installing tile roof material. Unlike asphalt shingles that exert a dead load of roughly 250 pounds per square (100 square feet), tile systems are exceptionally heavy. Concrete tiles typically weigh between 950 and 1,100 pounds per square, while clay tiles range from 600 to 900 pounds per square.
- Standard Residential Trusses: Typically engineered for a maximum dead load of 15 to 20 PSF (pounds per square foot). Heavy concrete tile pushes 11 PSF just in material weight, leaving minimal margin for snow or live loads.
- Reinforcement Requirement: If the existing framing was designed for lightweight roofing, a licensed structural engineer must specify reinforcements. This usually involves sistering joists, adding mid-span purlins, or upgrading truss web members.
Always cross-reference the International Residential Code (IRC) Chapter 9 for minimum roof load requirements specific to your local jurisdiction, as seismic and snow load zones will alter the baseline engineering requirements.
Decking and Underlayment Specifications
The roof deck must be continuous and rigid. Minimum requirements dictate 5/8-inch CDX plywood or 1-inch by 6-inch solid wood decking. Spaced sheathing (1x4 or 2x4 boards) is acceptable for certain clay tile profiles but requires precise spacing to match the tile batten gauge.
Underlayment acts as the secondary water barrier. Because tile systems are water-shedding rather than water-tight, the underlayment must be highly durable. The Tile Roofing Institute Alliance (TRIA) strongly recommends upgrading from traditional felt to modern synthetic or self-adhered membranes to match the 50-year lifespan of the tile itself.
| Underlayment Material | ASTM Standard | Avg. Cost / Sq | Lifespan | Best Application |
|---|---|---|---|---|
| Heavyweight Synthetic | ASTM D226 / D4869 | $15 - $25 | 50+ Years | Primary field coverage on slopes > 4:12 |
| Self-Adhered Membrane | ASTM D1970 | $45 - $70 | 30-50 Years | Eaves (first 36"), valleys, penetrations |
| 90-lb Rolled Roofing | ASTM D226 Type II | $20 - $30 | 20-30 Years | High-heat environments, budget retrofits |
Batten and Counter-Batten Layout
Tiles should rarely be nailed directly to the solid deck. A batten system elevates the tiles, creating a crucial air channel that dissipates heat and allows moisture to drain. For optimal performance, install a counter-batten system vertically, followed by horizontal battens.
- Install Vertical Counter-Battens: Fasten 1x2 or 2x2 pressure-treated lumber vertically, aligning directly over the roof rafters. This creates a primary drainage channel from ridge to eave.
- Apply Horizontal Battens: Nail 1x2 or 2x2 treated lumber horizontally across the counter-battens. Spacing is dictated by the specific tile profile's 'headlap' requirement (usually between 13 and 15 inches on center).
- Eave Closure: Install an eave closure strip or bird stop at the lowest horizontal batten. This seals the gap between the first course of tiles and the deck, preventing wind-driven rain and pest intrusion while maintaining airflow.
- Ridge Batten Elevation: Ensure the top horizontal batten is elevated or sized to match the field battens so the ridge cap tiles sit at the correct pitch without dipping.

Fastening Protocols for Tile Roof Material
Wind uplift is the primary cause of catastrophic tile roof failure. Fastening requirements scale with the roof's slope, geographic wind zone, and the tile's interlocking design.
Adhere strictly to these fastener specifications:
- Nails: Use minimum 8d or 10d ring-shank nails. Smooth shank nails lack the withdrawal resistance required for heavy tiles and will back out over time due to thermal expansion and vibration.
- Material: Fasteners must be hot-dipped galvanized steel, stainless steel, or copper. Electroplated zinc nails will corrode within a decade, leading to loose tiles.
- Clips and Wire: For perimeter tiles (eaves, rakes, and ridges) and high-wind zones, use 11-gauge copper wire or stainless steel storm clips anchored directly to the batten or deck.
- Penetration Depth: Nails must penetrate a minimum of 3/4-inch into the solid wood deck or completely through the batten and into the underlying structural framing.
Flashing, Valleys, and Ventilation
Valley Construction
Open valleys are the industry standard for tile roofs. Install a minimum 24-inch wide metal valley liner (copper, lead-coated copper, or 26-gauge galvanized steel) over the self-adhered underlayment. Center a 4-inch wide weather baffle in the valley to divert high-volume water runoff and prevent it from migrating under the adjacent tiles. Never use closed-cut valleys with tile; the thickness of the material prevents proper weaving and sealing.
Ventilation Requirements
A tile roof acts as a thermal mass, absorbing significant solar radiation. Without adequate airflow beneath the tiles, this heat transfers directly into the attic space. Calculate the Net Free Vent Area (NFVA) to ensure a minimum of 1 square inch of ventilation per 150 square feet of roof area (or 1:300 if a balanced intake/exhaust system with a vapor retarder is present). Utilize ridge vents specifically designed for tile profiles, such as roll-ridge vents with built-in baffles, to exhaust air without compromising the weather seal.
Troubleshooting Common Installation Failures
Even experienced crews can make critical errors when transitioning from lightweight shingles to heavy tile systems. Watch for these specific failure modes:
- Over-driven Nails: Driving the nail head too deep into the tile's nail hole cracks the lug on the back of the tile. The tile may appear secure initially but will slide off the batten during high winds. The nail head should sit flush, not tight, allowing the tile to hang freely on the batten.
- Improper Headlap: Stretching the batten spacing to cover a roof with fewer courses reduces the headlap (the overlap between upper and lower tiles). This compromises the water-shedding capability and violates the manufacturer's wind-uplift ratings.
- Mortar Dabs on Field Tiles: Using mortar or polyurethane adhesive to secure field tiles instead of mechanical fasteners restricts the natural thermal movement of the roof. As the tiles expand and contract, the rigid mortar will crack, eventually releasing the tile.
- Unsealed Penetrations: Tile profiles are irregular. Standard pipe boots used for asphalt shingles will not seal against the curved underside of a barrel or S-profile tile. Use lead pipe jacks that can be molded to the tile's exact contour, or install specialized tile-specific flashing collars sealed with high-grade polyether sealant.
Proper installation of tile roof material transforms a structure into a legacy building. By prioritizing structural verification, precision batten layout, and rigorous mechanical fastening, the resulting roof system will easily outlast its 50-year warranty.
Written by
Sarah WhitfieldSarah Whitfield is a chartered quantity surveyor (MRICS) and construction cost analyst with 15 years of experience in material pricing, procurement strategy, and project budgeting. She earned her degree in Construction Management from the University of Reading (UK) and has worked on projects ranging from $2M custom homes to $180M mixed-use developments across North America and Europe. Sarah currently leads cost estimating for BuildMat Insight, maintaining a proprietary database of 4,000+ material price points updated quarterly. She is a frequent contributor to RSMeans cost data panels and has presented at the International Cost Engineering Council (ICEC) congress. Based in Denver, CO, Sarah is an avid trail runner and volunteer mentor for Women in Construction.
More from Sarah Whitfield
View all
Wood & Lumber
What Are the Different Types of Wood? A Builder's Guide
Compare structural softwoods, finish hardwoods, and engineered lumber. Analyze Janka ratings, MOE values, and 2026 pricing for construction.
Aug 4, 2026
Walls & Panels
Steel Framing vs Wood Framing: Corrosion and Moisture Defense
Compare steel framing vs wood framing for moisture resistance. Learn about galvanized coatings, condensation risks, and corrosion protection strategies.
Jul 21, 2026

Stone & Masonry
How to Cut Stone Veneer: Wet Saw vs Grinder Comparison
Compare the best tools for cutting stone veneer. We review wet saws, angle grinders, and chop saws to help you achieve clean, chip-free cuts.
Jul 21, 2026