Torch Down Roofing Material: Complete Installation & Cost Guide
Discover everything about torch down roofing material. Learn modified bitumen costs, installation steps, durability, and pros vs cons for flat roofs.

The Science of Modified Bitumen: SBS vs. APP
Torch down roofing material, technically known as modified bitumen (mod-bit), represents the evolution of traditional built-up roofing (BUR). By blending asphalt with polymer modifiers, manufacturers created a membrane that offers the waterproofing reliability of asphalt with the elasticity and tensile strength of modern plastics and rubbers. For flat and low-slope commercial roofs, this material remains a dominant choice due to its puncture resistance and seamless heat-welded seams.
When specifying torch down roofing material, you must choose between two distinct polymer modifiers. According to testing frameworks established by ASTM International, these fall into two primary categories:
Material Selection Framework
SBS (Styrene-Butadiene-Styrene) - ASTM D6164: Often called "rubberized asphalt." SBS modifiers grant the membrane high elasticity and flexibility. It is the mandatory choice for climates experiencing extreme temperature fluctuations or freezing winters, as it resists thermal shock and structural shifting without cracking. It typically melts at lower torch temperatures.
APP (Atactic Polypropylene) - ASTM D6222: Known as "plasticized asphalt." APP modifiers create a stiffer, more UV-resistant membrane. It flows more easily under high heat and is ideal for consistently hot, high-sun climates. It requires a higher torch temperature to achieve the proper melt for seam welding.
Torch Down Roofing Material Cost Breakdown
Pricing for mod-bit systems fluctuates based on the insulation requirements, the number of plies, and regional labor rates. In 2026, the national average for a fully installed, 2-ply torch down system on a commercial flat roof ranges from $5.50 to $9.00 per square foot. The National Roofing Contractors Association (NRCA) notes that upgrading to a 3-ply system or adding heavy-duty walkway pads for HVAC maintenance will push costs toward the upper end of this spectrum.
| Component | Material Cost (per sq. ft.) | Function & Specification |
|---|---|---|
| Polyiso Insulation Board | $1.20 - $2.50 | Thermal barrier; typically 2 to 4 inches thick (R-12 to R-26). |
| Base Sheet (Ply 1) | $0.60 - $0.90 | Mechanically fastened or adhered; provides structural foundation. |
| Cap Sheet (Ply 2) | $1.10 - $1.80 | Torch-applied; features ceramic granules for UV protection. |
| Primer & Flashing Cement | $0.15 - $0.30 | Ensures adhesion at parapets, drains, and penetrations. |
| Labor & Equipment | $2.50 - $4.50 | Certified torch applicators, propane, and crane hoisting. |
Step-by-Step Installation Protocol
Proper installation of torch down roofing material requires strict adherence to thermal dynamics. The Asphalt Roofing Manufacturers Association (ARMA) emphasizes that the majority of mod-bit failures stem from improper torching techniques—specifically under-heating (leading to cold seams) or over-heating (which burns off the polymer modifiers and destroys the membrane's elasticity).
- Deck Preparation and Insulation: The substrate (concrete, steel, or wood) must be clean and dry. Polyiso insulation boards are mechanically fastened to the deck using stress plates and corrosion-resistant screws, with joints staggered to prevent thermal bridging.
- Base Sheet Application: The first ply is typically mechanically attached or applied using a cold adhesive or self-adhering backing. This layer acts as a fire barrier and a slip sheet, protecting the insulation from the open flame used in the next step.
- Cap Sheet Alignment: The granular cap sheet is rolled out and allowed to relax and acclimate to the ambient temperature for at least 30 minutes to prevent post-installation wrinkling.
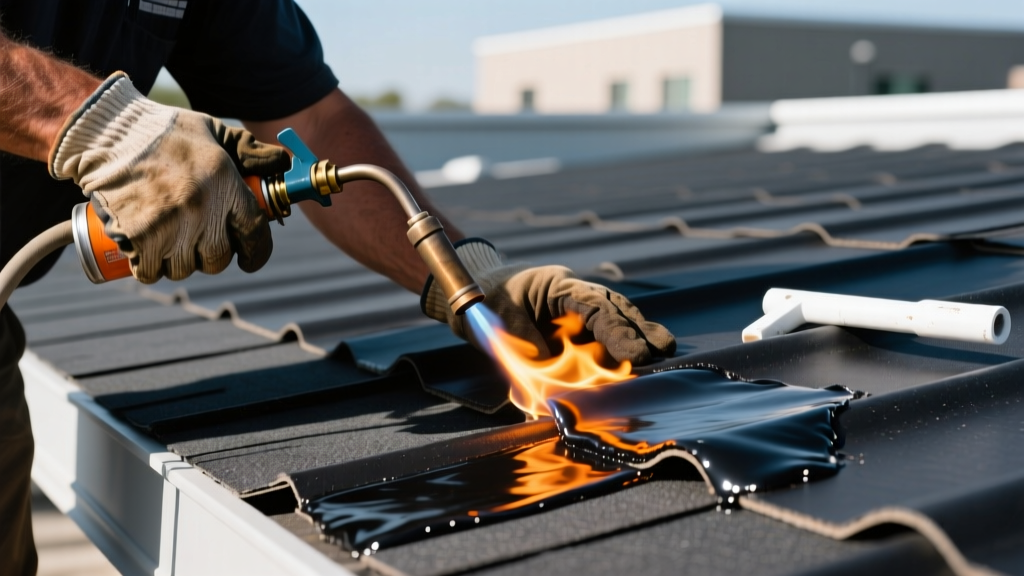
- Torching and Welding: Using a multi-head propane torch rig (outputting 1,500°F to 2,000°F), the applicator melts the bottom of the cap sheet and the top of the base sheet simultaneously. The roll is pushed forward into the molten asphalt.
- Verifying the "Bleed Out": This is the most critical quality control metric. As the cap sheet is pressed down, a continuous bead of melted asphalt—known as the bleed out—must extrude from the side and end laps. This bead must be exactly 1/4-inch to 1/2-inch wide. If there is no bleed out, the seam is cold and will leak. If the bleed out is over 1 inch, the material is overheated and compromised.
⚠ Fire Safety & OSHA Compliance Warning
Torch-applied roofing carries inherent fire risks. OSHA and local fire codes mandate that a dedicated fire watch must remain on-site for a minimum of two hours after the last torch is extinguished. Contractors must use infrared thermal imaging cameras to scan the roof deck and interior ceiling spaces for hidden hot spots before leaving the job site. Never torch directly onto combustible substrates like wood decking without a fire-rated base sheet barrier.
Common Failure Modes and Edge Cases
Even high-quality torch down roofing material will fail if edge cases are ignored during the design and installation phases. Understanding these failure modes allows building owners to inspect their roofs proactively.
- Fishmouths (Ridge Blistering): Occurs when the membrane is installed while too cold or wet, causing it to shrink slightly as it warms and pulls away from the seam, creating a curved, open slit resembling a fish mouth. Fixing this requires cutting the blister, cleaning the area, and welding a patch.
- Granule Loss at Seams: If the torch operator burns the cap sheet too aggressively, the protective ceramic granules will sink into the asphalt or burn off, leaving the underlying bitumen exposed to UV degradation. These areas must be coated with an aluminum or acrylic elastomeric roof coating immediately.
- Ponding Water Degradation: While mod-bit is highly waterproof, chronic ponding water (standing for more than 48 hours) can eventually break down the asphalt matrix. Tapered insulation should always be used to route water to scuppers and drains.
Torch Down vs. Single-Ply Membranes (TPO & EPDM)
Building owners frequently weigh torch down roofing material against single-ply alternatives. Here is how they compare in critical performance metrics for low-slope commercial applications.
| Feature | Torch Down (Mod-Bit) | TPO (Thermoplastic) | EPDM (Rubber) |
|---|---|---|---|
| Puncture Resistance | Excellent (Multi-ply thickness) | Fair to Good (45-60 mil) | Good (60 mil) |
| Seam Integrity | Superior (Heat-welded monolithic bond) | Excellent (Hot-air welded) | Poor to Fair (Tape or liquid adhesive) |
| Foot Traffic Tolerance | High (Ideal for roofs with heavy HVAC maintenance) | Moderate (Requires walkway pads) | Moderate (Requires walkway pads) |
| Installation Risk | High (Open flame, requires certified pros) | Low (No open flame) | Low (No open flame) |
Frequently Asked Questions
Can torch down roofing material be installed over an existing roof?
Yes, mod-bit can often be installed over an existing smooth-surface BUR or metal roof, provided the existing structure can support the added weight and the old roof is completely dry. However, installing over existing wet insulation will trap moisture, leading to vapor blisters when the sun heats the new membrane. A core cut test is mandatory to verify moisture levels before designing an overlay system.
What is the expected lifespan of a properly installed torch down roof?
A 2-ply SBS or APP torch down system, installed to manufacturer specifications and maintained with bi-annual inspections, carries a proven life expectancy of 20 to 30 years. The granular surface is vital to reaching this lifespan, as it shields the bitumen from UV oxidation.
How do you repair a tear in a torch down membrane?
Repairs require cleaning the area with a wire brush and roofing solvent, applying a layer of asphalt primer, and torching a patch of matching cap sheet over the damaged area. The patch must extend at least 3 inches beyond the tear in all directions, and the installer must ensure a proper 1/4-inch bleed out around the entire perimeter of the patch.
Written by
Sarah WhitfieldSarah Whitfield is a chartered quantity surveyor (MRICS) and construction cost analyst with 15 years of experience in material pricing, procurement strategy, and project budgeting. She earned her degree in Construction Management from the University of Reading (UK) and has worked on projects ranging from $2M custom homes to $180M mixed-use developments across North America and Europe. Sarah currently leads cost estimating for BuildMat Insight, maintaining a proprietary database of 4,000+ material price points updated quarterly. She is a frequent contributor to RSMeans cost data panels and has presented at the International Cost Engineering Council (ICEC) congress. Based in Denver, CO, Sarah is an avid trail runner and volunteer mentor for Women in Construction.
More from Sarah Whitfield
View all
Wood & Lumber
What Are the Different Types of Wood? A Builder's Guide
Compare structural softwoods, finish hardwoods, and engineered lumber. Analyze Janka ratings, MOE values, and 2026 pricing for construction.
Aug 4, 2026

Walls & Panels
Steel Framing vs Wood Framing: Corrosion and Moisture Defense
Compare steel framing vs wood framing for moisture resistance. Learn about galvanized coatings, condensation risks, and corrosion protection strategies.
Jul 21, 2026

Stone & Masonry
How to Cut Stone Veneer: Wet Saw vs Grinder Comparison
Compare the best tools for cutting stone veneer. We review wet saws, angle grinders, and chop saws to help you achieve clean, chip-free cuts.
Jul 21, 2026