How to Apply Stone Veneer: A Buyer's Step-by-Step Guide
Learn how to apply stone veneer with this buyer's guide. Compare mortar types, lath specs, 2026 material costs, and critical moisture management steps.

The Buyer's Dilemma: Mortar-Based vs. Mortarless Systems
When researching how to apply stone veneer, buyers immediately encounter two distinct installation methodologies: traditional mortar-based systems and modern mortarless interlocking systems. Understanding this distinction is critical before purchasing materials or evaluating contractor bids.
Mortarless Systems: Products like AirStone or interlocking high-density polyurethane panels utilize construction adhesives or mechanical clips. While marketed as DIY-friendly, these systems are generally limited to interior accent walls or low-risk exterior applications. They lack the structural rigidity and authentic shadow lines of traditional masonry.
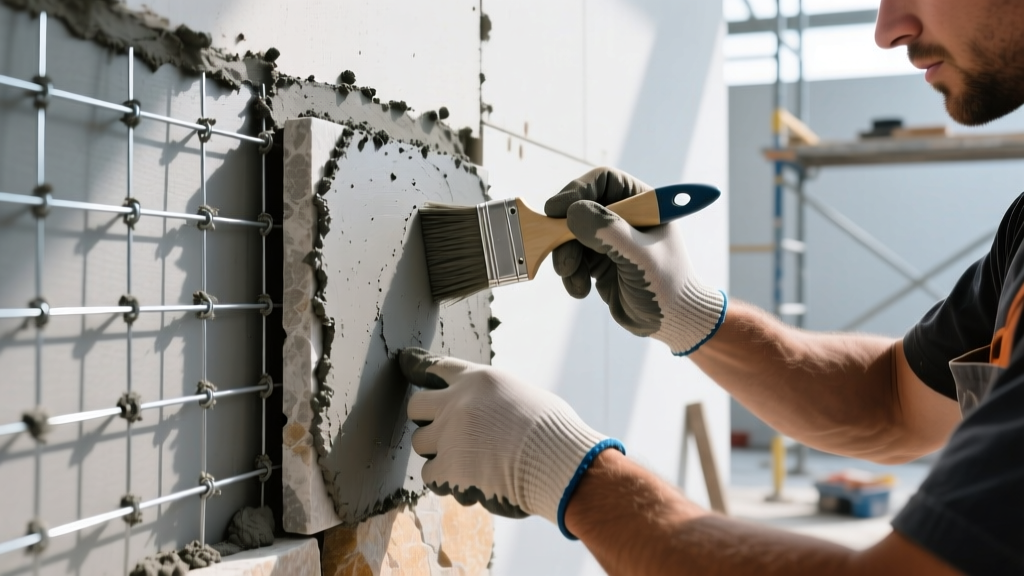
Traditional Mortar-Based Systems: This is the industry standard for both manufactured stone veneer (MSV) and natural thin stone. It involves a multi-layer moisture management assembly consisting of a weather-resistive barrier (WRB), metal lath, a scratch coat, and the final setting bed. If you are investing in premium materials like natural limestone, slate, or high-end MSV, a mortar-based application is non-negotiable for longevity and warranty compliance.
Material Selection Matrix: What to Actually Buy
A successful stone veneer installation relies entirely on the compatibility of the underlying assembly. Cutting corners on hidden components is the primary cause of delamination and moisture intrusion. Use this matrix to verify your material list or contractor's proposal.
| Component | Required Specification | Top Brand Examples (2026) | Est. Material Cost |
|---|---|---|---|
| Weather Resistive Barrier (WRB) | Two layers of Grade D building paper or a high-performance commercial housewrap. | Tyvek CommercialWrap, Fortifiber Weathersmart | $0.75 - $1.20 / sq ft |
| Metal Lath | 2.5 lb self-furring galvanized welded wire lath (Must meet ASTM C847). | ClarkDietrich, AMICO | $1.50 - $2.25 / sq ft |
| Base Coat / Scratch Mortar | Type S Masonry Cement or Portland Cement + Lime mix. | QUIKRETE, Sakrete | $12 - $18 / 80lb bag |
| Setting Mortar | Polymer-modified veneer stone mortar (high bond strength, non-sag). | QUIKRETE Veneer Stone Mortar, SPEC MIX | $18 - $28 / 80lb bag |
| Weep Screed | Corrosion-resistant PVC or galvanized steel with a 3.5-inch vertical flange. | ClarkDietrich, Plaster Stop | $1.50 - $2.50 / linear ft |
The Critical Role of ASTM C847 Metal Lath
Buyers must specifically look for ASTM C847 Standard Specification for Metal Lath compliance. The lath must be 'self-furring,' meaning it has dimples that hold the wire 1/4-inch away from the WRB. This gap allows the scratch coat mortar to completely encapsulate the wire. If a contractor proposes using flat, non-furring lath or standard chicken wire, reject the bid immediately; the mortar will not lock behind the wire, guaranteeing future delamination.
Step-by-Step Application Framework (For Bid Evaluation)
Even if you are hiring a professional mason, you must understand the correct sequence of how to apply stone veneer to inspect their work. According to the Westlake Royal Stone Veneer Installation Guides, the assembly must follow this strict progression:
Step 1: WRB and Weep Screed Installation
The wall must be covered with two layers of Grade D paper. The first layer acts as a slip sheet; the second is the primary water barrier. A weep screed must be installed at the very bottom of the wall assembly. Code Requirement: The weep screed must be positioned at least 4 inches above soil grade and 2 inches above concrete hardscapes (patios, driveways). This prevents ground moisture from wicking up into the stone assembly.
Step 2: Lath and Fastening
Galvanized lath is applied horizontally over the WRB. It must be stapled or nailed directly into the structural studs, not just the OSB or plywood sheathing. Fasteners should be spaced every 6 inches along the studs. All horizontal seams must overlap by 1 inch, and vertical seams by 2 inches. Corners require the lath to wrap around the corner by at least 12 inches; never terminate lath exactly on a corner.
Step 3: The Scratch Coat
A 1/2-inch thick layer of Type S mortar is troweled onto the lath, forcing it through the wire mesh. While the mortar is still wet, it must be 'scarified' (raked) with a coarse comb to create horizontal grooves. These horizontal lines provide a mechanical key for the final setting bed. The scratch coat requires a minimum of 24 to 48 hours to cure before any stone is applied.
Step 4: Setting the Stone
Using a polymer-modified setting mortar, the mason applies a 1/2-inch to 1-inch layer of mortar to the back of each stone piece (a technique called 'buttering'). The stone is then pressed firmly into a fresh mortar bed on the wall with a slight twisting motion until mortar squeezes out slightly at the edges. Crucial Rule: The face of the stone must never be smeared with mortar during this process, as cleaning acid or wire brushing later will damage the stone's pigment and texture.
⚠️ Warning: The Efflorescence Trap
Efflorescence (the white, powdery salt deposits on stone faces) is rarely a defect of the stone itself; it is almost always an installation failure. It occurs when moisture trapped inside the wall assembly dissolves soluble salts in the mortar and pushes them to the surface as it evaporates. To prevent this, ensure your contractor uses a low-alkali Portland cement, installs proper weep screeds, and avoids sealing the stone with non-breathable acrylic sealers until the wall has fully cured for at least 30 days.
Evaluating Contractor Bids: Red Flags to Watch For
When soliciting bids for exterior stone veneer application, use this checklist to filter out underqualified masons:
- Red Flag 1: Omission of a Weep Screed. If the bid does not explicitly list a weep screed or termination bead at the base of the wall, the contractor is trapping water behind the veneer.
- Red Flag 2: Using Type N Mortar for the Setting Bed. Type N mortar has a lower compressive and bond strength than Type S. For exterior veneer subject to freeze-thaw cycles, polymer-modified Type S or specialized veneer mortar is mandatory.
- Red Flag 3: 'Mastic' or Construction Adhesive Promises. Any contractor suggesting they can glue natural or manufactured thin stone to exterior sheathing using Liquid Nails or similar mastics is violating building codes and manufacturer warranties.
- Red Flag 4: Skipping the Scratch Coat. Some installers attempt to apply stone directly over the dry lath to save a day of labor. This results in a weak bond and voids behind the stone where water can pool and freeze.
Cost Breakdown: Material vs. Labor (2026 Estimates)
Pricing for stone veneer application varies significantly based on the complexity of the architecture (e.g., numerous window returns and corners increase labor time). Below is the current national average for a standard exterior residential facade.
| Cost Category | Manufactured Stone Veneer (MSV) | Natural Thin Stone Veneer |
|---|---|---|
| Stone Material (Field & Corner Pieces) | $7.50 - $14.00 / sq ft | $12.00 - $28.00 / sq ft |
| Assembly Materials (WRB, Lath, Mortar, Screeds) | $3.50 - $5.50 / sq ft | $3.50 - $5.50 / sq ft |
| Professional Masonry Labor | $14.00 - $22.00 / sq ft | $18.00 - $30.00 / sq ft |
| Total Installed Cost | $25.00 - $41.50 / sq ft | $33.50 - $63.50 / sq ft |
Note: Corner pieces are sold by the linear foot, not the square foot. A common buyer mistake is underestimating corner costs, which typically run 1.5x to 2x the price of field stone per linear foot due to the complex manufacturing required to wrap the 90-degree edge.
Troubleshooting Common Installation Failures
If you are inspecting an existing installation or a newly completed project, look for these specific failure modes:
1. Delamination and Hollow Spots
Symptom: Tapping the stone produces a hollow sound, or pieces fall off entirely.
Cause: Failure to butter the back of the stone, applying stone over a fully cured/dry scratch coat without dampening it first, or using non-furring lath.
Fix: Affected stones must be completely removed, the lath cleaned or replaced, and reset with fresh polymer-modified mortar. Spot-gluing with construction adhesive is not an acceptable repair.
2. Mortar Smearing and Staining
Symptom: Gray or white haze permanently embedded in the texture of the stone face.
Cause: The mason used a wet sponge to clean mortar off the face of the stone while it was still wet. This pushes the cementitious paste deep into the stone's pores.
Fix: According to the QUIKRETE Veneer Stone Installation Guide, mortar droppings must be allowed to dry to a crumbly state and then removed with a dry, stiff bristle brush. If the stain has set, a diluted masonry cleaner (muriatic acid substitute) may be required, but must be tested on an inconspicuous area first to prevent pigment bleaching.
3. Step Cracking at Window Corners
Symptom: Mortar joints crack in a stair-step pattern radiating from the corners of windows or doors.
Cause: Lack of structural expansion joints or improper lath detailing around framed openings. The house framing shifts slightly, and the rigid masonry assembly cracks at its weakest points.
Fix: Rake out the cracked joints to a depth of 1/2 inch and repoint with a high-quality, color-matched polyurethane masonry caulk or a flexible elastomeric joint sealant, rather than rigid mortar.
Written by
Sarah WhitfieldSarah Whitfield is a chartered quantity surveyor (MRICS) and construction cost analyst with 15 years of experience in material pricing, procurement strategy, and project budgeting. She earned her degree in Construction Management from the University of Reading (UK) and has worked on projects ranging from $2M custom homes to $180M mixed-use developments across North America and Europe. Sarah currently leads cost estimating for BuildMat Insight, maintaining a proprietary database of 4,000+ material price points updated quarterly. She is a frequent contributor to RSMeans cost data panels and has presented at the International Cost Engineering Council (ICEC) congress. Based in Denver, CO, Sarah is an avid trail runner and volunteer mentor for Women in Construction.
More from Sarah Whitfield
View all
Wood & Lumber
What Are the Different Types of Wood? A Builder's Guide
Compare structural softwoods, finish hardwoods, and engineered lumber. Analyze Janka ratings, MOE values, and 2026 pricing for construction.
Aug 4, 2026

Walls & Panels
Steel Framing vs Wood Framing: Corrosion and Moisture Defense
Compare steel framing vs wood framing for moisture resistance. Learn about galvanized coatings, condensation risks, and corrosion protection strategies.
Jul 21, 2026

Stone & Masonry
How to Cut Stone Veneer: Wet Saw vs Grinder Comparison
Compare the best tools for cutting stone veneer. We review wet saws, angle grinders, and chop saws to help you achieve clean, chip-free cuts.
Jul 21, 2026